Frequently asked questions
It's so good to get feedback from new sculptors about the challenges they face. Below is my attempt to answer some of the most common questions. I hope this section helps you! If you have questions, please don't hesitate to reach out. There is a feedback form underneath the HOME menu or I'm often connected to social media. Or just explore the rest of this site which continues to evolve. I started this section on January 19, 2021 and will add to it over time. Have fun this winter!
1. What is the best way to stack the two sintered mini-towers?
|
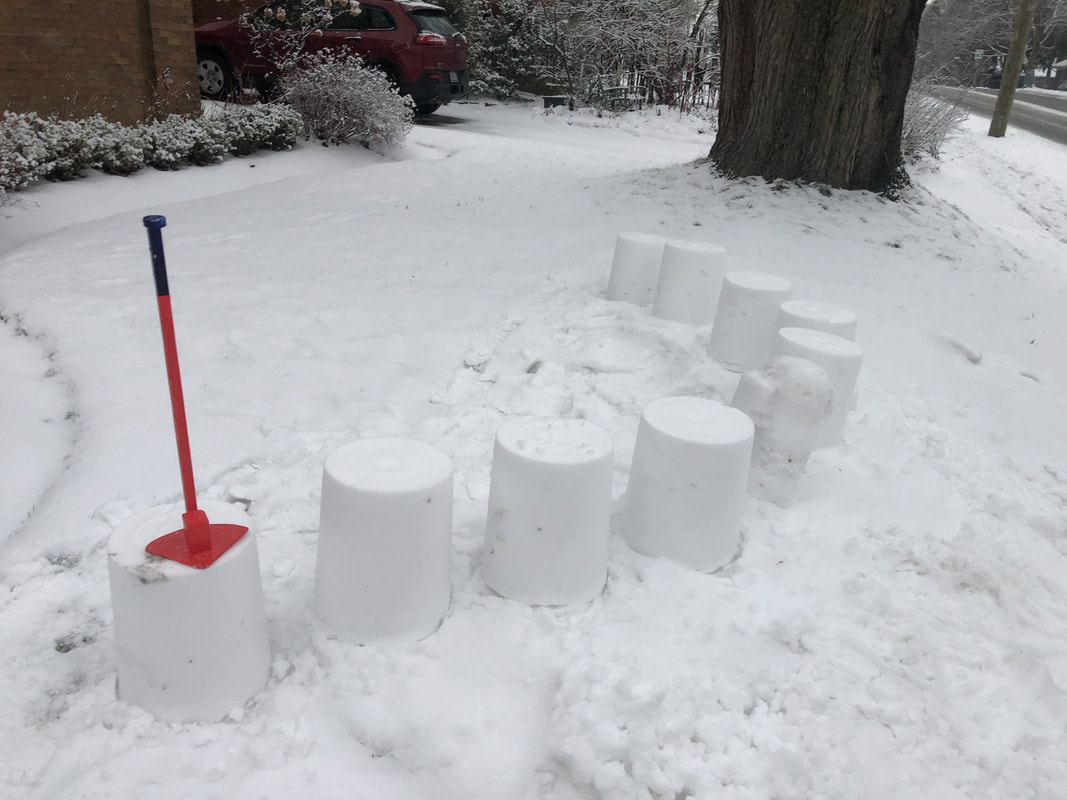
Pick the most stable tower as the base. It might be semi frozen into the ground and thats actually a good thing. Pick up the second tower by gripping it on both sides. And here is the trick--as you lift it up to place it on top of the other tower, flip it upside down. The perfectly smooth top of your second tower will now dock perfectly with the perfectly smooth top of the first tower.
On a related note, in some situations, the tower you want to lift might itself be frozen to the ground. You might be worried that by lifting it, you break it in two. You can test this by just putting a bit of a lift on the tower. If it lifts immediately, great--proceed. But if you determine that it is frozen to the ground, you will need to 'cut' it off the ground. An old hand saw is ideal for this action. Bend down with the saw just off the ground and saw through the bottom--there will be a moment when you feel it release from the ground. If you do not have access to a hand saw, use your shovel. Gently slide your shovel along the ground into the bottom of the tower. You may have to bend down to try and get the angle of the cutting area of the shovel to line up with the ground. You are not trying to push over or shovel the tower, you are trying to just cut underneath it. Move around the mini-tower as you jab the shovel in. Once around the entire tower, do it again, proceeding to jab it in a little deeper. You will feel it release at some point. |
|
2. Do I have to let it sinter in the pail?
|
No! Take the pail off right away and build more. But be careful NOT to touch the fragile tower. Give it time to sinter. One suggestion is to go out in the evening and make a bunch of mini-towers. Keep taking off the pail using the proper (quick twist and jerk up) method and build more. Let's say you build 6 buckets worth. You can then let them sinter all night and then go back out the next morning and let the fun begin! You won't believe how beautiful the sintered snow is to carve!
If the towers were made with packing snow, you can likely use them right away. |
|
3. I can't get the pail off!
|
This should rarely happen with non-packing snow. But sometimes it does! Or, more likely, you have created a tower using packing snow. You can still get the pail off.
Lift the pail off the ground about 3 inches. Now violently throw the pail towards the ground and then jerk it up with a twist just before it hits the ground. This will often pop the snow out. If it doesn't, you can bang the sides of the pail and then try it again. If you are using packing snow and can't get it out, you might be pounding too much. I applaud your enthusiasm! Try the technique above. If that doesn’t work, dig out about an inch of snow from the pail. Now actually bang the pail on the ground. That might release it. If not, dig out the entire pail and try again. But this time just give it a small amount of pounding. Experiment--you will find the sweet spot. All snow is different and experimentation is part of the fun. |
|
4. My little tower: a) fell apart b) a chunk fell off c) there are voids in it.
|
How frustrating! When you take off the pail, you should be able to marvel at the beautiful little pristine tower of snow.
Here are four reasons for failure: 1) Not a long enough sinter. See #6 below. I'm beginning to think that an automatic overnight sinter might be best. I'm gravitating to packing the towers day 1 and leaving it (them) to sinter overnight and then carve day 2. The overnight sinter gives me confidence that the carving medium (snow) will be beautiful. But if you are short on time, make the towers as early as you can, give them a few hours to sinter and then get at it! Take a risk--go out after 1 hour and try carving a top edge. If it's good to go, begin! If it's still fragile, give it more sintering time. 2) Not enough pounding. One recent innovation is to spin the pail with one hand while you pound with the other. Make sure you pound all the way around. Watch some videos on the topic on the video support page to improve your skills here. 3) Tower gets bumped. Even a little tap and you might lose a chunk. It's truly amazing how each tower moves from very fragile to amazingly strong after a good sinter. Have you seen my video where I drop a piece of LRT track on a tower! 4) Leaves and dirt in the snow. This is especially a problem early in the season. A large leaf can lead to a crack in your tower. It also looks wrong and usually needs to be dug out. Aim for pristine snow. Keep your shovel edge just above the grass. Avoid shovelling a dirty driveway/sidewalk. Avoid shovelling a driveway/sidewalk that has salt on it. Consider laying out a tarp to collect snow ensuring that the tarp is clean. Once the pistine snow lands on the tarp, lift the edges to get the snow in a line and then pull (if necessary) to your tower location. I often pull snow from my backyard or back driveway to the front. |
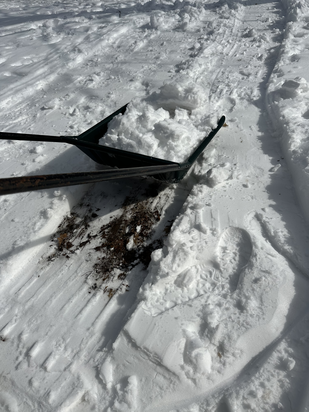
If you scoop too low, you might catch some dirt. Don't try to save it--start a new run keeping above the dirt line!
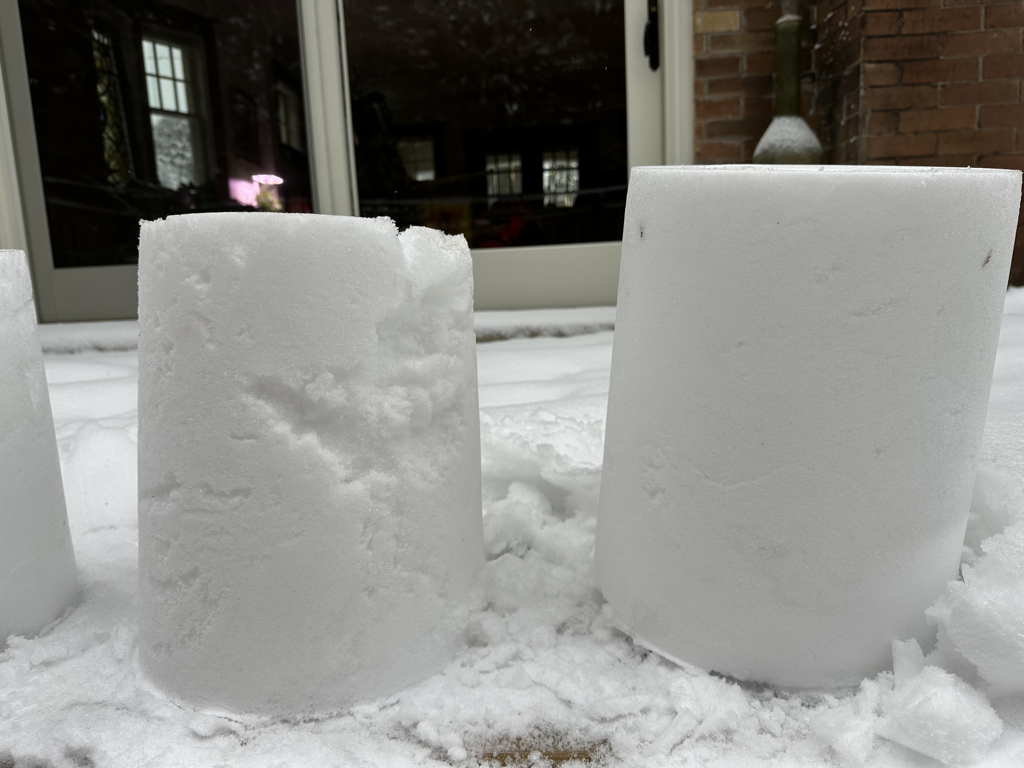
The left tower was not packed enough. The right tower was packed every few inches. This issue is very troubling especially during wet or packing snow conditions.
|
5.Do I have to wait for packing snow?!
|
No! Packing snow is ok, but NON-packing snow is better! Packing snow can get icy and can often be inconsistent in its compaction. Non-packing or fluffy snow pounds in beautifully. Once sintered, the snow becomes a consistent, easy to carve medium. You won't believe it until you experience it. But make sure you sinter it!
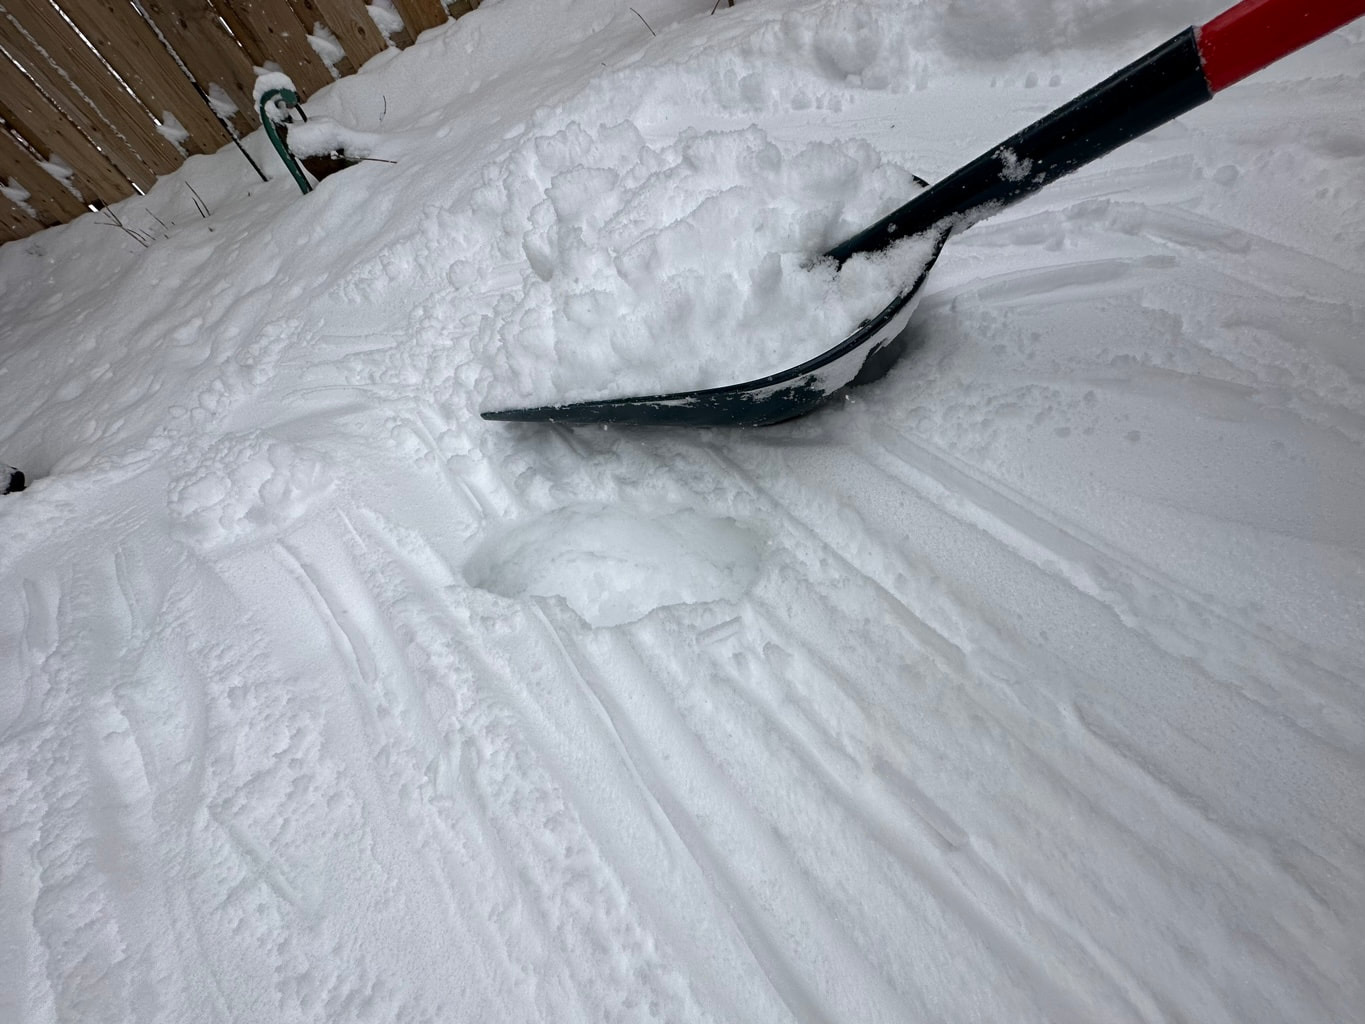
And here is a finer point. Please observe the picture here of me shoveling fluffy snow in our backyard. There is a hole in the snow. I stomped that hole to show you how my boot smashed through a crusty layer. So you can see that I shovelled ONLY the fluffy snow ON TOP of the crusty layer. Remember: crusty snow bad, fluffy snow good! |
|
6. How long do I have to sinter?
|
Packing snow basically does not need to be sintered. Create your towers and start building or carving.
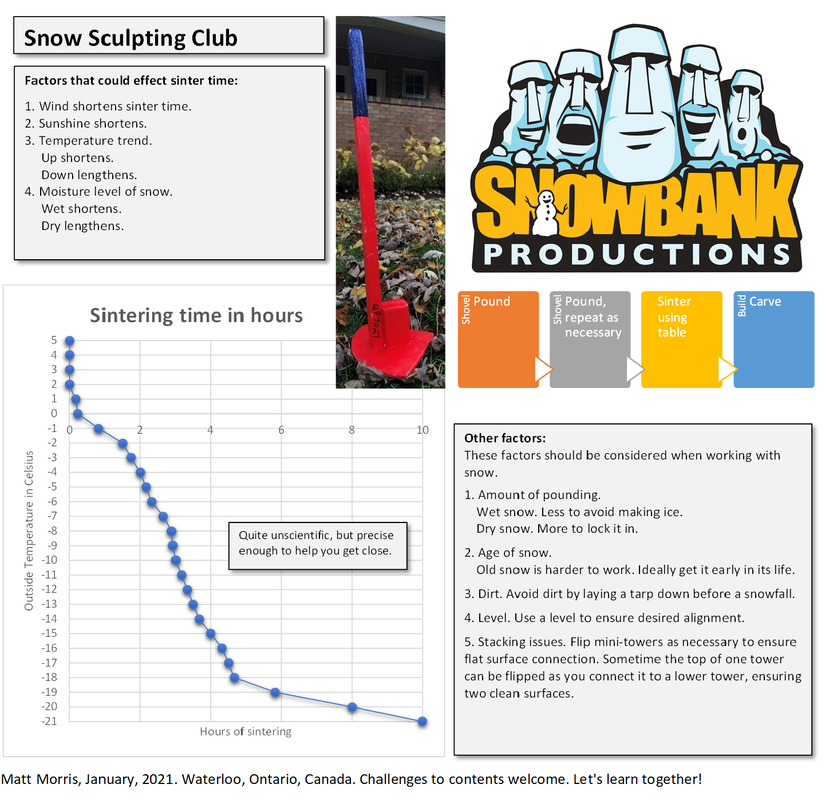
NON-packing snow needs to be sintered so that the snowflakes can bond together. The colder it is, the longer the sinter. Follow the displayed guideline and then do a little test. Try carving a bit of a tower and see how it carves. And here is a graph and other notes that might help you get it right. |
|
7. How can I improve my carvings?
|
While your towers are sintering, jump on the web and print off some pictures of what you are trying to carve. Try really hard to find profile (sideways) pictures of what you are trying to carve. For example, if you are trying to carve a moai, search for "moai profile" or "moai side picture". Print some front view pictures too and place the resulting printout in a plastic sleeve if possible. Take it outside with you. Remember to dress more warmly for the carving stage as you will be standing around. Now stand back 10' or more so that you can hold up your picture beside your snow tower. Now study the lines and start tracing out where you will cut. I often start with the profile view of a project. Getting those initial broad strokes or cuts into the right spot is key to final success. And if you are carving a moai, view my 'how to carve a moai' video in the VIDEO SUPPORT section.
The picture shown here really shows the value of cutting out the exact shape of what you want. In this example, I started trying to carve Totoro with the picture inside a sleeve to protect it from getting wet. Good idea, but I couldn't really hold it up and compare the edge. Once trimmed with scissors, I was able to hold it up and get a good shape going for Totoro! |

|
8. I made a mistake and cut off too much!
Snow sculpting is a (mainly) subtractive art form and things sometimes go wrong. The good news is that you can add to your tower.
If it's warm out (-2 to +5) gather some loose snow and pack it onto the area needed. Hold for 30 seconds and then, if possible, leave it alone for a few minutes to bond to the existing tower. Come back to it later and continue carving.
If you are working with NON-packing snow, you will need to make 'patch snow'. I have a very specific (and easy!) method that is described in a short video you should watch. Just click the YouTube video below.
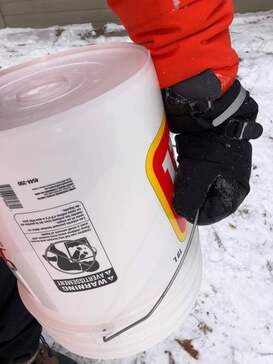
9. What if I don’t have a QP7000?
No problem! Use your mitts!
I designed the ‘Quarter Pounder’ to make the compaction job easy and effective. It’s called the funny name because the pounding surface covers 1/4 of the surface of the bottom of the pail. The 7000 part recognises that it is the 7th pounder I have designed. The curve of the pounding surface follows the edge of the pail. This ensures great edge compaction—where a lot of your carving action will occur.
But you will be fine without one!
Your mittens or gloves will work almost as well! Shovel in the snow and punch down the snow with one or both mittens. Keep loading and compressing. Open palms are usually best, but experiment! And remember when done to let the tower sinter for a few hours. This allows time for the snow to bond together. See chart above for guidance on sintering times. And yes, the pail can be removed immediately after flipping as long as you do not touch the tower while it is sintering.
Some have had success with pushing another pail into the first pail. This can be effective IF it’s non-packing snow. If the conditions are packing snow, then this technique will often leave voids within the compression. The smaller head on a pounder or your mittens make sure all of the voids are busted up.
