2019-2020. Season 8
Most recent first.
#18 Mini-Moai
|
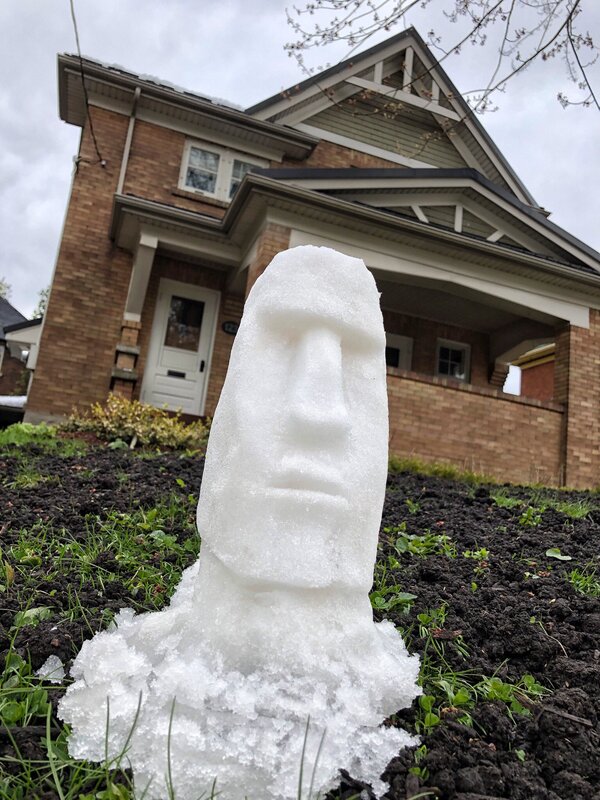
May 11, 2020.
I could not believe that on May 11, I was sculpting snow. I built a little Moai and placed it on our front lawn where the 8' sculptures usually reside. Perhaps my photgraphy approach gave the impression it was larger. In fact, it was bout 10" tall. On Twitter, I was not sure what to type. I went with: "I do not know how to caption this. If life gives you lemons? Snow sculpting May 11? How about a stoic tribute to our front line workers! Yes!" It received 28,000 impressions and 339 Likes. |
|
#17 Unexpected
|
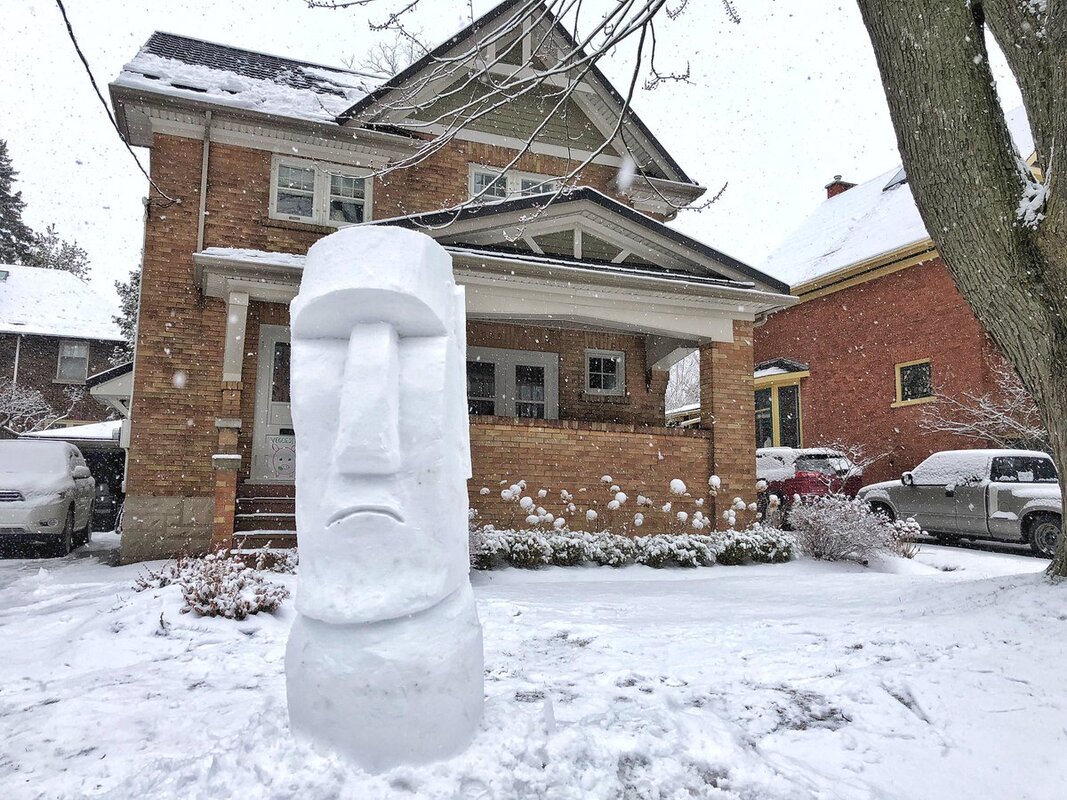
March 23, 2020.
I built this Moai snow sculpture this morning. One ambulance and one police cruiser drove by. I dedicate this snow sculpture to them and all the other critical workers who are trying to keep us safe and healthy. It quickly made 57,000 impressions on my Twitter account, received 779 Likes and 82 Retweets. This activity was a reflection of how the community felt during the early days of COVID-19. |
|
#16 Unexpected Sculpture / Tribute to Cubism
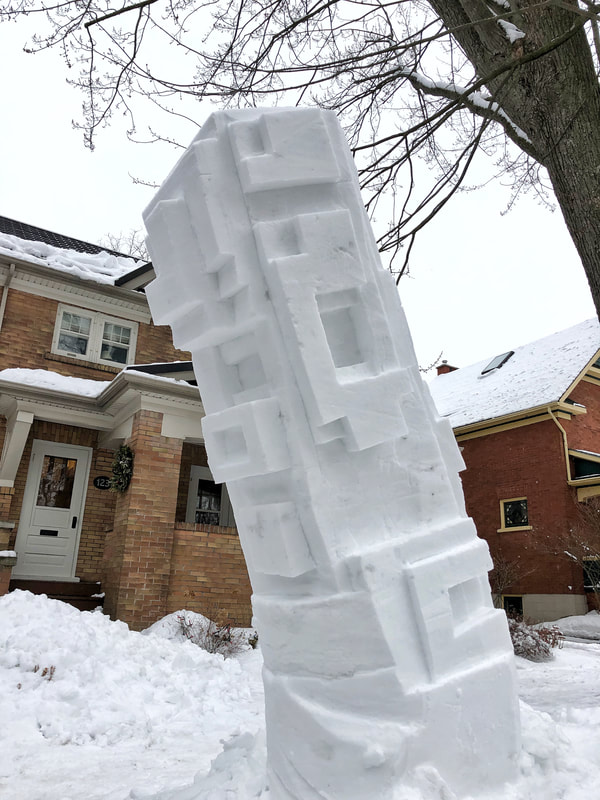
Friday, March 6, 2020.
I got home from a brunch and was wrestling with what, and even if, I would create something.
But in the end I decided to put up a quick tower. The snow was very warm and the tower went up quickly. I had to be careful to pack it in every foot or so. I then left it to sinter for a short time. Later in the afternoon I went out to carve as the kids from school were walking home. When they asked what I was going to make I had to answer “I’m not sure”.
As I looked at the tower of snow I noticed that (for the first time) it was starting to lean while still in the form. I had clearly not compacted the base enough. The accumulated snow over the entire winter was on the bank and the base of my 7’ sculpture was a good 4’ off the frozen ground. Perhaps there were soft spots in the snowbank.
I started to carve without a plan. No maquette. I carved away and at one point even put in a few eyes to give it an effect. Later I would take them out as I did with the previous (babies) sculpture. I found the eyes detracted from the purity of the snow.
After I was done, I wasn’t sure what to call my creation. Later, some would ask it was a celebration of cubism. I guess that would work. But I decided to call it “Unexpected Snow Sculpture” as a result of the unexpected snowfall.
It quickly start to lean even more towards the driveway and by Sunday morning it was on a good 40 degree tilt. We were heading to Toronto Sunday morning and I knew it would be down by the time we got home. With the plus 12 temperature, it didn’t have a chance. When we got home, Lorna jumped out to attempt to shovel it off the driveway so that we could get in.
|
|
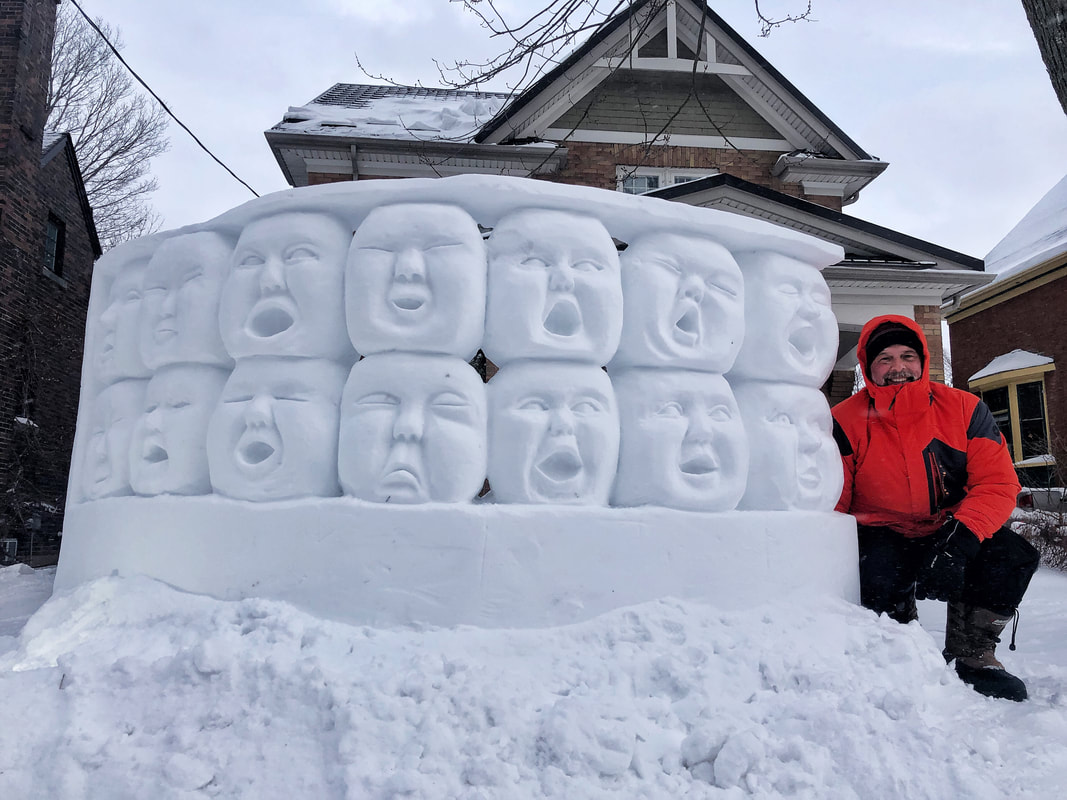
#15. Wall of babies
Thursday, February 27, 2020.
The snow was falling and there was lots of it. But what to make? I had been wrestling with maybe a hippo or choir of old men, but then decided I must try my wall form. One of the neighbourhood kids who has shown a lot of interest in snow sculpting recommended it was time for a wall. He and a bunch of his friends had helped New Years eve in what became a team build on the front lawn. He was right.
I had been intrigued by the work of Johnson Tsang of Hong Kong, and his ceramic sculptures of babies. I thought a sculpture focused on babies would be a great application for the wall. I find the majority of Tsang's work is babies in distress or unhappy, and my goal, as always, was to bring fun to my community. There were of course many other baby sculptures on the internet and our family had three young babies in our midst! I thought babies would be an easy carve and not take a lot of depth from the sculpture. I was wrong about how difficult it is to carve a baby face into snow! Perhaps I made it harder by not first making a maquette of a typical baby. Throughout the process I would find the nose the most difficult.
I started building the wall with my new 'wall form' around 10am. The idea was to build one section and then slide the form along for the next section. I had only used the wall form twice. Once in our backyard when it would later fall on me, and once in the front yard with my neighbourhood helpers. Both times we created 3 sections.
Today I decided to make 4 sections and had previously distributed the remains of my Baby Yoda sculpture in a way that would act as a solid base to accept the curve of the wall I was going to make. The process went well and the snow was amazing. Once built, I went in for lunch to allow the snow to sinter. We ended up doing a Costco run, but I eventually got to work, and carved 5 babies the first night. The first one took maybe 25 minutes. Realising I had 14 in total to finish, I wondered what I had gotten myself into!
By the end though the 14th baby took me about 10 minutes for a total of a bout 6 hours of carving over 2 days.
Imbedded in the structure was my attemp at recreating the three family babies that we were all enjoying so much. Lorna came out to the snowbank and I showed here the three family babies in a row. I then had her guess who was who. She got it right! Or should I say, I got it right!
At night I would give the babies a night light and we had a lot of fun discussions about the sculpture until a big melt happened on Monday, March 2. Looking at the forecast, this might be the end for season 8! But I've learned never to say never, as one year I remember carving a tower of snow on April 4th!
I think that one of my summer projects will be to make a baby maquette to see how important the modelling process is. I suspect I will learn that it is very important. Through the process I have also come up with a number of ideas on how to improve and simplify the use of the wall form.
BONUS:
It was a cool moment when two kids from the neighbourhood dropped by and politely asked to borrow a 'mid-sized form'. I grabbed some old form parts (from my matisse form) and did a little repair, adding some extra holes for releaseable zip ties. But in the end they also borrowed some rope to help hold it all together. They ended up working hard to make two moai on one of their lawns, and one moai on the other lawn. Now that's what I call community!
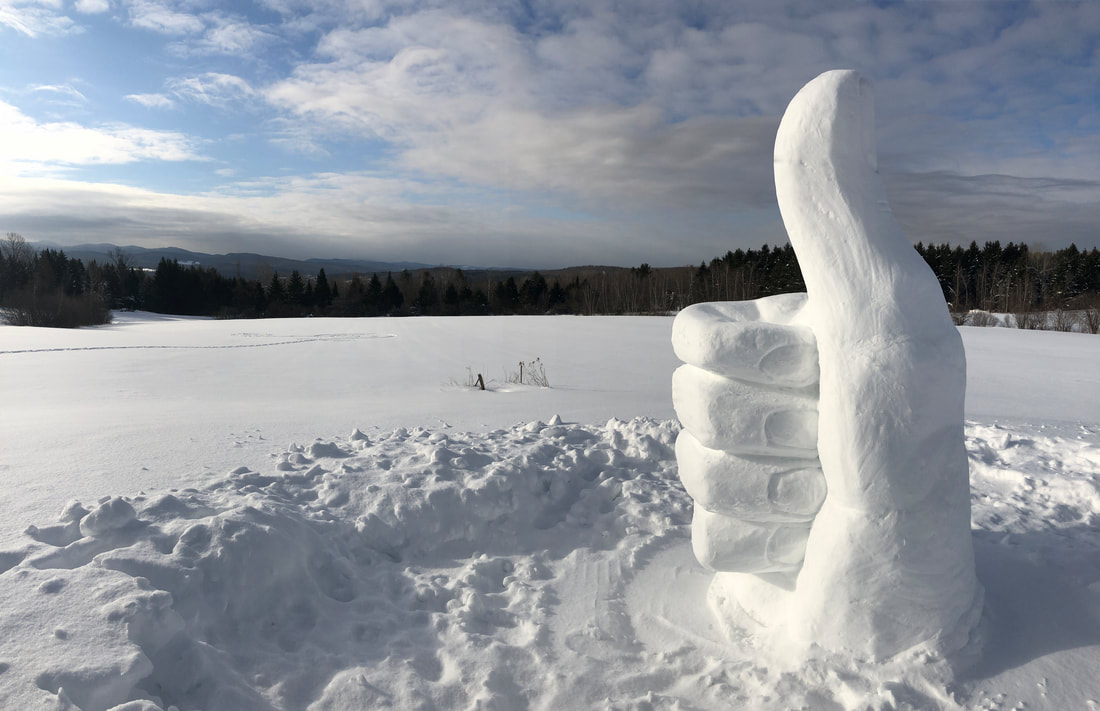
#14. Thumbs up for winter! Sutton, Quebec
Sunday, February 16, 2020.
The snow was bountiful in Sutton, Quebec and something had to be done. I got out the forms and had decided to attempt a 'thumbs up' sculpture.
It took two, 2'x8' plastic snow form rings each for the first three rows and then two rows of single forms for the thumb on top. I had to use rope to get around the first two layers and doubled up a ratchet for the third. My brother-in-law Michel helped with the shovelling! Thank you bro! The snow quality was pristine and I let it sinter overnight. Carving was fun and I had an excellent maquette--to gain perspective, I simply removed my glove!
In the end we launched the drone and got some good aerial pictures. A fun time in Sutton!
|
|
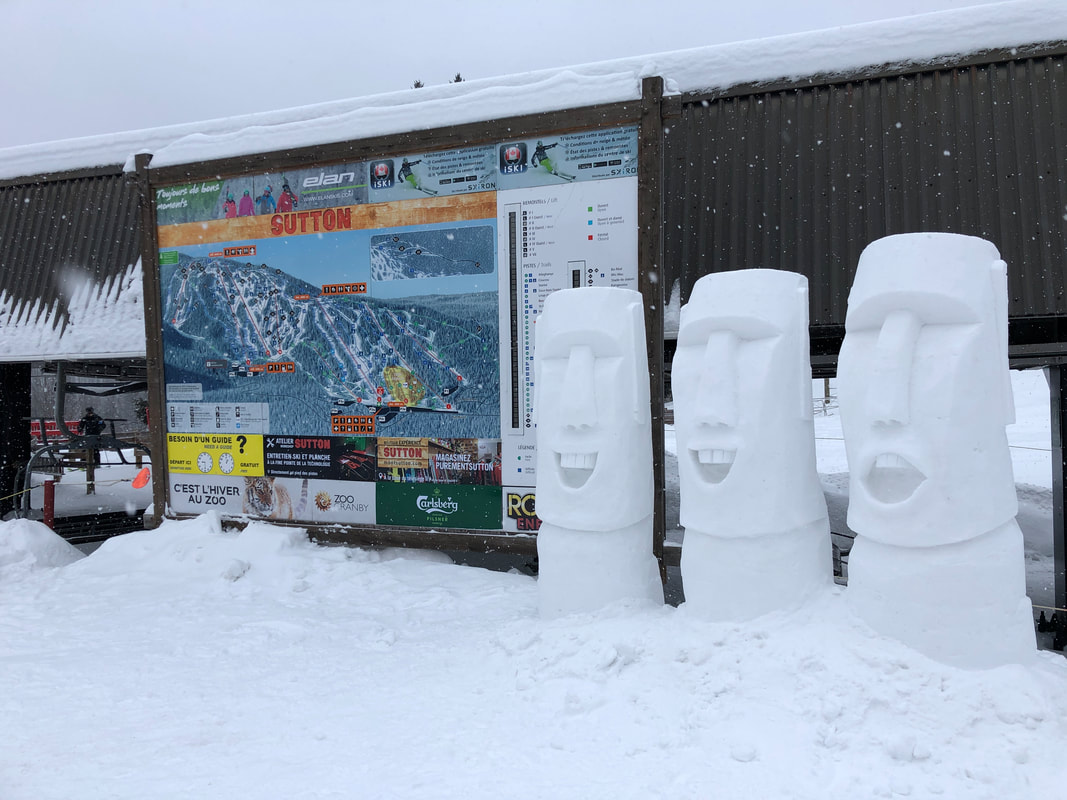
#13. The Choir. Sutton, Quebec
Thursday, February 13, 2020.
My wife Lorna and I drove down to Sutton, Quebec to visit family. As part of the fun, my brother-in-law Michel had arranged an experience at Mont Sutton, a very popular ski resort near the border with the USA. The next morning we met with a number of the Directors of the hill and decided what I would carve. We landed on a 'choir' as shown here. Their massive groomer plowed in just one scoop of snow which was more than enough, and we got to work. Michel was on the shovel which allowed me to specialise on the pounder. Then his friend Norm skied in and quickly parked his ski equipment. He grabbed a shovel too making quick work of the three towers that needed to be built. The sintering process was fast while we ate Chili and cheeze curd poutine. Yum!
Then out we went and I began to carve. The snow was not quite cement, but it was certainly a challenge to carve. Quite the change from the recent mushy experiences I had had to endure. We finished them up and I'm confident that they will be on display for some time given the major compaction and forecasted ongoing cold temperatures.
The next day, I enjoyed a great lesson from instructor Jean-Guy and learned some basics of how to downhill ski. Then for much of the day, Michel and I enjoyed the hill, including a trip right to the top where we enjoyed the chalet I had been to once before a number of years ago. And just to add a bit of mystery to my story, this time I skied down under my own power! A great day on the hill!
|
|
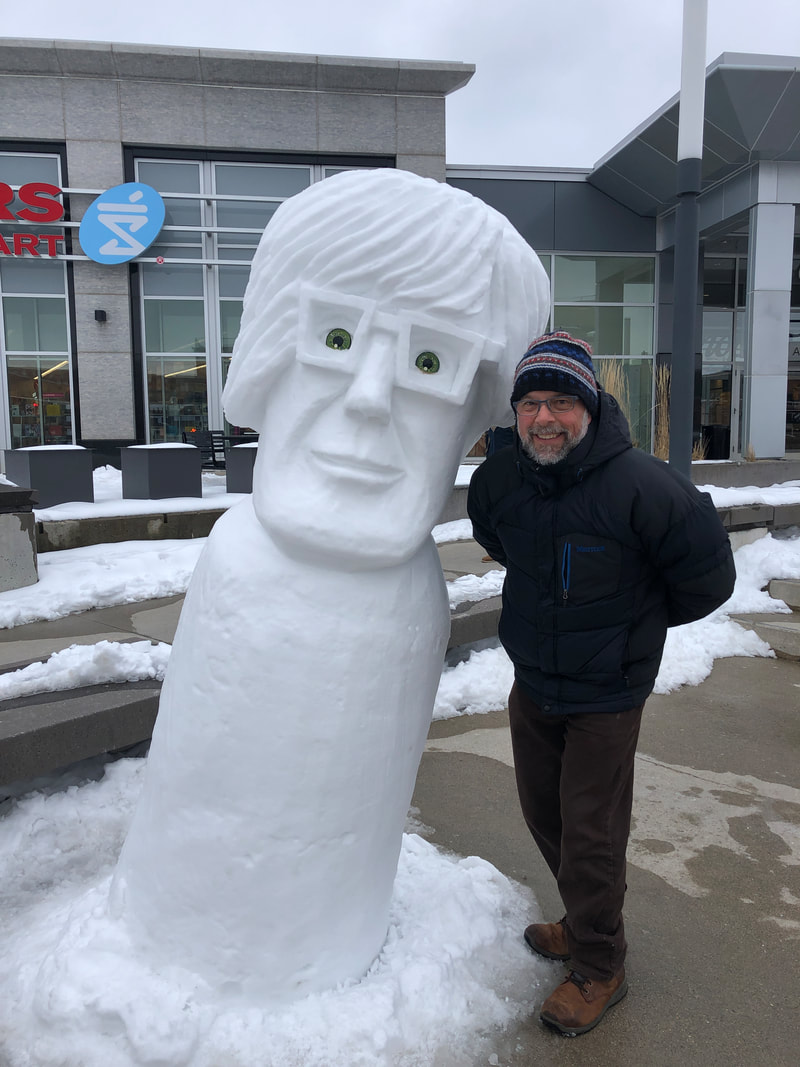
#12. Andy
Monday, February 10, 2020.
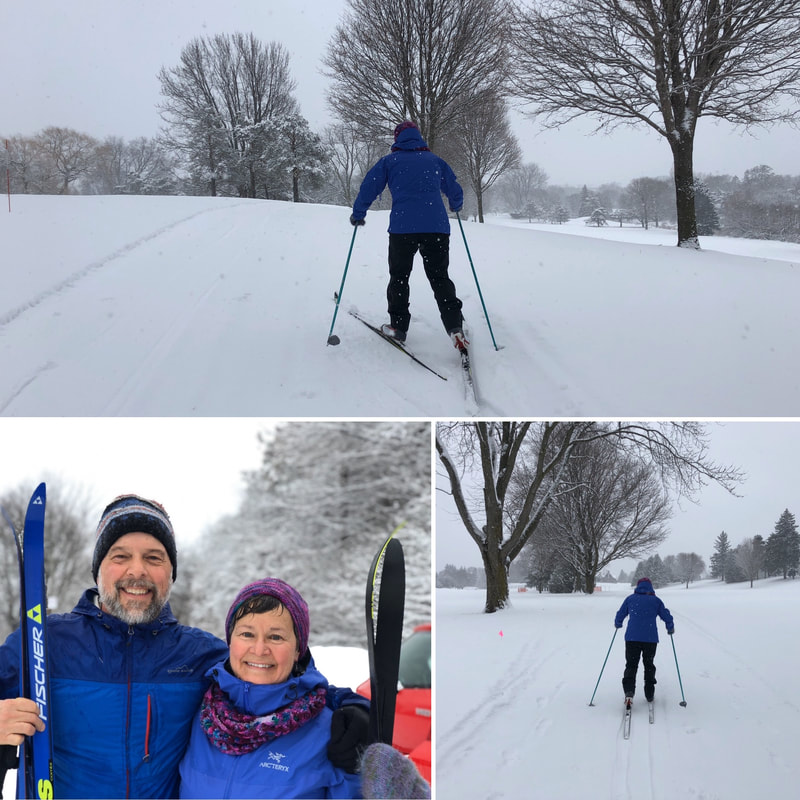
Friday morning I got up at 5:45am for my (almost) weekly exercise session with a good friend. We've been exercising together for over 20 years. This morning we headed off to Rockway Golf Course in Kitchener for some xc skiing. The local xc group had recently set up an amazing system of trails and we wanted to test it out again. The temperature was high for xc skiing and I had applied the warmest non-klister wax I owned. We put on our headlamps and away we went. A great way to start a day.
On the way home, I decided to stop by the Waterloo Public Square to begin the process of creating a snow sculpture.
Earlier in the year I had gone through the process to arrange a 'Temporary Art Installation'. And let's be clear--what I do is definitely temporary! As I arrived around 7am, the city crew were busy shovelling the square and plowing a good load of snow off the public rink. I waved down one of the workers and introduced myself. We became fast friends and 'Randy' was more than happy to plow a number of runs of beautiful, fresh, clean snow from the rink into a pile just off the rink for my use. I then used my 'box on a sleigh' to move a number of loads up to the target area. I set up my first plastic ring and started filling. I was careful to compact the snow often as I did not want a repeat of what happened with Steve--please see below, #10. By 7:50am I was done. The form was filled to a little over 7'. Satisfied with my progress, I headed home for breakfast while the structure sintered.
By 11am I was back at the square with my tools. I had forgotten my step ladder, but an upside down pail worked well as long as I was careful not to slip. I roughed out the shape using a plasticine maquette I had created a few years ago as a reference.
The next morning (Tuesday), I went for a little run to check out my Albert Einstein carving from a few weeks back. He was looking fairly weathered but was still standing! Gravity had not ended Albert's tenure. I also stopped at the Public Square and hung out with some family for a while and then proceeded to give Andy a little smile. All I needed was a grapefruit knife. I also thinned out the rims of his glasses.
Towards late afternoon, I was motivated to go back yet again to give Andy iris's. The challenge of carving deeply and accurately into a sculpture was the source of the motivation and I took a wider selection of tools. The first set I installed where too small. The green set you see here were not perfectly shapped but did give Andy a bit of a pop.
Update: Andy fell down on Tuesday, February 18th.
|
|
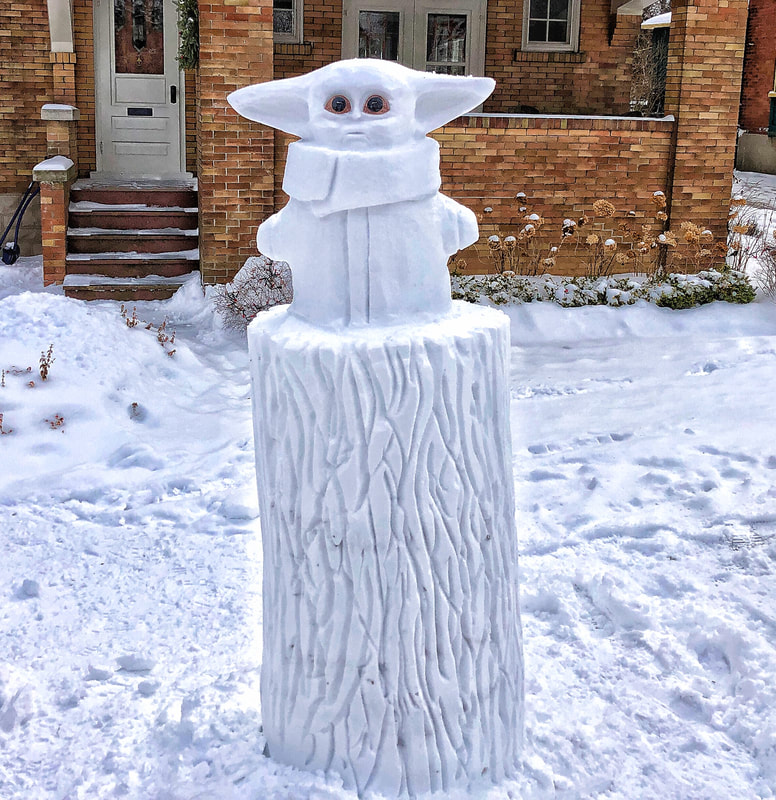
#11. Baby Yoda
Friday, February 7, 2020.
On Thursday evening (Feb 6), my wife and I went out to the Original Princess, in Waterloo, to hear a talk from adventurer Adam Shoalts. He had travelled alone across the arctic from the Yukon to Baker Lake (near Hudson Bay). Perhaps I was inspired, but when we got home, a fair amount of snow had gathered. So I went out at 9pm and built an 8' tower, finishing by 10:15pm. I collected snow off the sidewalk from my friendly neighbour, much of our front lawn and, to top it off, some excellent quality snow from our backyard. All it took was one big load in my plastic box sliding on broken xc skis screwed to a tray of plywood. My plan was to let it sinter all night.
The next morning I got outside in good time and proceeded to carve. It was one of the most challenging carves I've ever attempted. I'm still considering why, but perhaps it was the unique shape. I got close to completion and then took another look from the side while holding up my maquette. Wow. I was way off. The body was far too thick. So I got the cheese grater (wraped around a pointed trowel) out of the bucket and shaved off much of the front of the sculpture. Then I began to apply the final shape again.
I installed the eyes which did give it a 'pop' but didn't have enough width to carve fingers. The eyes were an excellent fit, but slightly too light on the outside ring of 'brown'. Later I would receive this light hearted tweet: "...has Baby Yoda been indulging in Canada's legalization of cannabis?". My response was "Baby Yoda only uses the force....."
It was an interesting moment for me. I usually turn the eyes on my lathe, cut them down to the desired size, glue a stick on the back so they don't fall out of the sculpture, paint them and then cover them with Mod Podge to give them shine.
In this situation, I decided to use an old pair of eyes I had not used for a while and just adjust them. You will see in the picture below that I marked where they needed to be cut to match the requirement of this sculpture.
I did cut them, but I also sanded off much of the existing paint to ensure good adhesion of the new paint.
When I repainted, I made the outer colour 'brown'. But when I was all finished and had applied Mod Podge, they looked a little light.
And this bloodshot look is what my new Twitter friend had noticed. There is always a fine line between 'good' and 'great', and this met the bar for good. To have someone notice registered the point. May I suggest the book 'Good to Great' by Jim Collins for more reading on this topic. My goal with snow sculpting is to be great. This little incident just highlighted another opportunity to improve. I need to reach out to a painter! I can adjust some of the shades using my go-to editing program 'Snapseed', but that is only for online viewing. The goal is to make it look great on the snowbank.
Another excellent technique I have discovered to improve my carvings is to take a picture of the 'final' result, and place it electronically beside a picture of the actual target. I did this with Baby Yoda (see below) and noticed some easy to improve opportunities around his chin and lower cheeks. I went out later on Friday, put the ladder up again, and made the adjustments.
While I was out there we realised that my 'tree trunk' was far too uniform. So I simply looked at the gigantic maple next to it and realised the simple adjustments I could make to improve it.
I also had run out of snow for Baby Yoda's little hands. Saturday morning I got out and attempted to add some 'patch' snow on the end of his sleeves that I could then carve into fingers.
World class snow sculptor Peter Vogelaar taught me how to make 'patch snow'. His main warning was to add less water than you think you need as you stir powder snow in a pail. With Baby Yoda, I broke his rule and the resulting patch became hard to carve as it was almost icy. In the end though it was an improvement.
The public seemed to really enjoy Baby Yoda. Perhaps someday I will view one of the episodes!
|
|
#10. Steve
Sunday, February 2, 2020. Superbowl Sunday.
A surprise snowfall arrived and I made the decision to try and build something. So I started building a tower and got about 3/4 done.
My wife Lorna and I then went for a great xc ski at Rockwood Golf Course. We had learned that the local xc ski club was tracking the course. We had a blast!
Back at home, I finished filling the form and then went in for lunch while it sintered.
As the snow was so plentiful, I had shovelled a lot of snow into the form before packing. Later I would learn the importance of packing often as I filled the form. Read on!
Once sintered, I went out with a little wood carving I had made a couple of summers ago. The inspiration for the carving (and now the snow sculpture) was Doug Linker, a famous Ontario outdoors enthusiast. Doug has an outstanding You-Tube video on how to carve a 'Hillbilly'. It was his video that taught me to carve the little guy which would become my maquette for this adventure.
For those with an interest, his video was called: Woodcarving How to: Carve a Hillbilly-Full Tutorial Start to Finish. And here is a link to that video.
A little neighour and her sister dropped by and we had a good visit and talked about snow sculpting. I asked them if they wanted to name the sculpture and one of them came up with 'Bob' or 'Steve'. I chose Steve.
Unfortunately, Steve didn't make it through the night as it really warmed up. Oh dear. He might have fallen apart due to lack of compaction in the center section of the tower. Lesson learned.
While I was carving, a Twitter poll I had created was just finishing. I was asking those interested what I should carve from three choices. They chose Baby Yoda. So I await great snow so that the ears have a chance!
Below is Steve. He is a good 7’ tall.
|
|
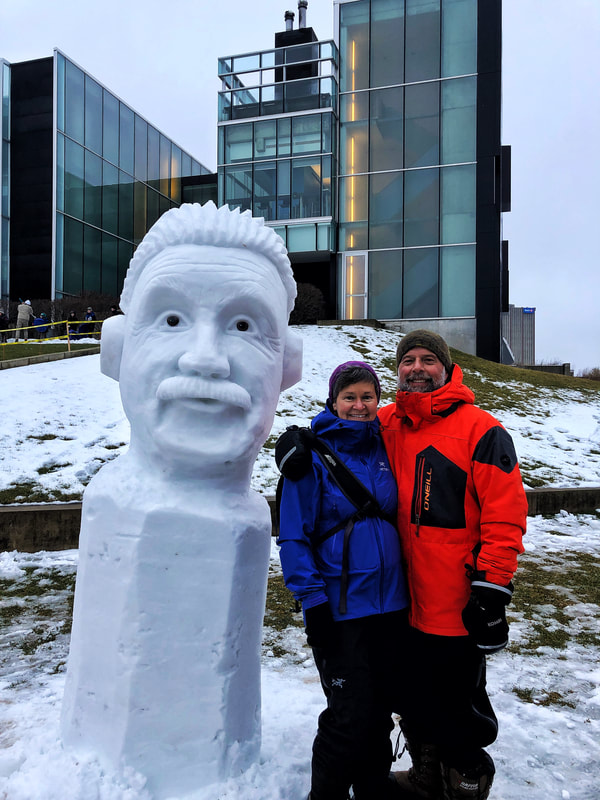
#9. Albert Einstein, Winterloo
Saturday/Sunday, January 25/26, 2020.
I was asked to perform at the City of Waterloo winter festival called Winterloo.
I was located next to the Perimeter Institute for Theoretical Physics and thought this would be a good time to attempt a more realistic version of Albert Einstein. I had spent many hours creating an accurate maquette.
The snow conditions were very challenging. Most of the snow close to where I was to set up was needed for a very fun snow slide that was created for the kids.
I did manage to find some snow and used my sliding box sled the second day to find more.
The snow was soggy and the carving difficult. Nonetheless, everyone seemed to have a good time as I carved away. I went early to build the 8' tower and then went home to warm up and change into dry wool for the carve while the tower sintered.
The second day I gave Albert more hair which was a challenge partly because he started to lean over. I also carved a thin tower and put a 'tree guy' on each side of the tower looking down each side of the trail.
A week later, residents of Waterloo were still enjoying the sculptures.
|
|
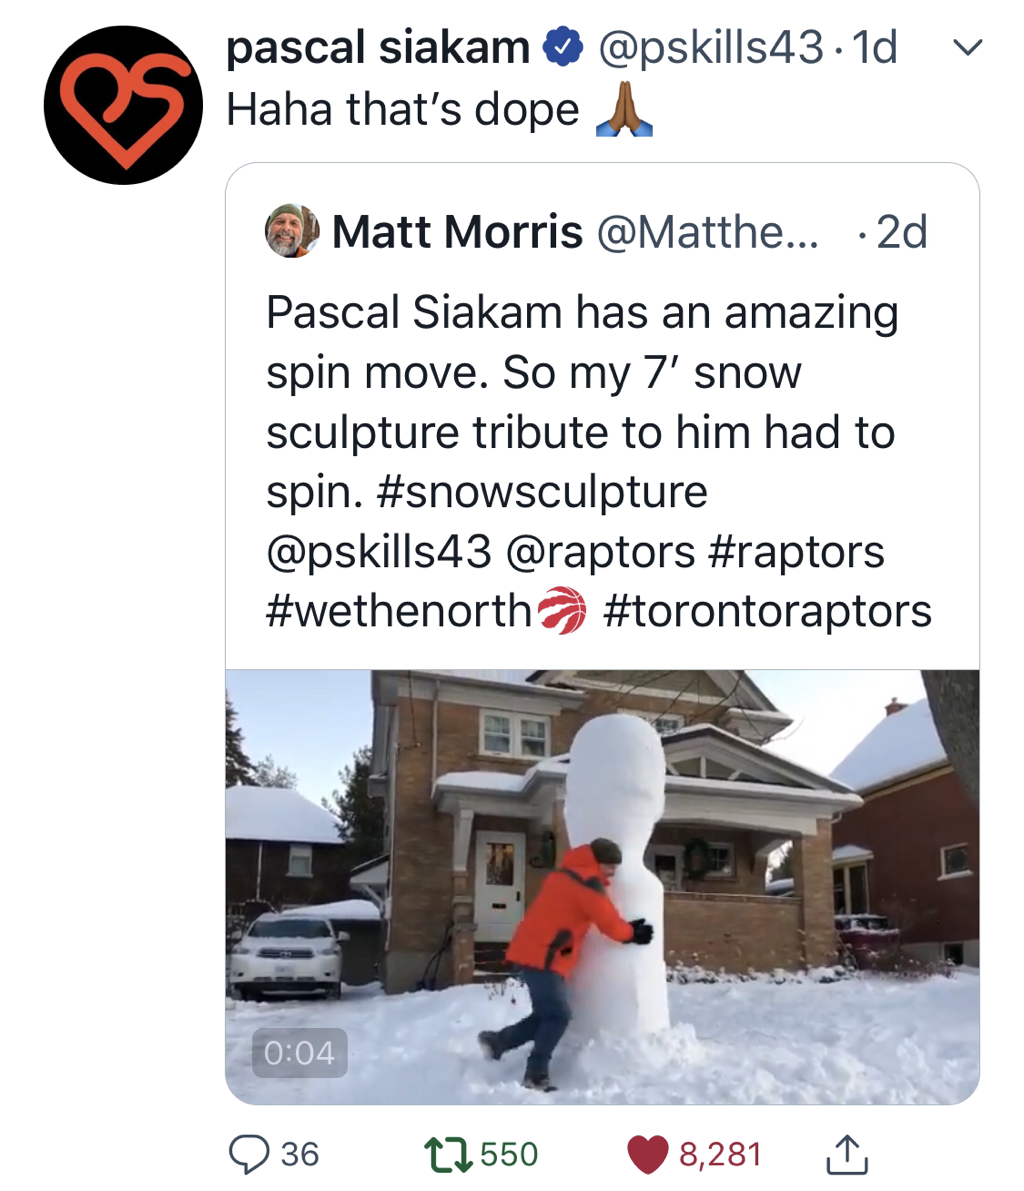
#8. Spicy P
Sunday, January 19, 2020.
A beautiful Sunday morning meant time to get out and tackle Pascal Siakam, or Spicy P, of the Toronto Raptors. I’ve wanted to create a tribute to him in snow as a way of celebrating the outstanding player he is. Watching him develop is great fun. And observing his determination to continually make his game better is an inspiration. His signature move is a 'spin' move, so the sculpture would have to be built on the rotating platform so that I could help Siakam spin!
I started the plasticine model months ago and today was the day for the attempt! Part of the motivation was to help put him over the top as voting for the NBA All-Star game was ending the next day.
Pascal was a challenging carve. I was very happy with my plasticine model, but wanted to make sure I could transfer this to the much larger snow tower. I started by mixing up some patch snow to build a nose. This saved width. I had made eyes previously and they ended up the correct size. As I proceeded I made a few mistakes. The headband was initially too thin. And his upper lip needed more snow. The rotator worked well and the orientation was vertical. With the cold temperatures this week, he should last. Lorna and I even got out for a nice snow shoe outing on a local golf course. A raptor coloured light at night finished the display.
Later that evening, I was sitting on my couch and Mr. Siakam responded by retweeting my post with a little comment! It was a total surprise. What fun! Then my phone started making a lot of noise for the next few days. My Twitter post has had over a quarter million impressions. And then our Aunt from Saint John New Brunswick called to say it was on her 6 o'clock CBC news. And then the CTV National News with Lisa Laflamme was fun too! Many other news organizations all picked it up and you can view the coverage on the PRESS menu item.
We will learn next week whether Siakam has made the NBA All-Star team, but regardless, my tribute to Spicy P stands on its own!
Update: Pascal Siakam is a starter for the All-Star game!
And then Pascal responded!
|
|
#7. Pioneer Woman Sarah. Schneider Haus
Saturday, January 18, 2020.
I had a great time carving “Louisa” at the Winter Carnival for Schneider Haus in kitchener. She was a Schneider and lived in the house in the late 1800s. We arrived at 10am and had the tower packed in by 11am. We then left it for a while to sinter. Carving started at 12:20pm and finished around 2:30pm. Amazing snow quality. Thanks to Lorna for the help filling the form! Lorna had a nice time knitting by the fire while I carved. And Sara was a very gracious host.
When finished, we drove home to snowblow out a few neighbours and build an 8’ tower for tomorrow.
Bonus:
Schneider House used to be called Joseph Schneider Haus. They changed the name of the museum as a healthy evolution to the simple observation that the history involved all of the members of the family.
Tuesday, Jan 14, 2020. New truss tool creation
I finally found ‘truss plates’ at a lumber yard. 5” x 8”.
$1.50 each.
Skilled snow sculptors use these to quickly remove snow from their sculptures. I attached one to a bent tree branch I had found. Or was it a root? One good screw with a pre-drill and a liberal amount of construction adhesive was applied on each attachment point. I think the adhesive will be the source of the main holding power. The screw was more to hold the two parts tightly together while it cured. Time will tell.
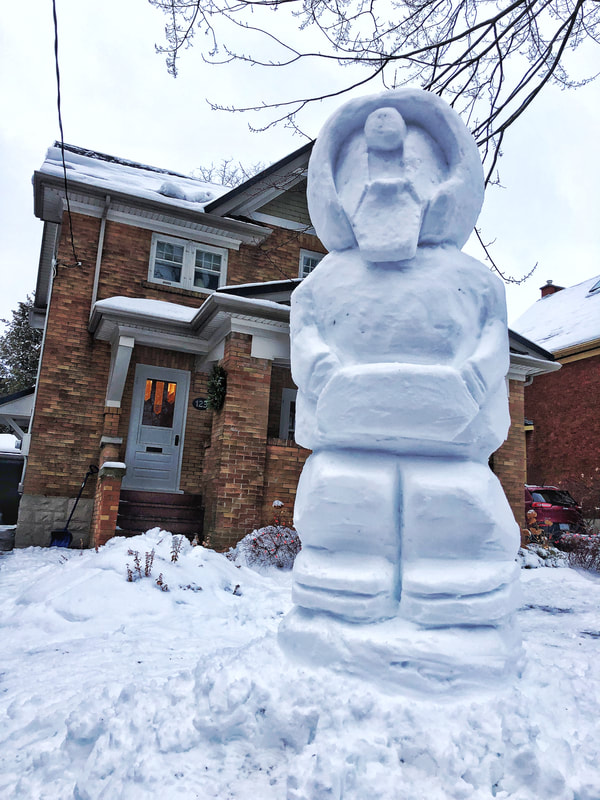
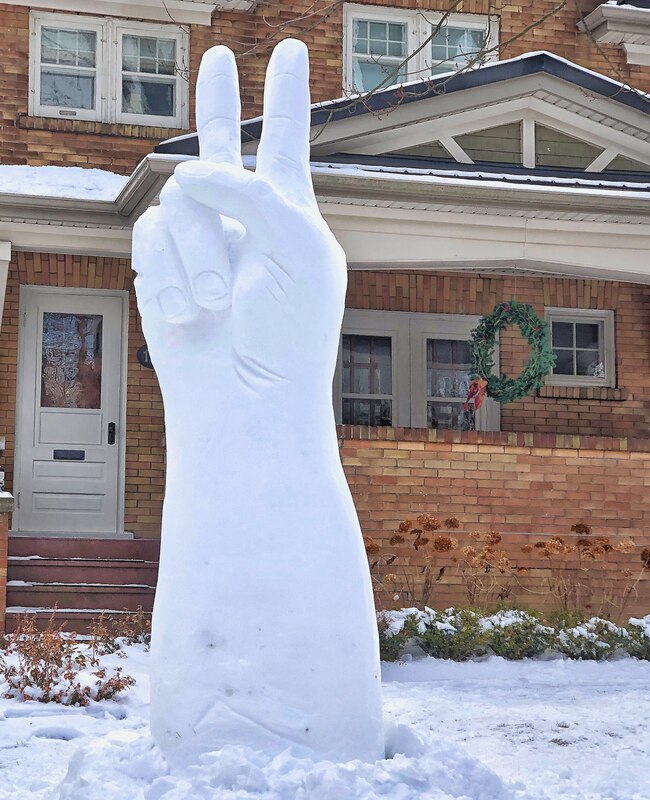
#6. What we need
Monday, January 6, 2020.
We had a small snowfall which meant a build was possible. It was on the freezing point, and rain was in the forecast for Friday.
Weeks previous, I had prepared a maquette which represented the Toronto Raptors 25th Anniversary promotion involving two hands. One was two fingers and the other was five. Together they would symbolize the 25th anniversary of the team. But the snowfall was not heavy enough for both. I was struggling with the decision of what to carve. And then it hit me. My maquette for the '2' could be used on its own with the theme of Peace. Recent world events have brought the spector of war to the forefront again. My comfort with the idea was immediate. My 9' tall snow sculpture would make a small statement. And so I built "What we need".
|
For this build I used three tarps. A 10' x 20' white tarp covering much of our backyard. An orange tarp on our driveway, and a third on an open deck. They worked so well and saved my back from overexertion. I just dragged the tarps to our front snowbank.
I was touched when a gentleman knocked on our door that evening. He said that he had immigrated from Iran and the sculpture had really effected him to the point that he drove home to get his wife and children tocome and see the sculpture. He said it was "such an important message". |
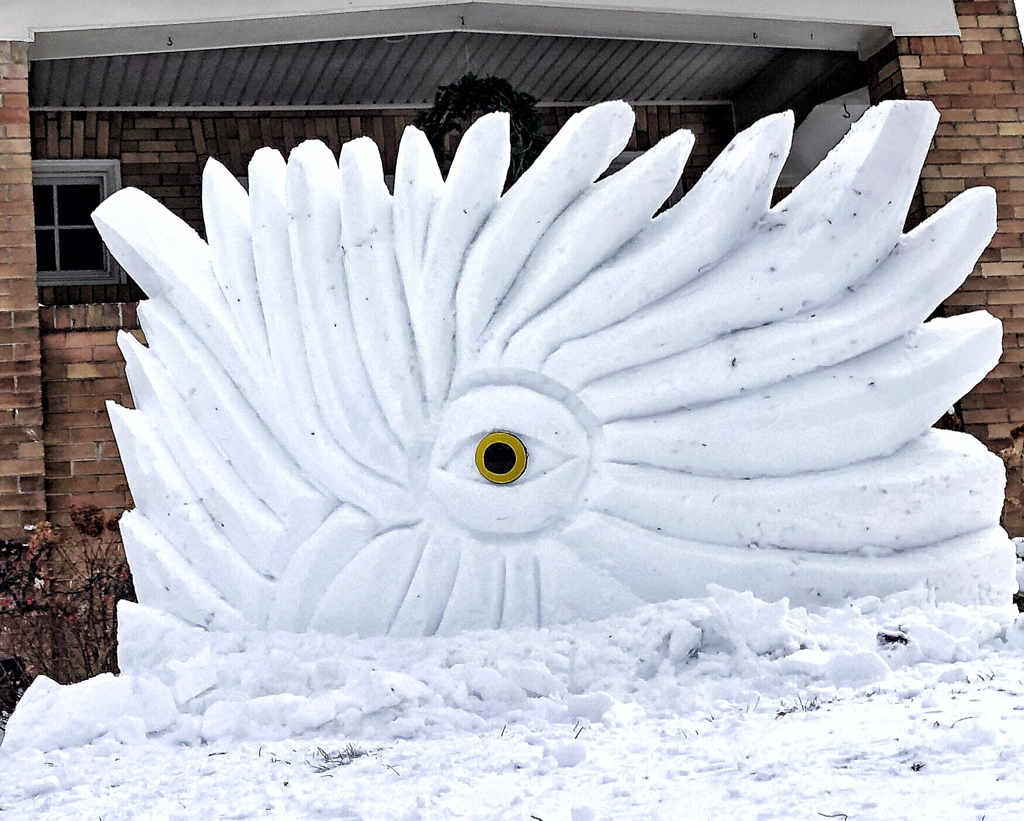
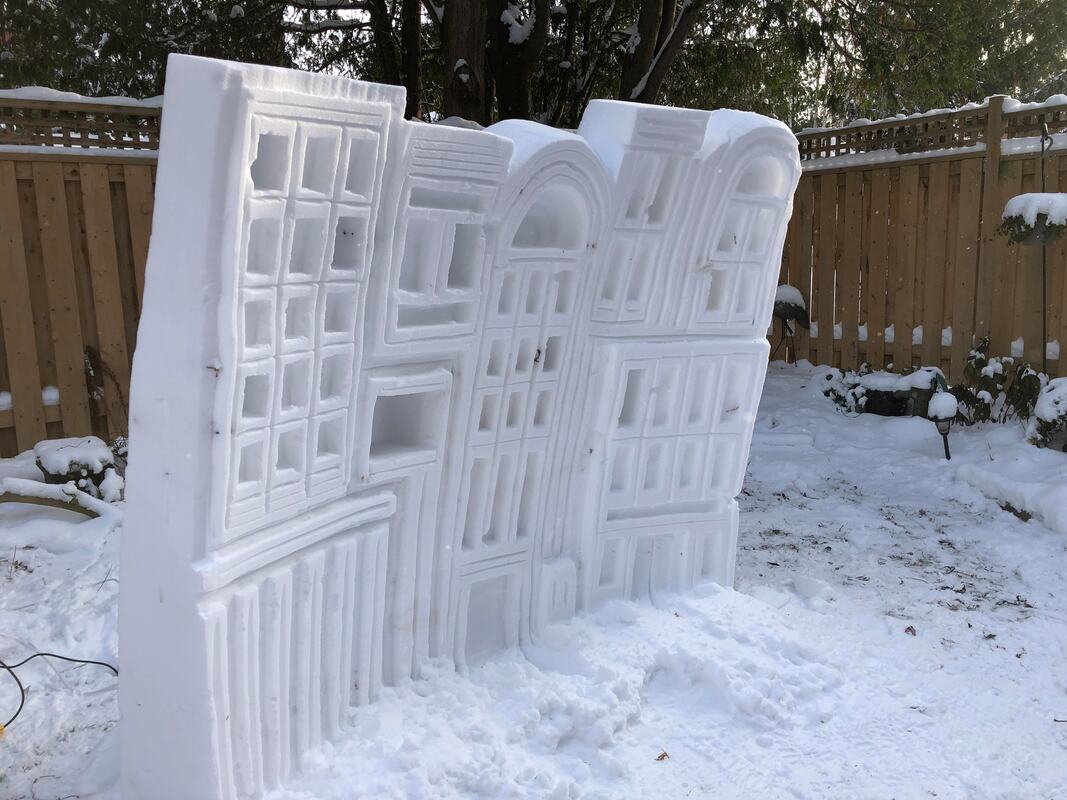
#5. The Eye on William
Tuesday, December 31, 2019.
New Years Eve! After a great day with family, I ended up out on our snowbank for the 1st non-testing use of my new ‘snow wall’ form. Then, 5 neighbourhood kids showed up offering to help. We were a real team and everyone had fun. We will call this the ‘Eye on William’. Happy New Year!
New Years Eve! After a great day with family, I ended up out on our snowbank for the 1st non-testing use of my new ‘snow wall’ form. Then, 5 neighbourhood kids showed up offering to help. We were a real team and everyone had fun. We will call this the ‘Eye on William’. Happy New Year!
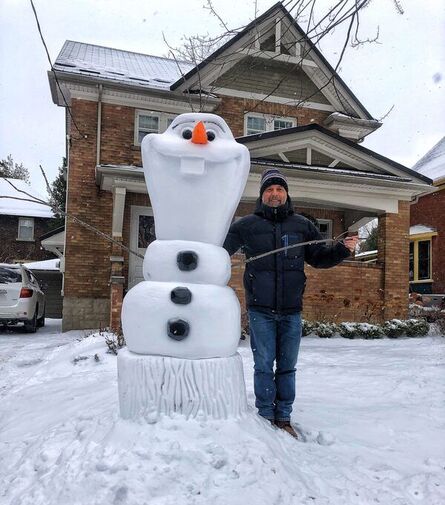
#4. Olaf!
Wednesday, December 18, 2019.
Apparently children love Olaf from the Disney movie Frozen. So Olaf it was! I had planned to make an Olaf about a year ago and created an orange paper mache nose. But other priorities delayed the building of Olaf. When I learned that Frozen 2 was released, I decided to readdress the idea of creating an Olaf. I had the nose, and decided I should make 3 buttons and black eyes. The buttons were from an old 2x6 that I cut up with a chop saw. The eyes were turned out of junk wood on my lathe. I then painted them and, once dry, poured 2 part epoxy on them to give them a real shine. I then glued little sticks on the back of each. These sticks made sure that the they would not fall out of the structure.
During this time, I saw a video of a young Quebec gentleman who made a gigantic Olaf in his front yard. This inspired me to also make a bigger set of Olaf 'parts'.
When I heard snow was arriving, I decided to go for it. But the amount of snow that fell meant that the smaller Olaf would be the goal. Below Was the result. .

|
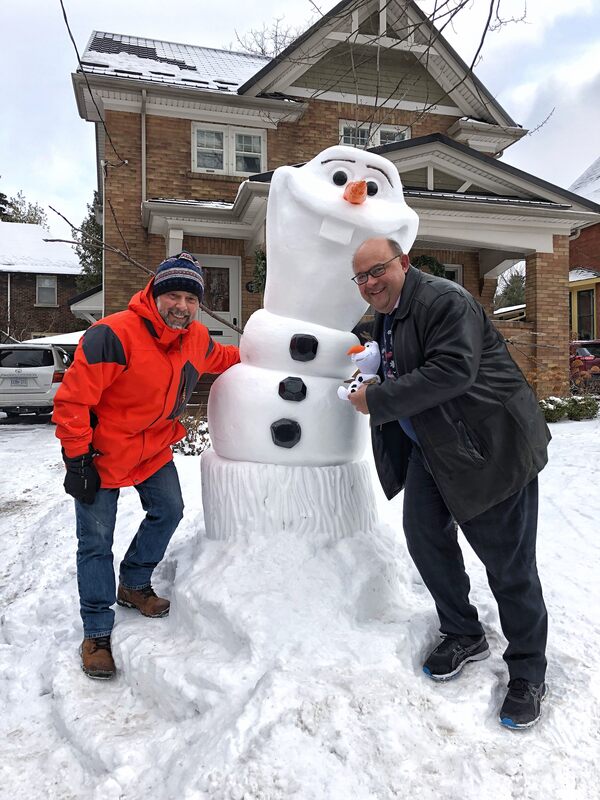
Kitchener Mayor Vrbanovic is a big Disney fan. He brought his own Olaf for the picture.
|
In the end, we had a load of fun. Many, many young children hugged Olaf. And Olaf hugged them back. The base around Olaf got a bit slippery, so I got an ice chopper to create a set of stairs on both sides. Kids would walk up, get a hug and a picture, and then slide down the middle. Even the Mayor of Kitchener, Berry Vrbanovic, dropped by for a picture. If you view the pictures in the slide show, you will note that Olaf did a slow lean over the almost week long event. His head eventually touched the ground. But he never broke!
Here is a little slide show showing some of the process of building two sets of Olaf parts: eyes and buttons. For the bigger set I crafted eyebrows too. Later I would add sticks for hair and branches for arms.
The first picture here highlights:
A. The small Olaf parts.
B. The bigger Olaf parts. We will need a big dump of snow to pull this off! I should post a picture of the larger orange nose I sewed together withy my wife's sewing machine.
Bonus: when I painted the larger buttons, I got a what I thought was the same paint on sale. But it was alkyd paint which is super stinky. The whole house stunk! So now I paint in my barn and let it attempt to dry in the cold. Any paint specialist would be horrified I'm sure. After a day, the stinky phase has passed. I then bring them inside and place them by a heating vent to firm up.
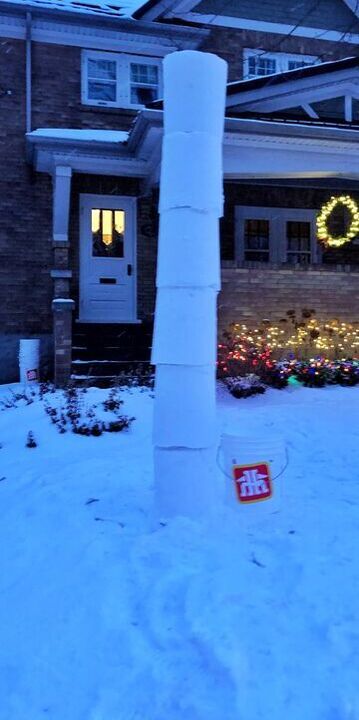
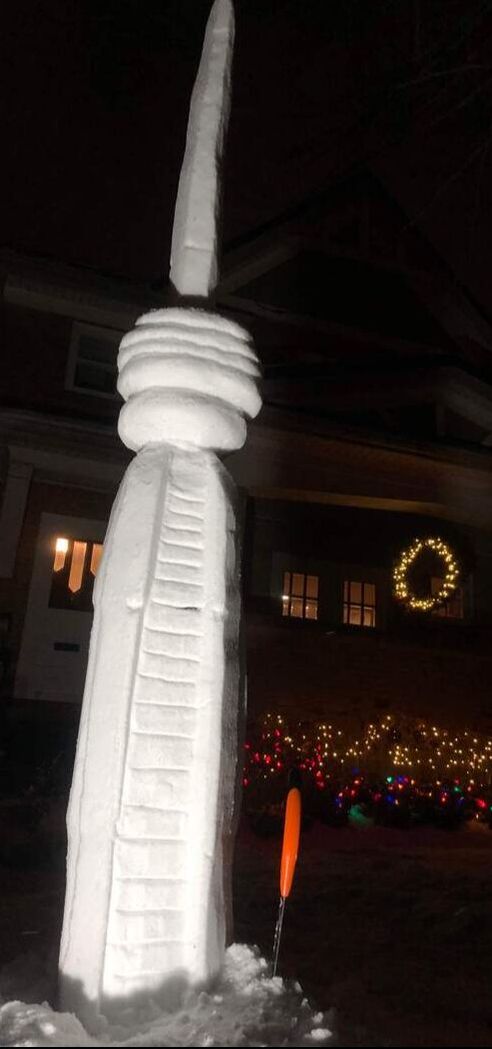
#3. CN Tower
December 6, 2019.
With just a bit of snow, what was I to do? I decided to attempt a CN Tower. As a teenager living in Toronto, I watched them build the CN Tower back in the 1970's. The builders placed the top piece (temporarily) on the ground at Harbourfront in Toronto and invited people to come down and sign it. So my brother and I jumped on our bicycles and rode down. I signed the top edge making my signature (at the time) the highest free standing signature in the world. LOL
I watched in amazement as the Sikorsky helicopter lifted the higher sections into place.
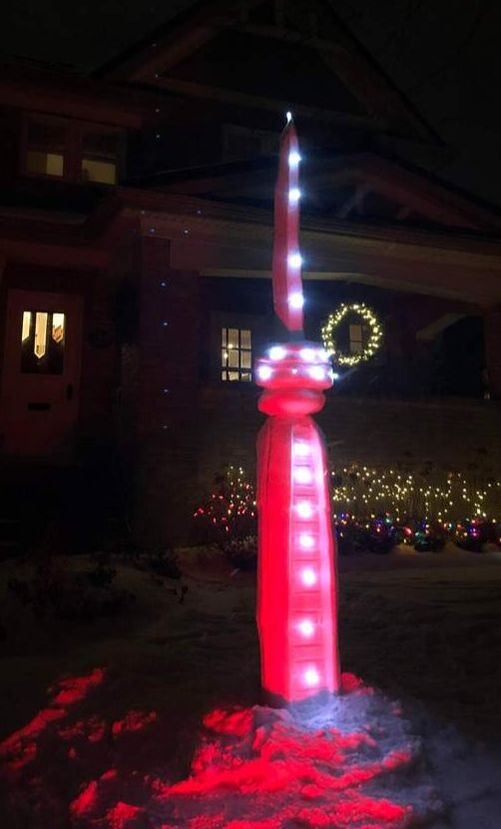
I stacked up six 5 gallon buckets of snow and then carved as close an approximation as I could. Then I placed a red light on the bank aimed at the tower and placed little lights all over the tower for a nice picture. Loads of fun but it didn't last long!
As I carved it thinner, it became more fragile. I learned that the weak points were where each pail of snow joined. Next time I will spray in some water before placing sections together. Hopefully this will act to bind the sections better.
With just a bit of snow, what was I to do? I decided to attempt a CN Tower. As a teenager living in Toronto, I watched them build the CN Tower back in the 1970's. The builders placed the top piece (temporarily) on the ground at Harbourfront in Toronto and invited people to come down and sign it. So my brother and I jumped on our bicycles and rode down. I signed the top edge making my signature (at the time) the highest free standing signature in the world. LOL
I watched in amazement as the Sikorsky helicopter lifted the higher sections into place.
I stacked up six 5 gallon buckets of snow and then carved as close an approximation as I could. Then I placed a red light on the bank aimed at the tower and placed little lights all over the tower for a nice picture. Loads of fun but it didn't last long!
As I carved it thinner, it became more fragile. I learned that the weak points were where each pail of snow joined. Next time I will spray in some water before placing sections together. Hopefully this will act to bind the sections better.
|
|
|
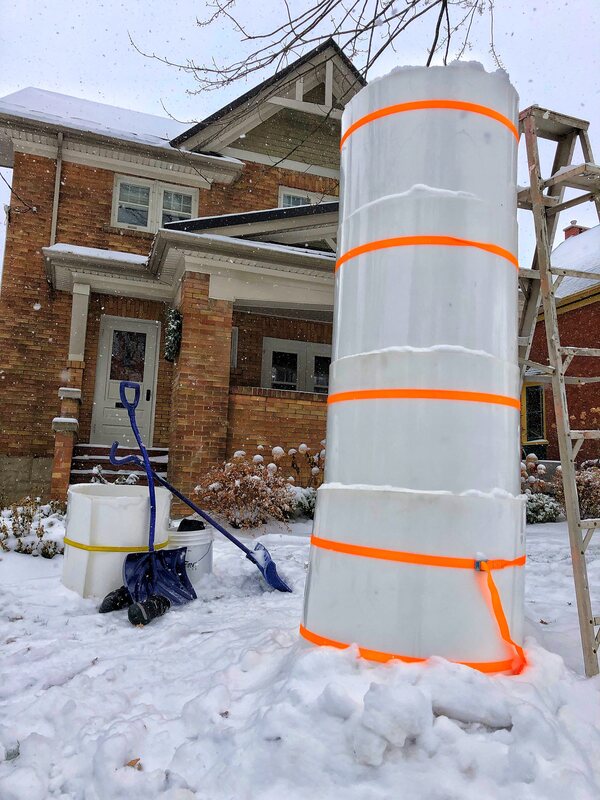
#2. First use of the 'Snow Wall' form
November 12, 2019.
After the inital Moai carve, it was time to head to the backyard for some testing. The goal was to use, for the first time, a 'snow wall form' I had designed and built over the summer. Details on the wall can be found lower on this page. The form is allowing an entirely new direction for my snow carving. This was a test.
In the end it fell over! I happened to be filming at the time and will post the video for your enjoyment.
Clearly, in my first use of the wall, I had not oriented the wall into a vertical position. As it started to lean more and more during the day, I was hoping to get some lights on it before it collapsed. Goal accomplished, but I had to move fast.
What was my feeling right after the collapse? Satisfaction for the amazing lessons and success I had during the test.
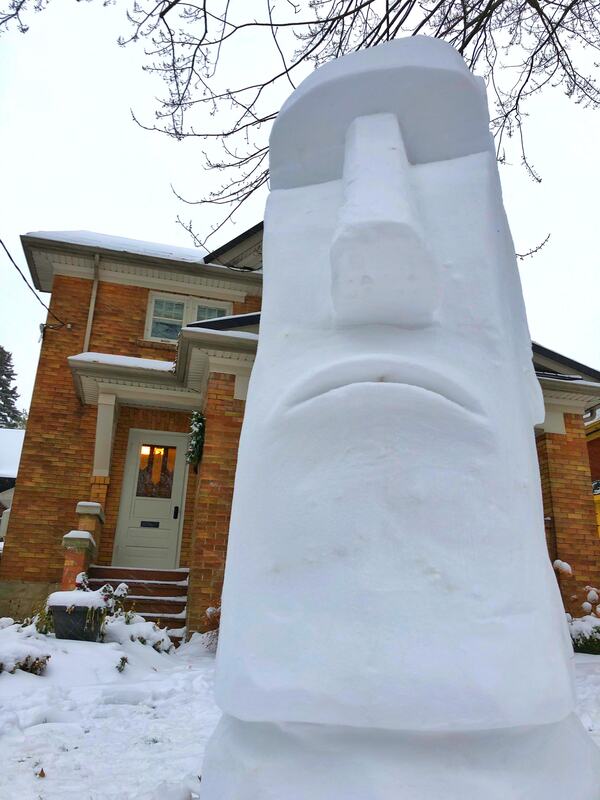
#1. Each season starts with a Rapa Nui (Easter Island) Moai
November 11, 2019.
A surprise dump of snow on Remembrance Day meant it was time to build. My wife and I went down to the Cenotaph in Waterloo to attend the annual service. Then back to the bank to enjoy the freedom to build--made possible by those Canadians who gave their lives and contributed in so many ways to building our democracy.
I built this Moai with the intent of making it truer to the original sculptures which sit on the island of Rapa Nui, a few thousand miles west of Chile. Some know the island as Easter Island, but I now prefer to use the indigenous name.
This involved taking a lot of material off the front of the top. I mention this only because I think it put more weight on the back end. Looking out the next morning, the Moai had crashed back onto the lawn. One down. More to build.
|

|
|
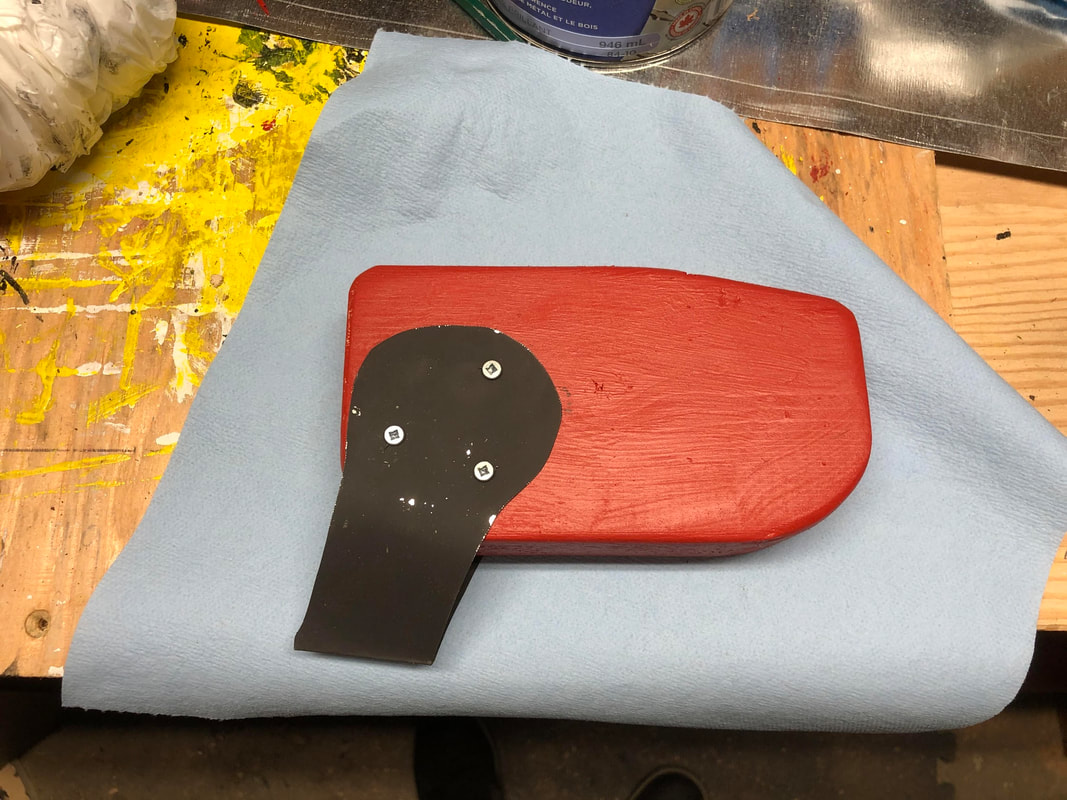
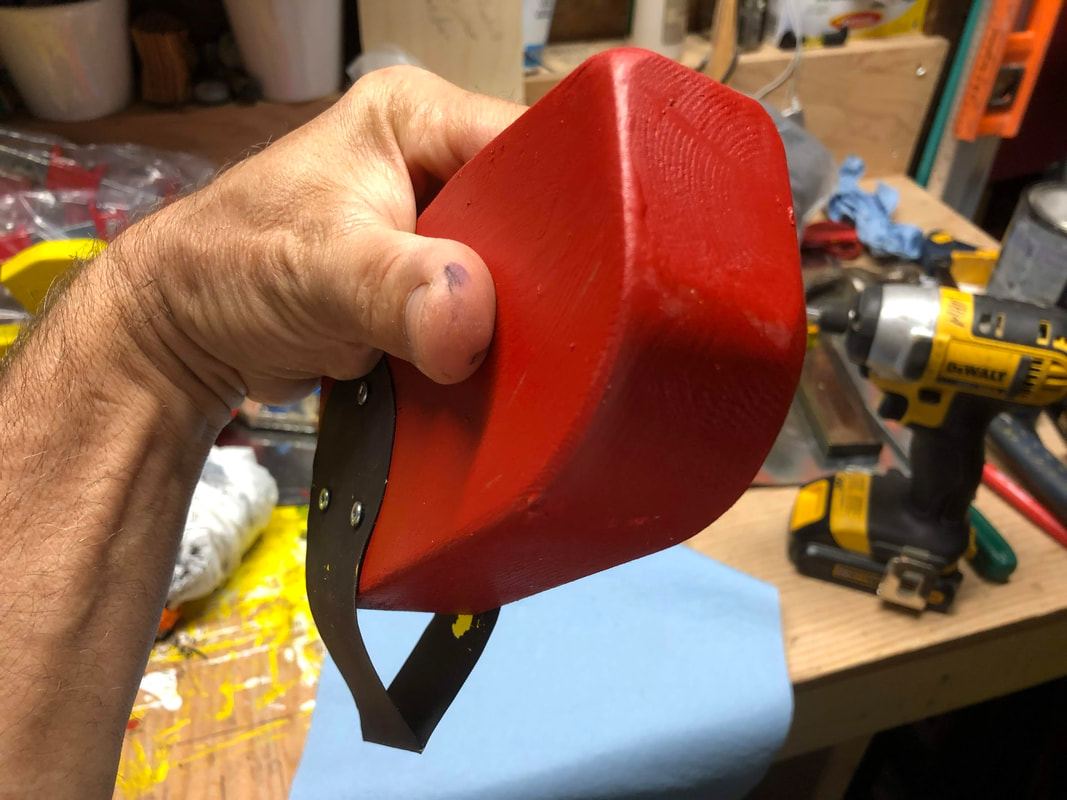
Note the very snazzy new orange straps on my plastic form. I realized that simple straps do the job compared to the more complex ratchet straps. It proved true as they provided good holding strength for the 2' x 8' sheets of looped plastic. BUT, they were super hard to undo. The metal release button had to be pushed very hard, with a bare thumb. Too hard and too cold on the hands. But just then I got a note from the co-owner of a local rock climbing gym. He has lots of rope he can't use as it no longer passes code for rock climbing. We will get together and he is going to very kindly donate some rope and teach me the 'truckers hitch' knot. This plan has promise!
Second attempt at Albert Einstein.
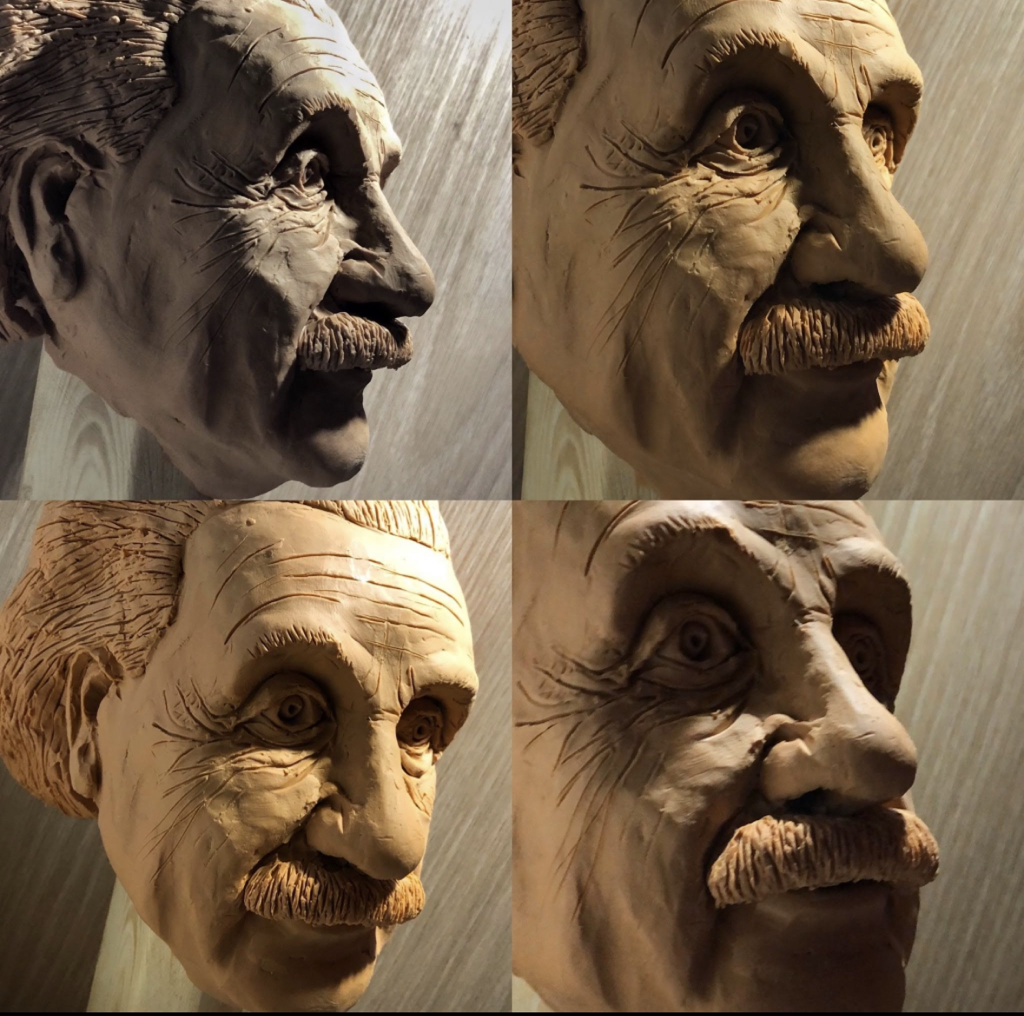
In the fall of 2019 I decided to attempt Albert Einstein again. I found some great pictures on the internet to help me get it right. As usual, it was difficult to find a good side profile picture but I prevailed. Here is the result. I can’t wait to try it on snow.
Update: I've just agreed to again perform at the City of Waterloo winter festival called 'Winterloo' in January of 2020. And I'll be placed next to the Perimiter Institute in Waterloo. As this world class organization studies physics, I think creating Einstein next to their building might be an idea!
Update: I've just agreed to again perform at the City of Waterloo winter festival called 'Winterloo' in January of 2020. And I'll be placed next to the Perimiter Institute in Waterloo. As this world class organization studies physics, I think creating Einstein next to their building might be an idea!
Snow Wall Form:
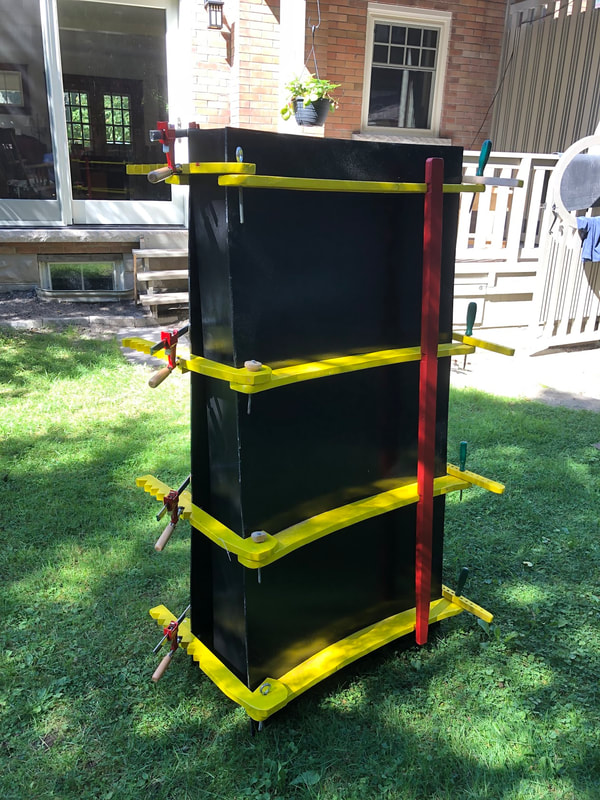
Through the summer of 2019 I had been planning a new snow form that would allow me to build a wall of snow. By mid September, I had it built. The 'wall' form is 5' tall an just 2'6" wide. It has a slight curve to give the final wall stability. When I use it this winter, the first wall built will (obviously) involve closing off both ends. Once the snow is packed in, one end wall is released. The form is ‘slipped’ along, away from the first wall segment, and the next section of snow is pounded in right next to the original piece of wall. But without the end wall 'ribs', how do I keep the wall together? There will be packed snow where the ribs use to hold together the two walls. Without support, the wall on the 'snow' end will start to push out on each outer wall.
The solution was to look at the cement forming business who place thin bars through the wall. These bars are bound on the outside of each side, thus holding the wall from expanding under pressure. Anything going through the wall will leave a hole in the snow once removed. So the pierce should be small. I decided not to use traditional cement forming bars. Instead I considered rope.
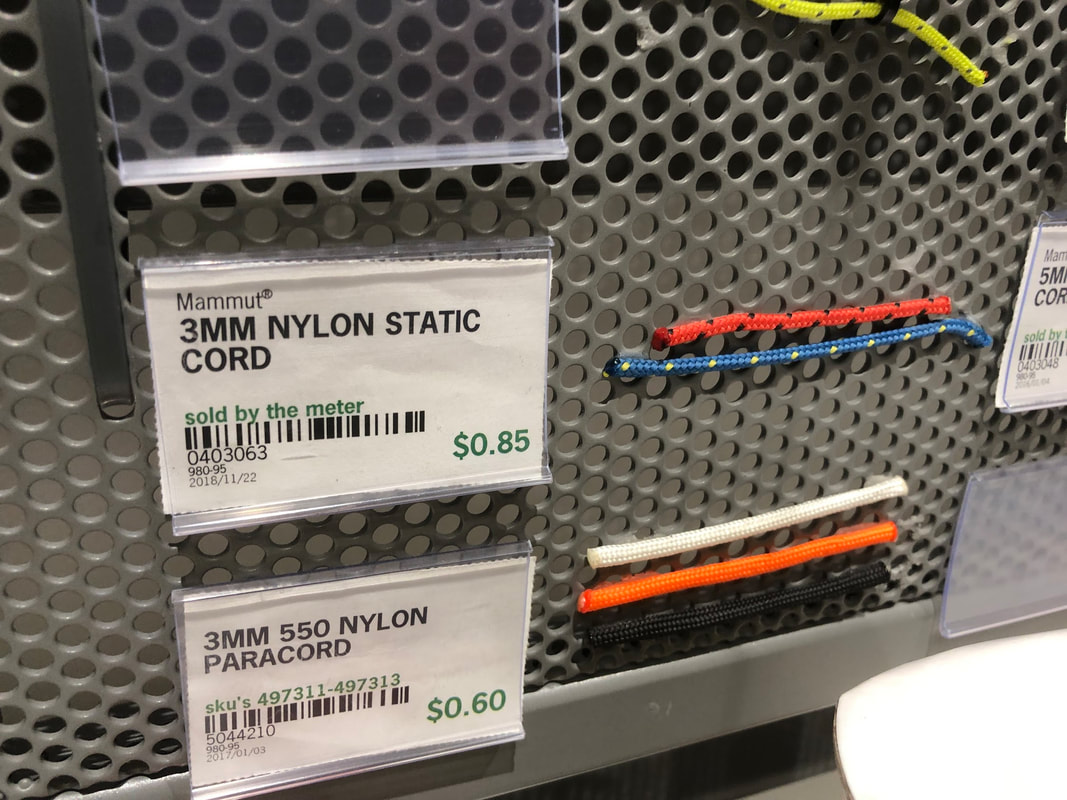
I visited MEC and had a great discussion with their rope specialist. She ended up selling me 3mm nylon (blue rope in picture) static cord with a break strength of 180kg. Incredible. The cord (in two positions) will go through the form near the open end (snow end) and pierce the red vertical ‘beams’. Once tied off, the red vertical beam, held by the static cord, will hopefully hold things together.
If I continue make wall segments, the curve will eventually come all the way around and complete a circle. I wanted just a gentile curve to give the snow wall stability. To get the right arc for the form, I marked the curve with a pencil, attached to 90" of string that rotated around an axle (nail) imbedded in dirt. I tried various radii, but 90" seemed to be about right.
Extra:
Using basic math, a 90" radius will create a 47' Circumference. We will need a team of workers to pull this off! We will also have to dig a tunnel through the wall to get inside!
The solution was to look at the cement forming business who place thin bars through the wall. These bars are bound on the outside of each side, thus holding the wall from expanding under pressure. Anything going through the wall will leave a hole in the snow once removed. So the pierce should be small. I decided not to use traditional cement forming bars. Instead I considered rope.
I visited MEC and had a great discussion with their rope specialist. She ended up selling me 3mm nylon (blue rope in picture) static cord with a break strength of 180kg. Incredible. The cord (in two positions) will go through the form near the open end (snow end) and pierce the red vertical ‘beams’. Once tied off, the red vertical beam, held by the static cord, will hopefully hold things together.
If I continue make wall segments, the curve will eventually come all the way around and complete a circle. I wanted just a gentile curve to give the snow wall stability. To get the right arc for the form, I marked the curve with a pencil, attached to 90" of string that rotated around an axle (nail) imbedded in dirt. I tried various radii, but 90" seemed to be about right.
Extra:
Using basic math, a 90" radius will create a 47' Circumference. We will need a team of workers to pull this off! We will also have to dig a tunnel through the wall to get inside!

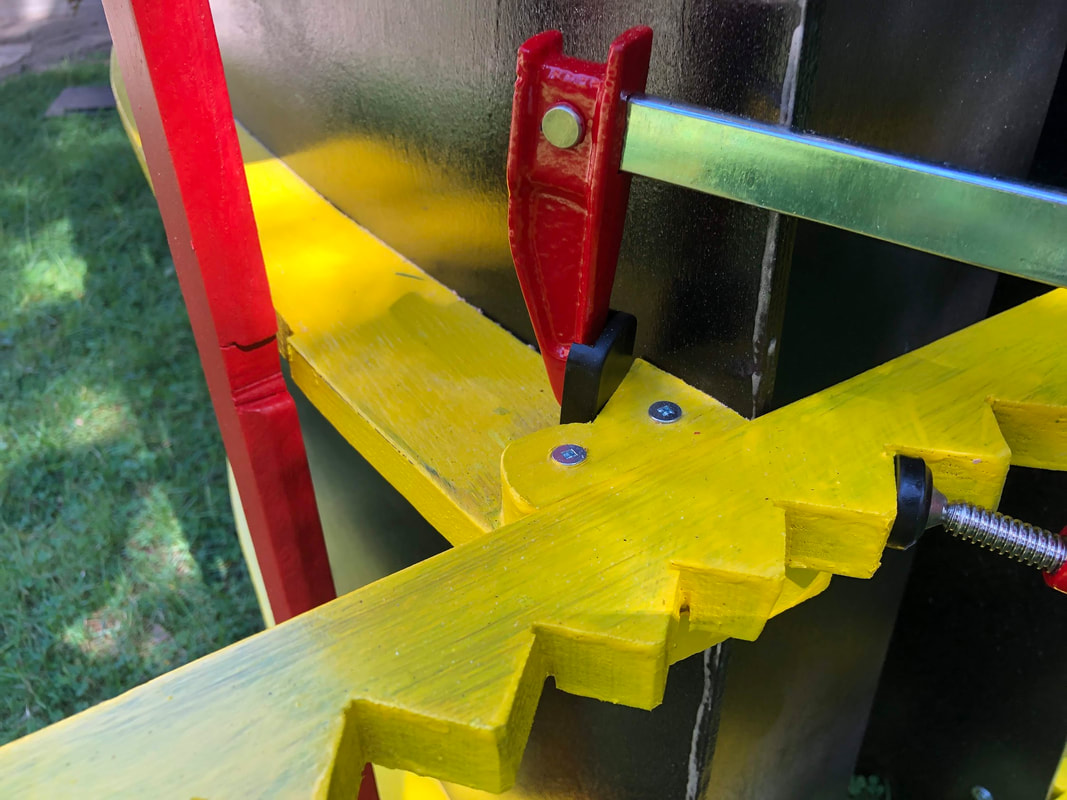
Detail showing the clamp that will hold together one end of the wall. There are 4 clamp spots that are adjustable to different wall thicknesses. These clamps are great because they are easy to install and remove.
|
|
|
|
Snow Carving Tools:
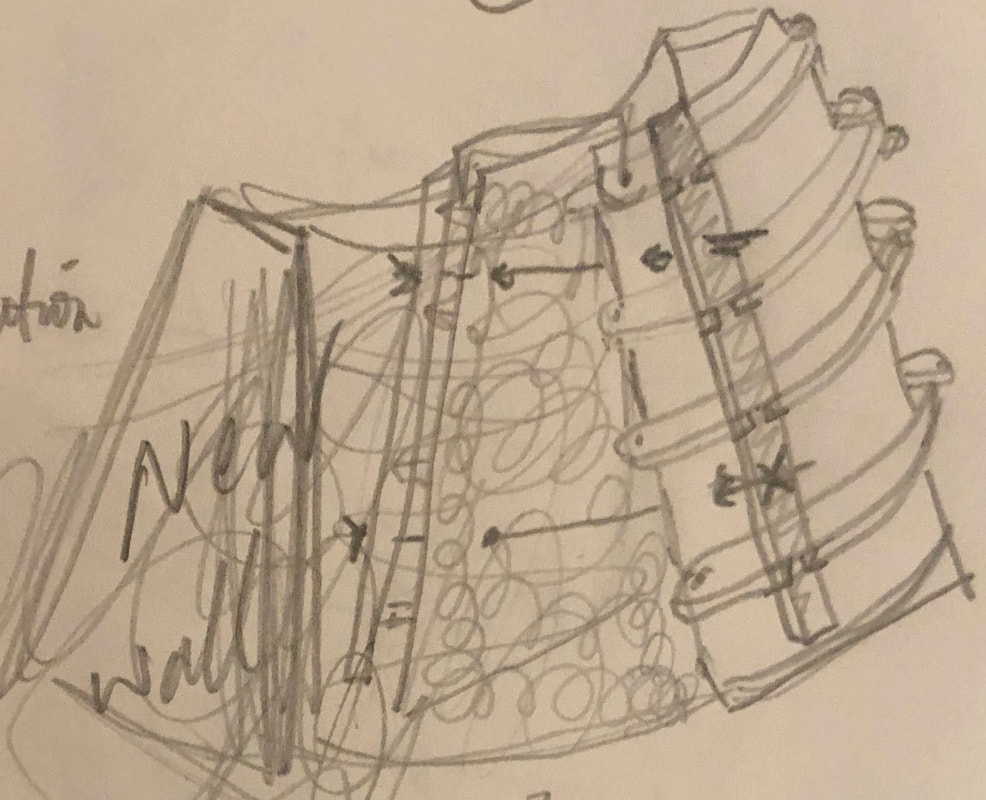
I learned so much from the professional snow sculptors such as (IG) @stijgerart while in Banff last winter. They were very kind to share their vast knowledge of carving....and tools. Special thanks also to my friend @snowsculpt who owns the coolest IG handle and has also shared his vast knowledge of snow sculpting tools. One of the fun aspects of this cheap hobby is the opportunity to create tools. In my new quest to carve cool designs into ‘snow walls’, tool design is an important consideration. How do I cut consistent, smooth and varied style grooves into the walls? Cutting square and V shaped grooves are critical. I should mention that cutting grooves will not be the only way I alter the snow walls. Many other techniques will be used. The grooves however will be key, as part of my plan is to shine a light from behind (at night) and have the different depths of snow allow more or less light penetration. If you review last season, you can see some late winter experiments where I play with lighting. I think the potential for creative expression is large. The pencil drawing picture below shows my thinking about snow carving tools. In the end, I had a breakthrough. The tool at the bottom (highlighted in pink) is simple, easy to make, and most importantly, will hopefully help create a consistent square shaped grooves in the snow wall. Of course a ‘breakthrough’ could end up being a failure. I’m good with failure. It gets me closer to a win. I will continue to bumble along, having fun with my little hobby that’s gets me thinking in new ways and hopefully creating some art that gives people a smile. Time for some snow so I can test out these new ideas!
In early September I created my first new tool. A 'V' cutter is shown below in red. The steel was heavier grade and the scrap 2 x 4 I used was raised at the 'heel' where the cutting edge is located. I put a slight angle on the bottom of the cutting edge to lift the snow out of the groove as I slide along. The (red) wood was removed to make a bit of room for the lifting snow. At least that is the theory.
In early September I created my first new tool. A 'V' cutter is shown below in red. The steel was heavier grade and the scrap 2 x 4 I used was raised at the 'heel' where the cutting edge is located. I put a slight angle on the bottom of the cutting edge to lift the snow out of the groove as I slide along. The (red) wood was removed to make a bit of room for the lifting snow. At least that is the theory.

|
Note the slight up angle on the bottom edge of this tool. The hope is that the cut snow will be lifted out of the groove.
|
|

|
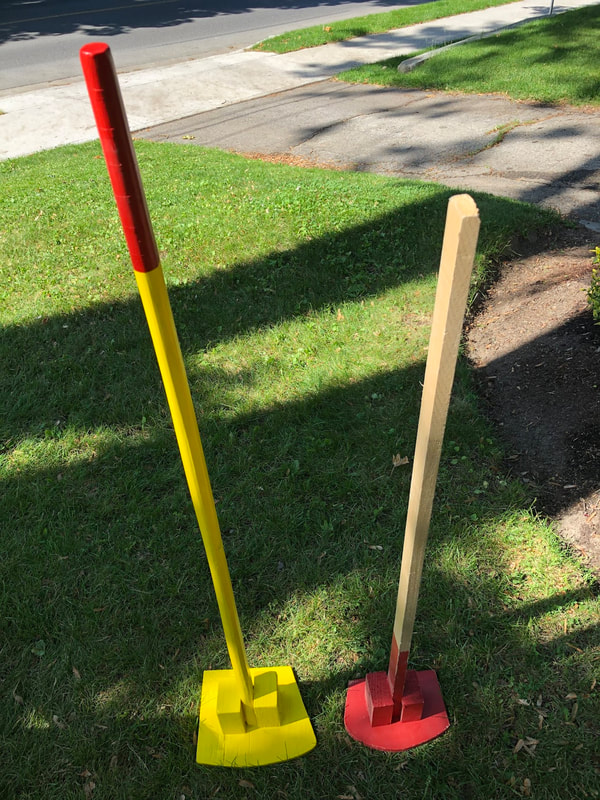
New Pounder:
Just finished my 5th ‘snow pounder’ I’ll call it the SP5000. I design these tools to create the initial 8’ tall column of carvable snow. Ideally I’m packing in NON-PACKING snow. The right (red) one was a design breakthrough compared to my first three pounders. The latest one on the left is the result of continuous improvement. The improved design includes: rounded and sanded shaft for better grip. Slightly large pounder surface to improve compaction and speed. Better arc on the pounder edge to match the actual curve of my round form. Still a 90° angle should I find it necessary to compact within a square form. Glued and screwed construction with pre-drills on all holes to reduce the chance of splitting. All edges well sanded to reduce injuries. Slightly heavier for perfect compaction. There is some debate on whether a pounder should be heavy or light. This debate often relates to sand compaction. I vote for light as it still gets the job done and I’m less tired. I’m almost 60 and I’ve got to keep in mind how I’m going to keep at this for another 30+ years. Somewhat longer handle as I’m considering a new form where the first section is 5’ tall. I’ll be able to use this pounder effectively while only having to use a small stool to gain an ideal pounding position. The light weight makes it easier for kids to have success. Colourful paint so I don’t lose it in the snow—and it just looks better.