2020-2021. Season 9
Most recent first.
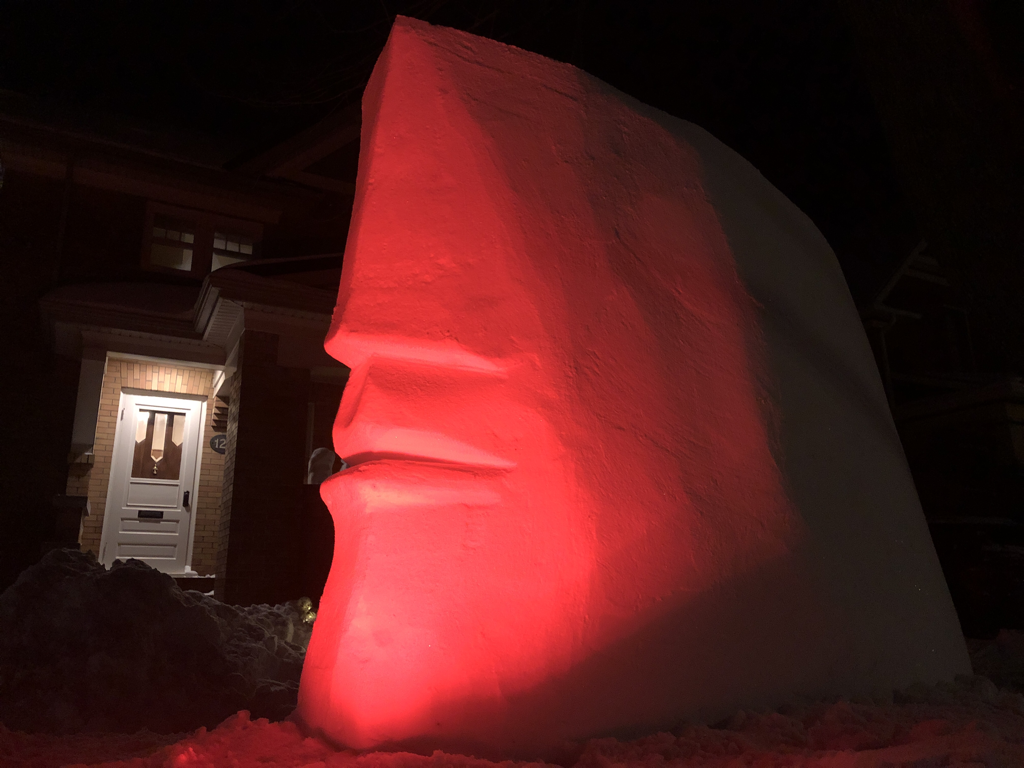
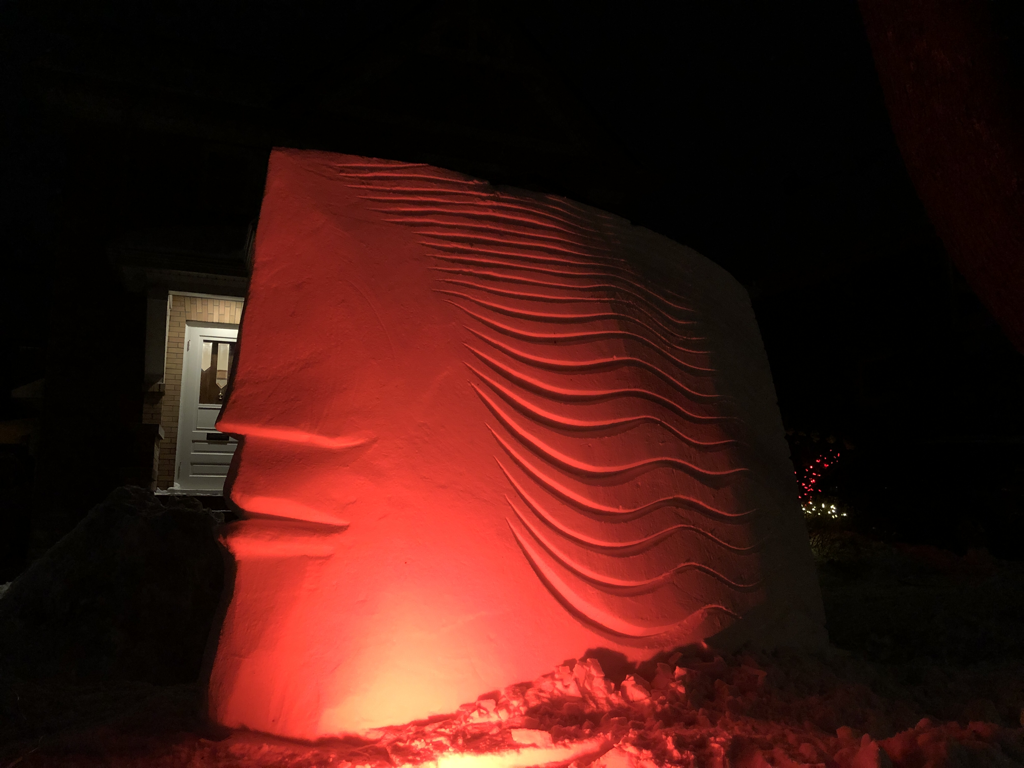
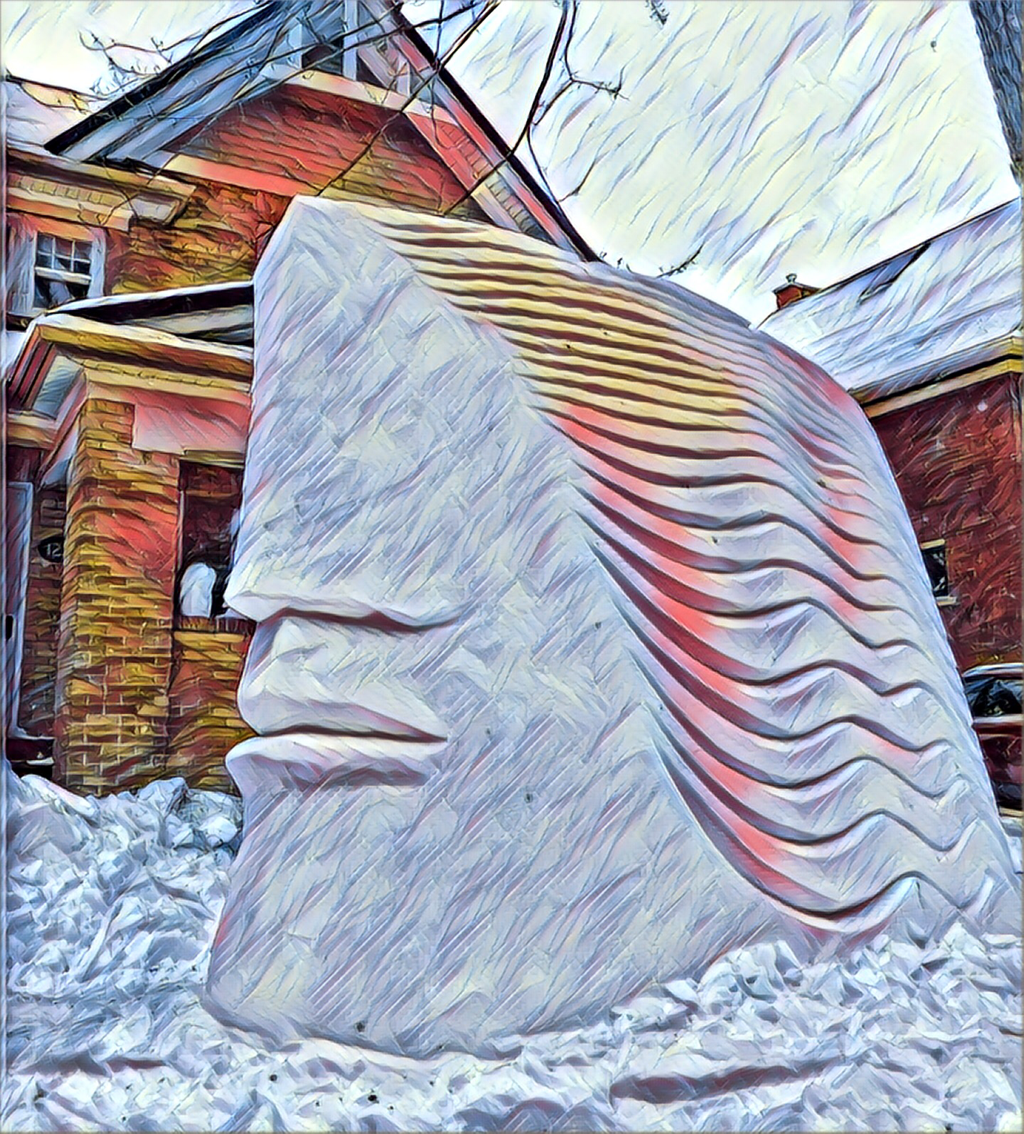
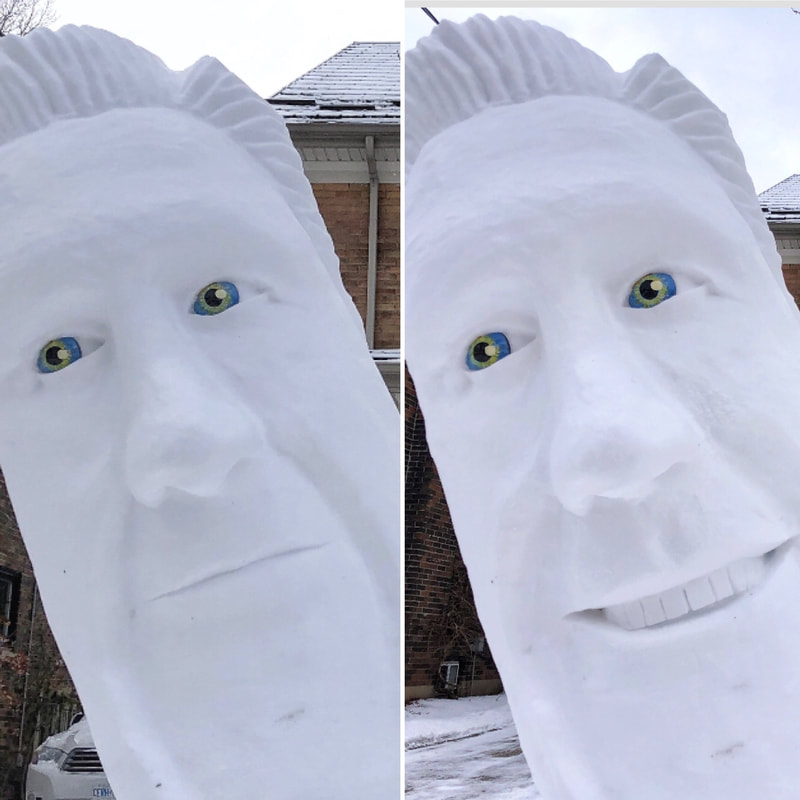
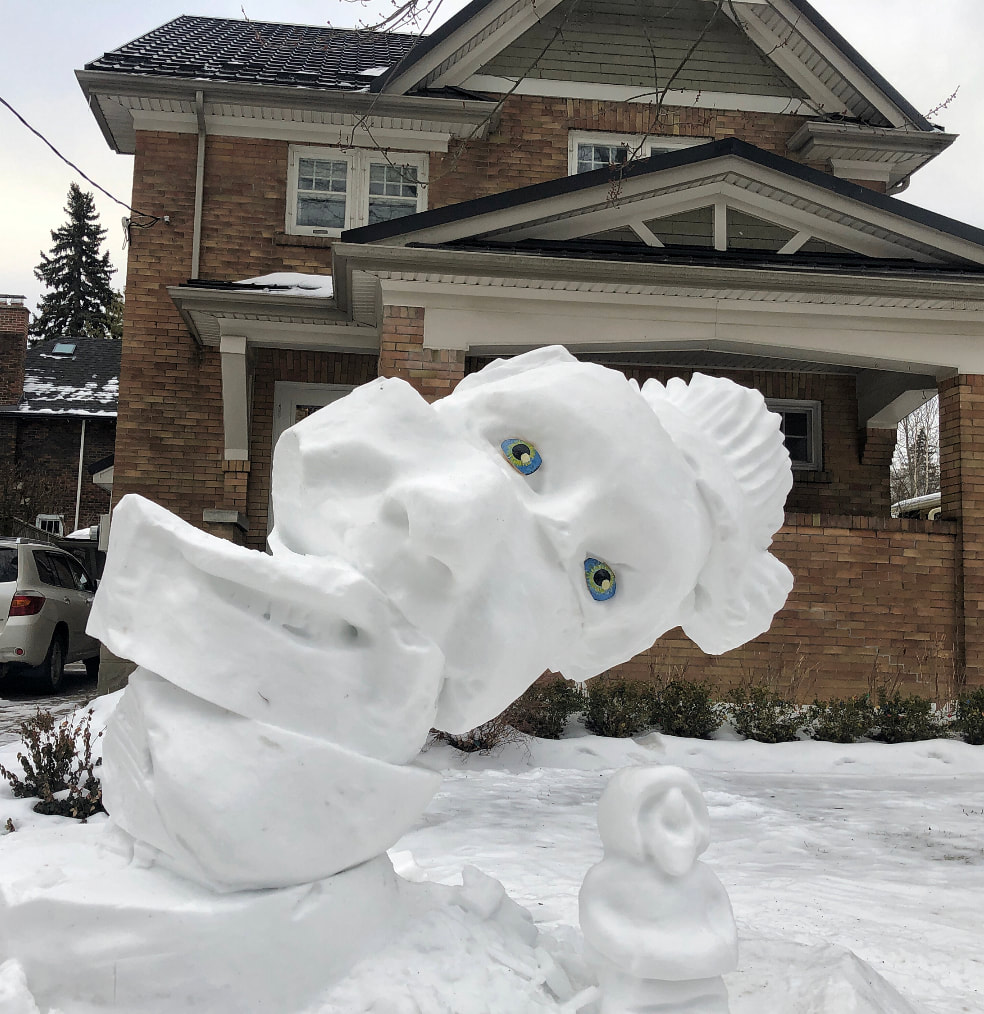
#12. Hair Swoop
Tuesday, February 16, 2021.
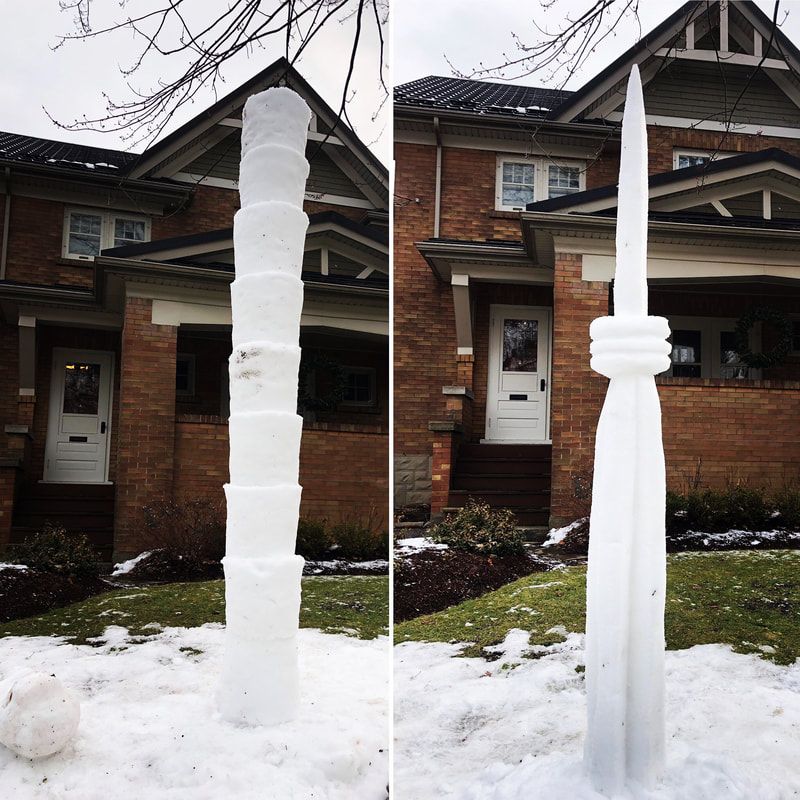
With mountains of snow available I pulled out my wall form. It was time to try again.
I adjusted the clamp system and I worked!
The second night I added hair!
With mountains of snow available I pulled out my wall form. It was time to try again.
I adjusted the clamp system and I worked!
The second night I added hair!
|
|
|
|
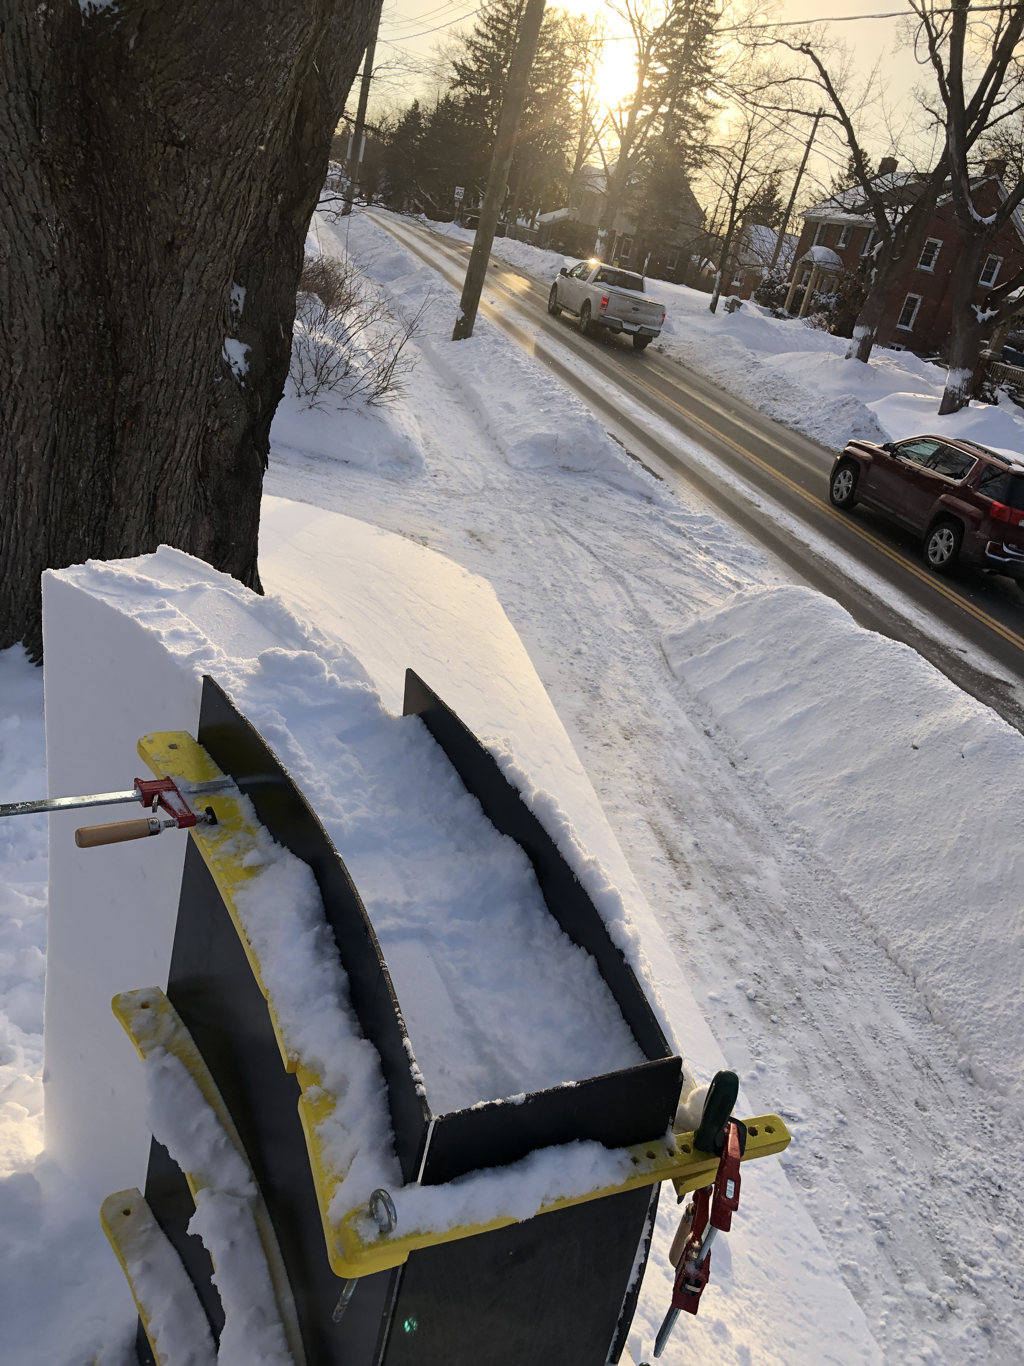
My wall form in action. I create one section and then slide the form along.
|
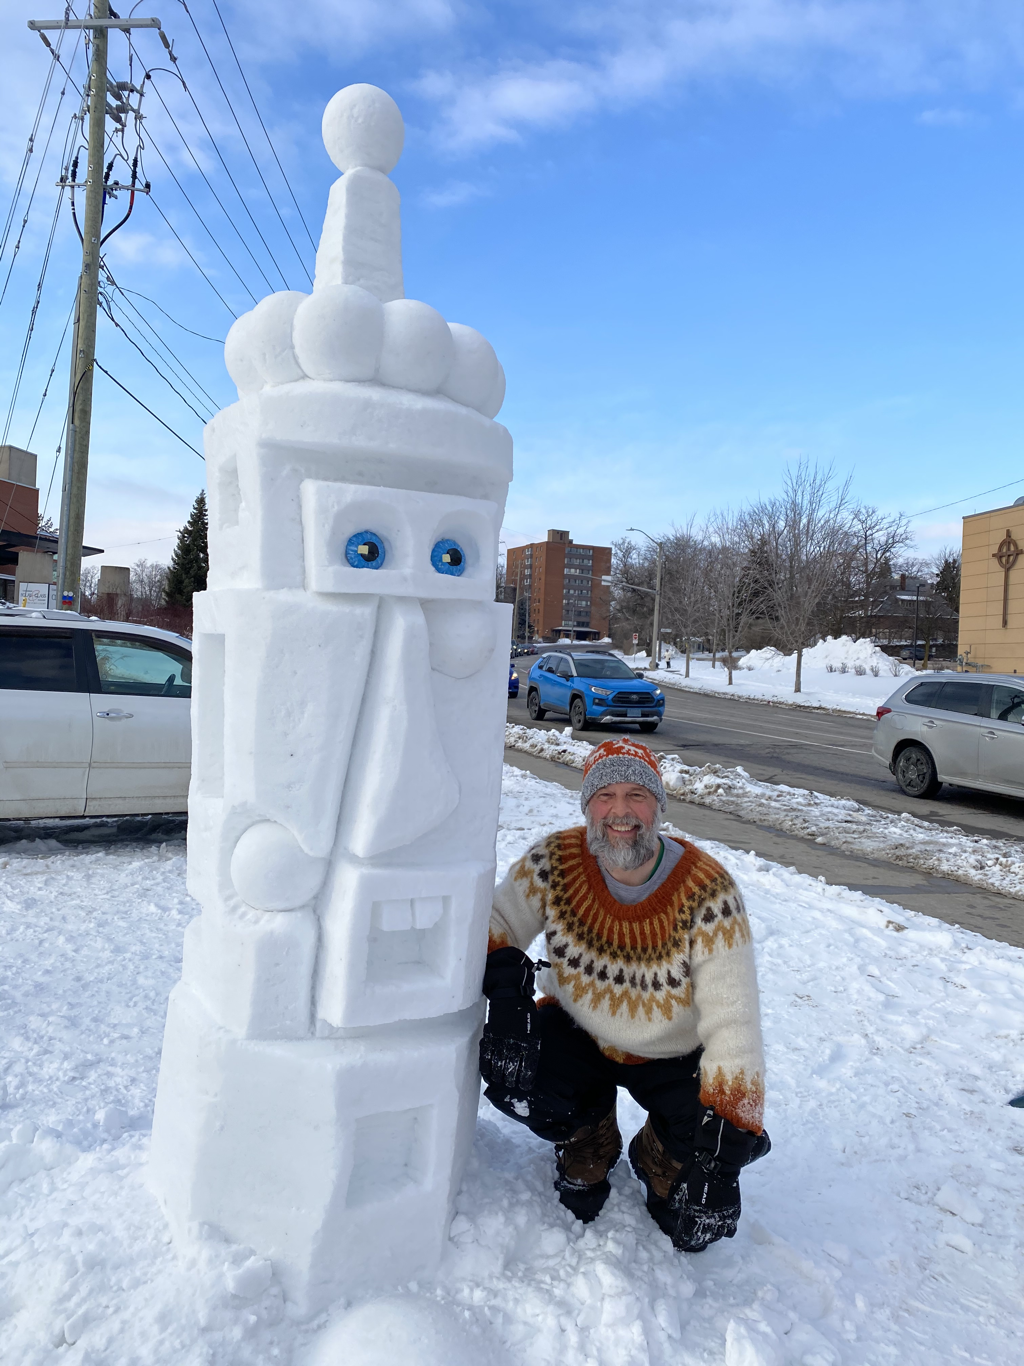
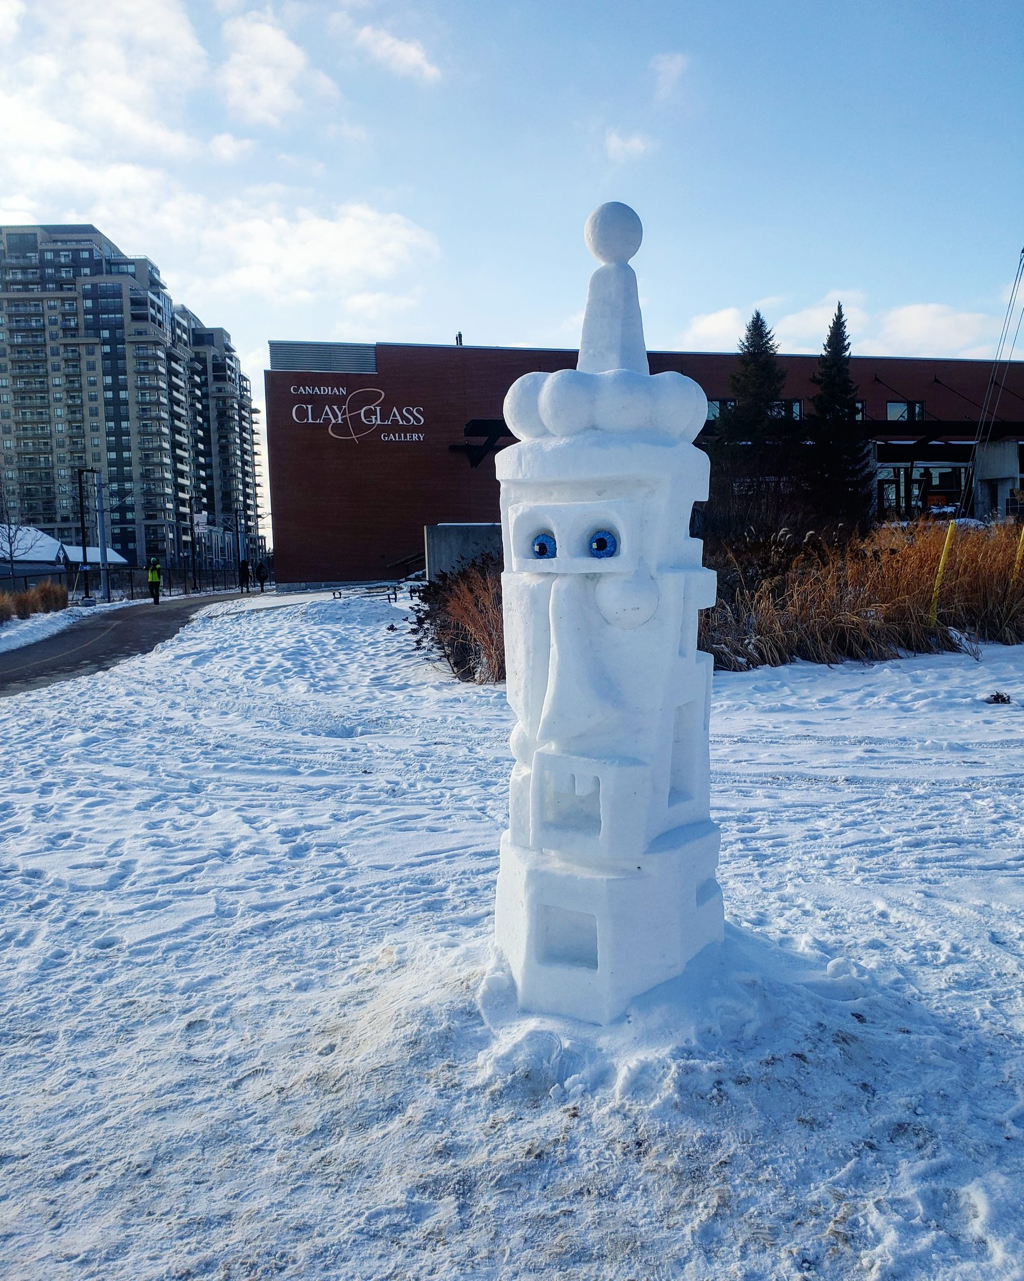
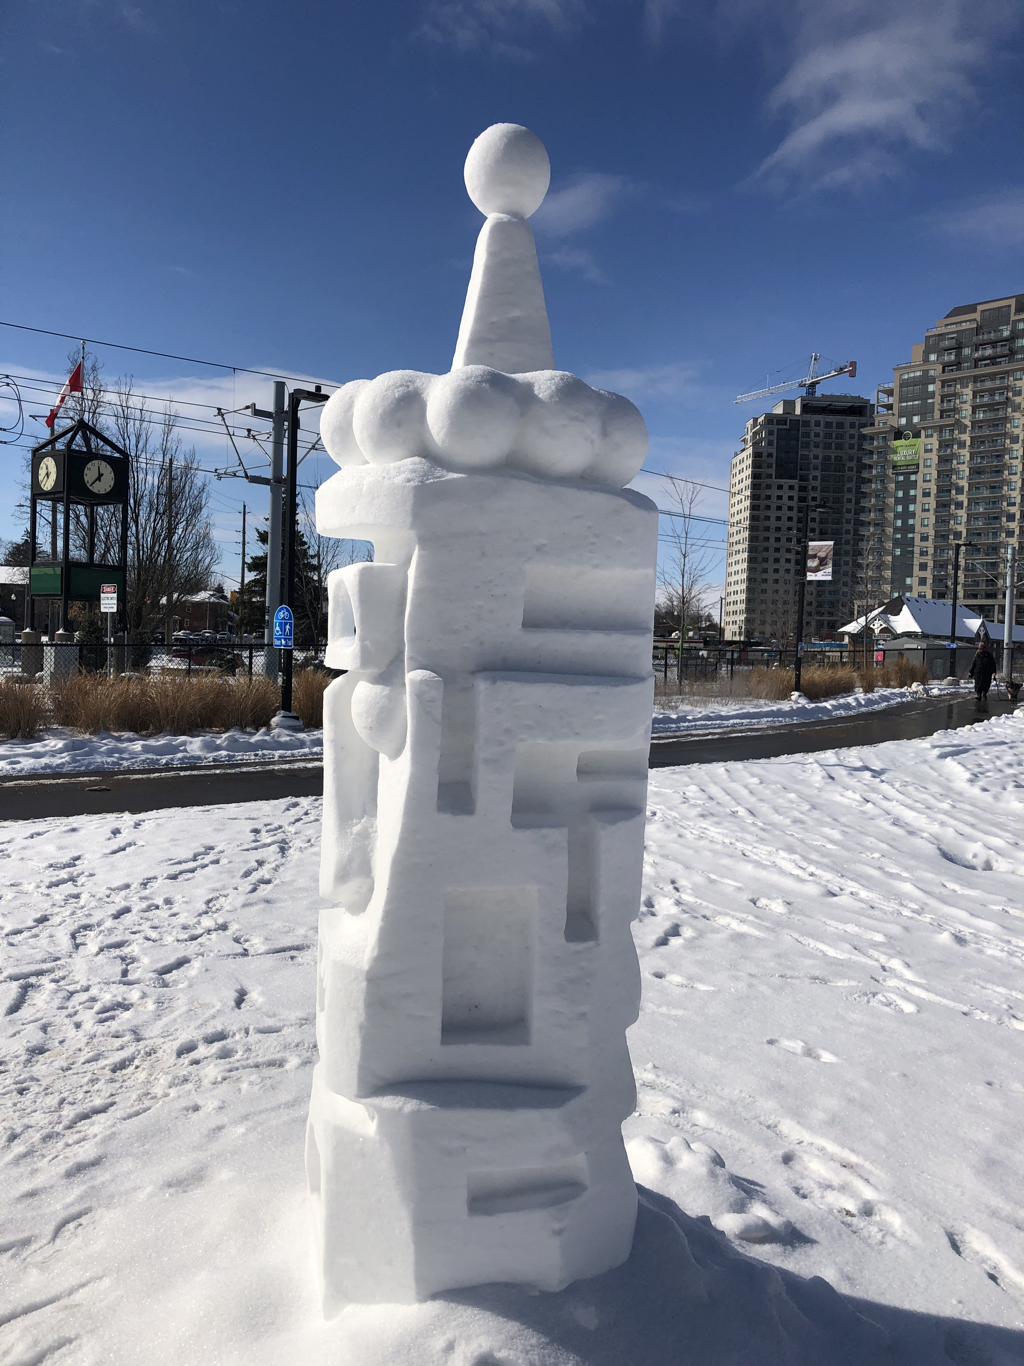
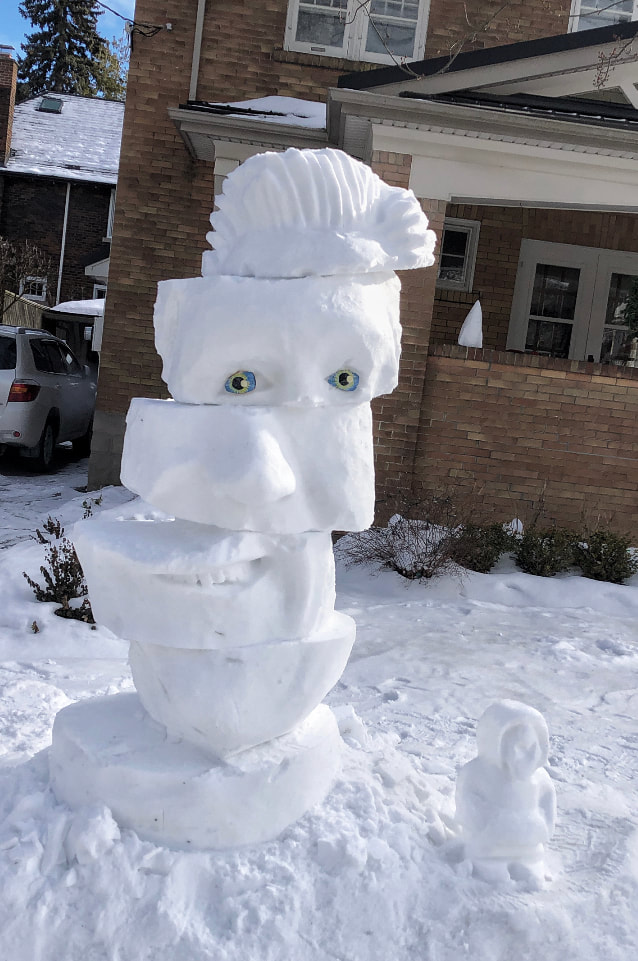
#11. Cubist exploration
February 9, 2021.
Today I carved my 4th sculpture for the City of Waterloo winter festival called Winterloo.
I started by collecting snow from the area and pounding it into a form. Later in the afternoon I began the carve.
I decided to use a Willysphere for the top edge and it took quite a while to make all the spheres. I added some large eyes I had turned on my lathe and then painted years ago. I really pounded the snow in and as of this writing it is still vertical.
This same week I had a great Google Meet with a grade 9 class from my old high school where I worked for many years, KCI.
|
|
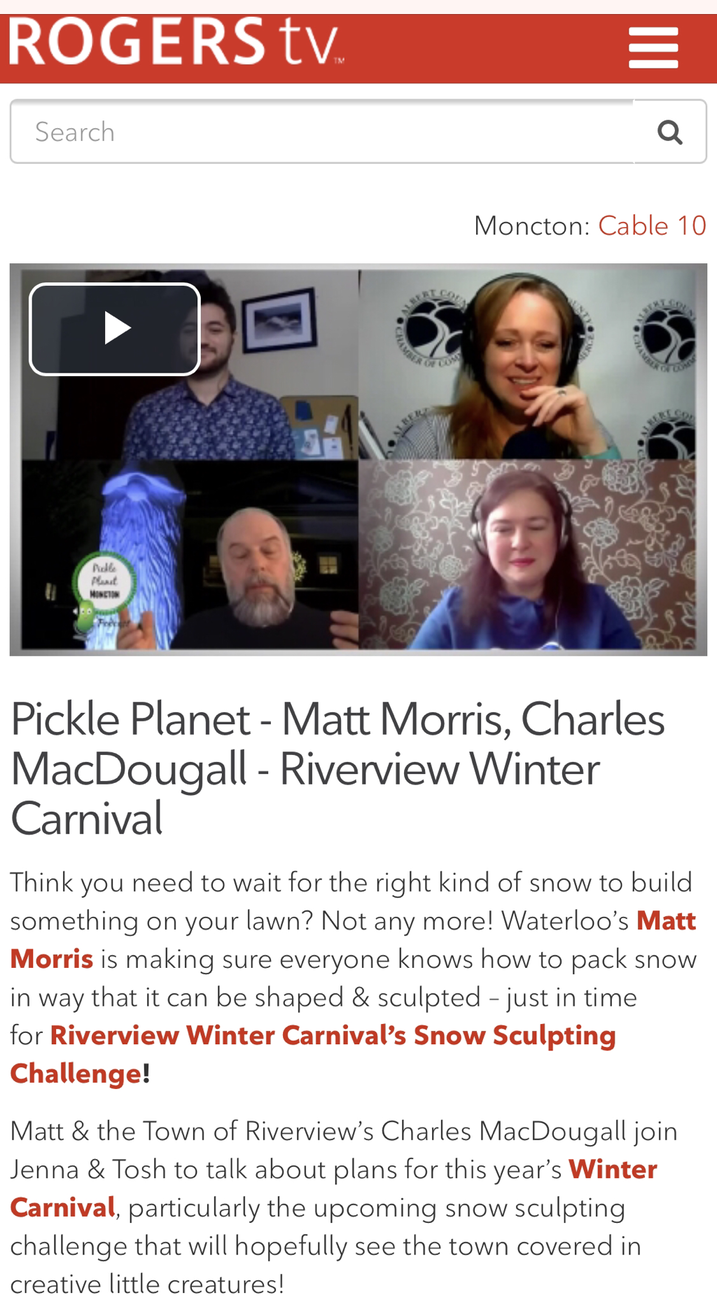
Riverview New Brunswick
|
January/February, 2021.
Riverview New Brunswick reached out and wanted to take advantage of my free resources. In the end they made over 300 of my QP7000’s and launched a gnome snow sculpting event. It was great fun to help them out. Click the video picture to view the video podcast where we chat about the event. |
|
|
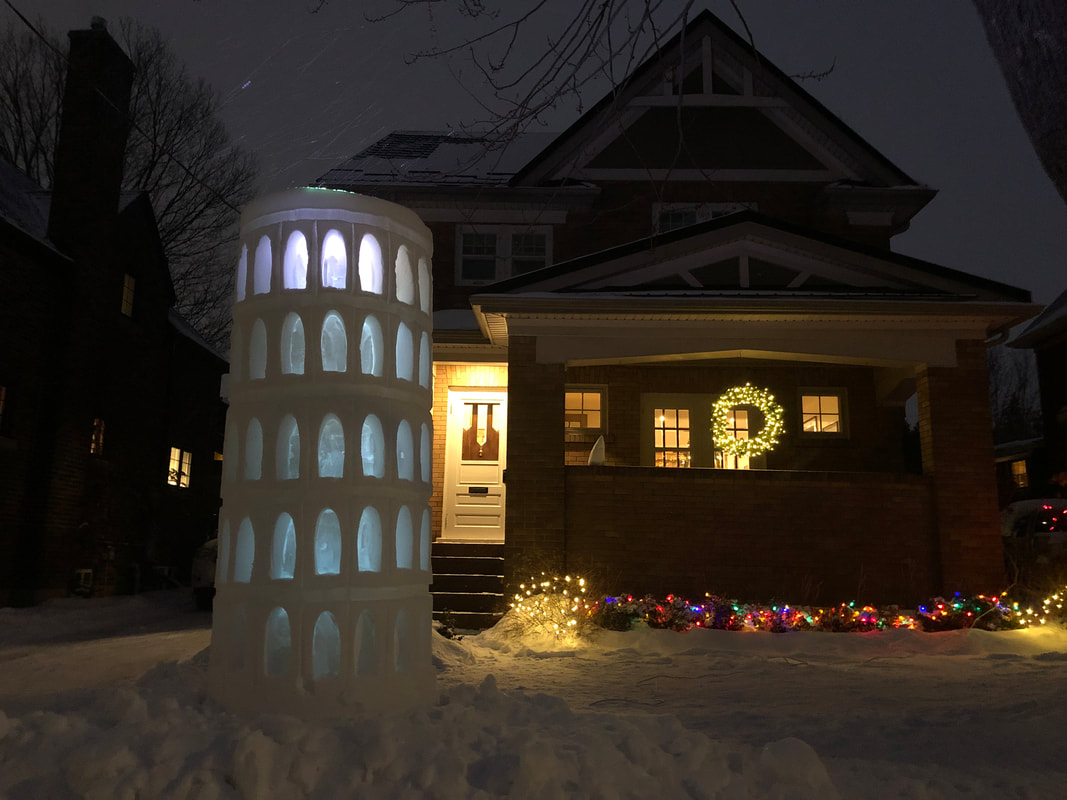
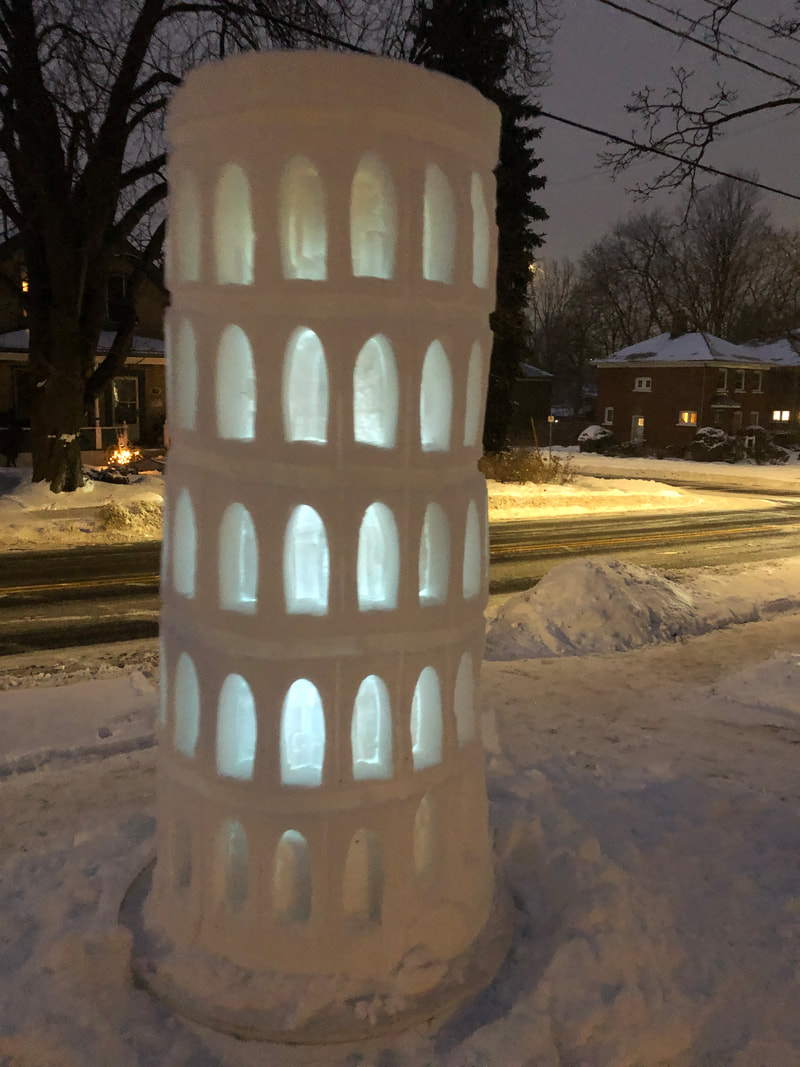
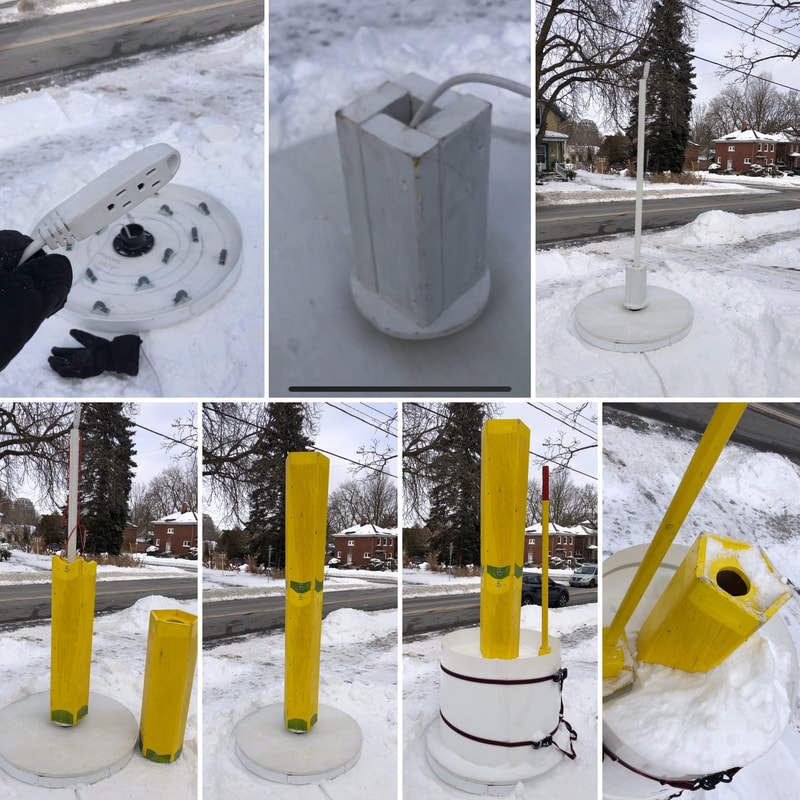
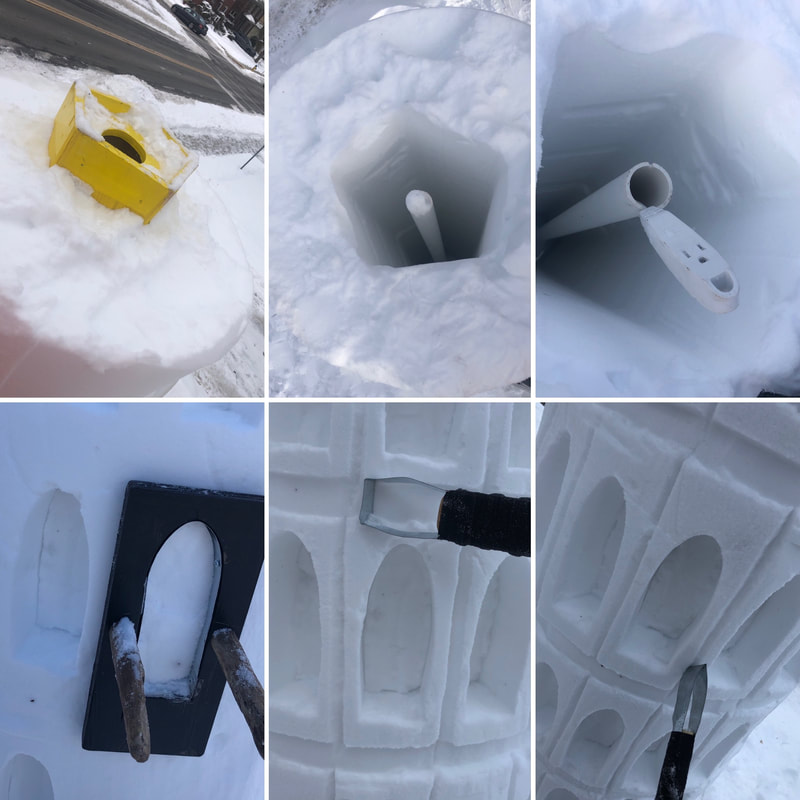
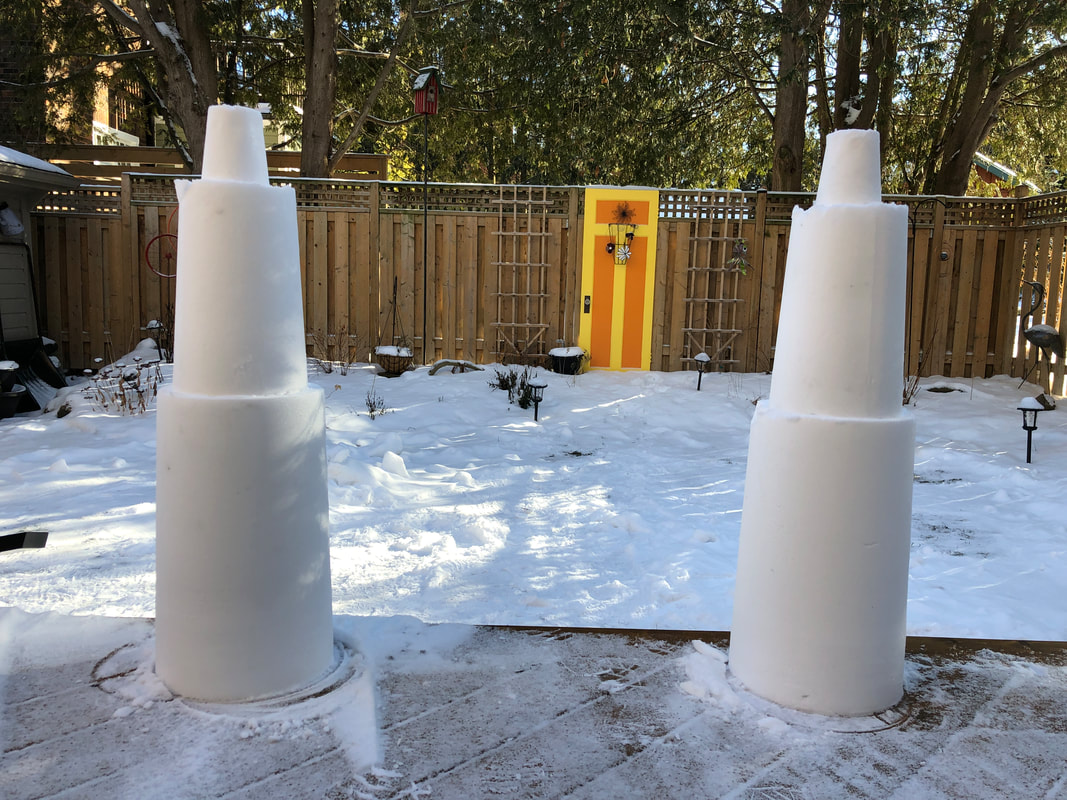
#10. Tower of Pisa
|
January 28, 2021.
I got a good start in the morning of Thursday and started preparing for a Tower of Pisa. The pictures will take you through the process. I put down a rotator, fed the power through the bottom and up the pole to the top. Then the yellow center void makers in two parts. I could never pull out one long sleeve, thus two parts. Then I filled it up with snow while packing. After a good lunch and rest, out I went to carve. I used all homemade tools for this one. It was a blast! And it rotated! YouTube video coming! that night I collapsed on the couch after this three day sprint of snow sculpting! |
|
|
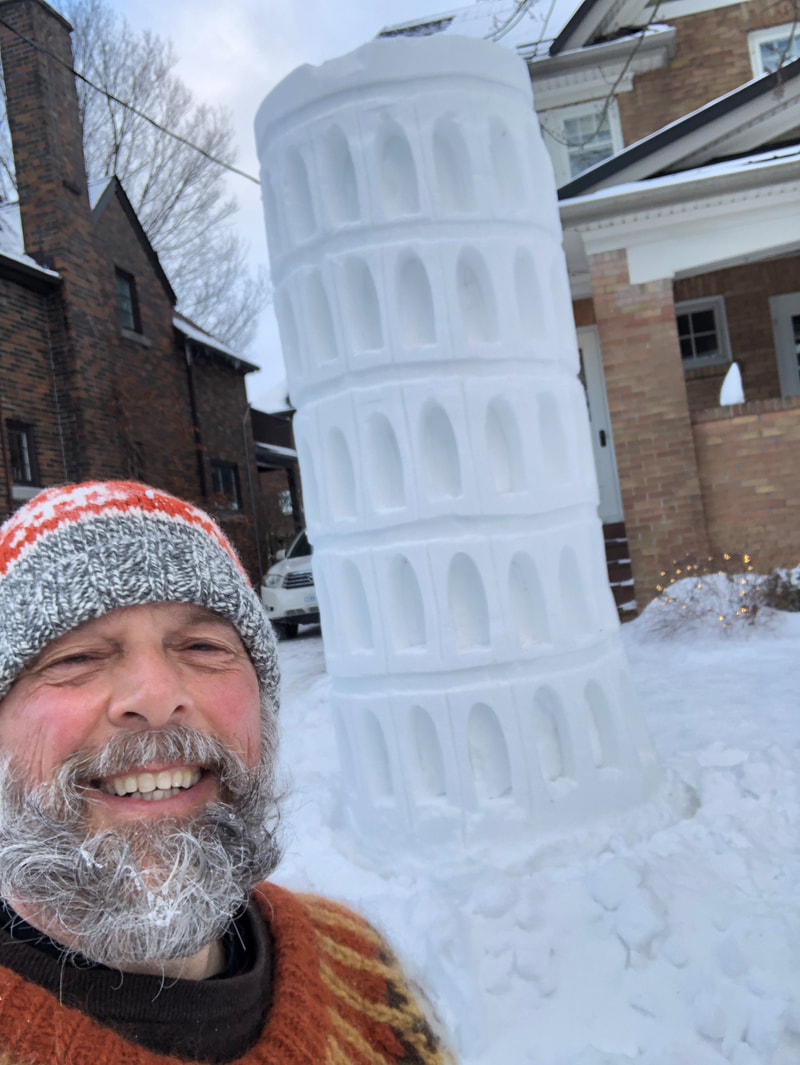
I wil call this my Covid, wild man out in the frosty weather beard!
|
|
|
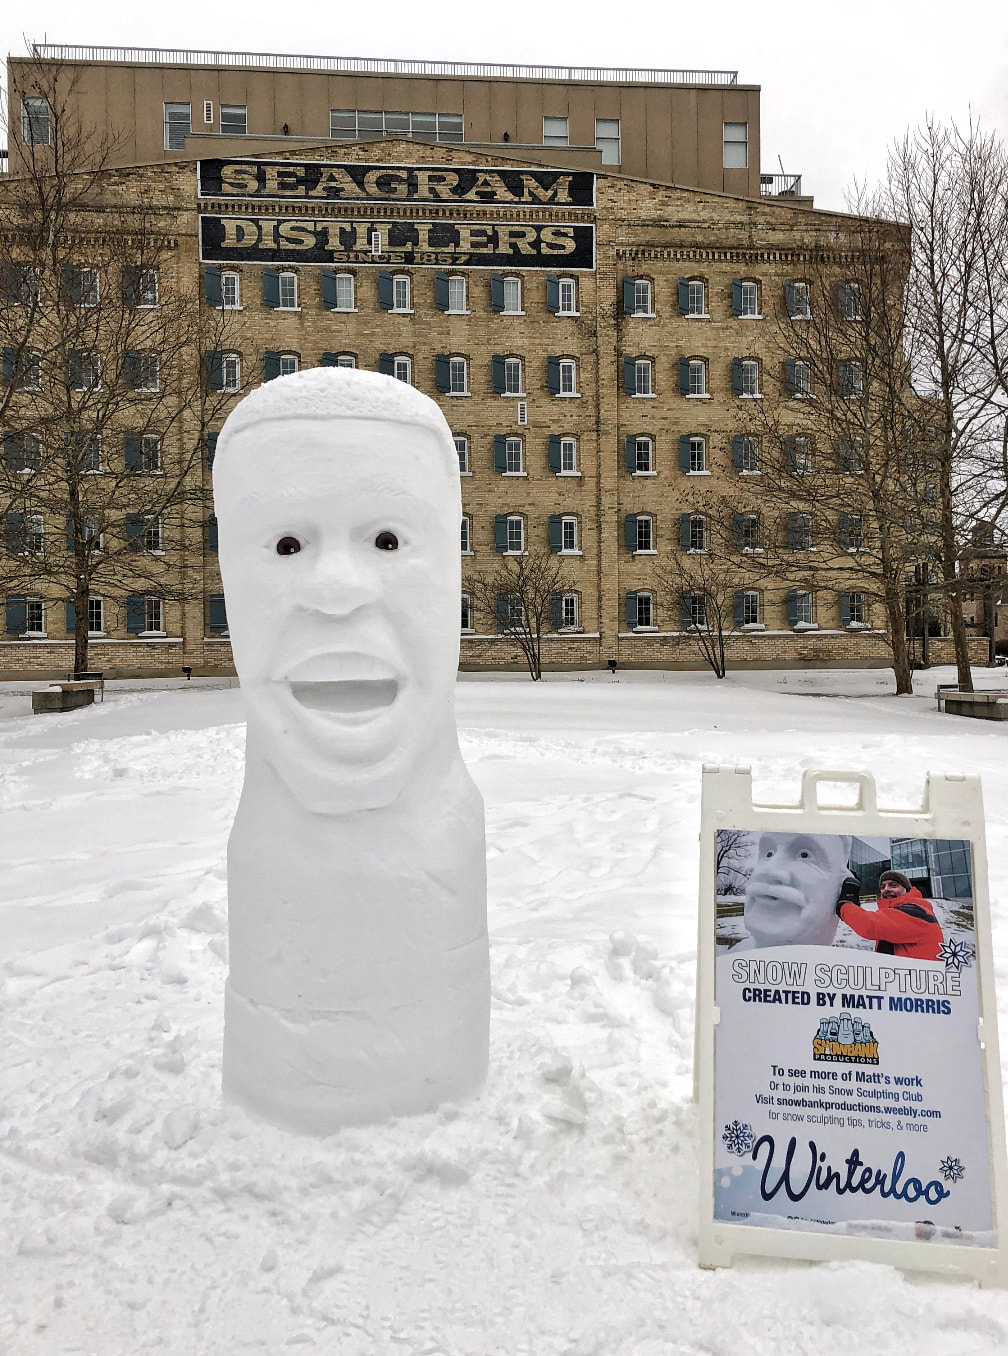
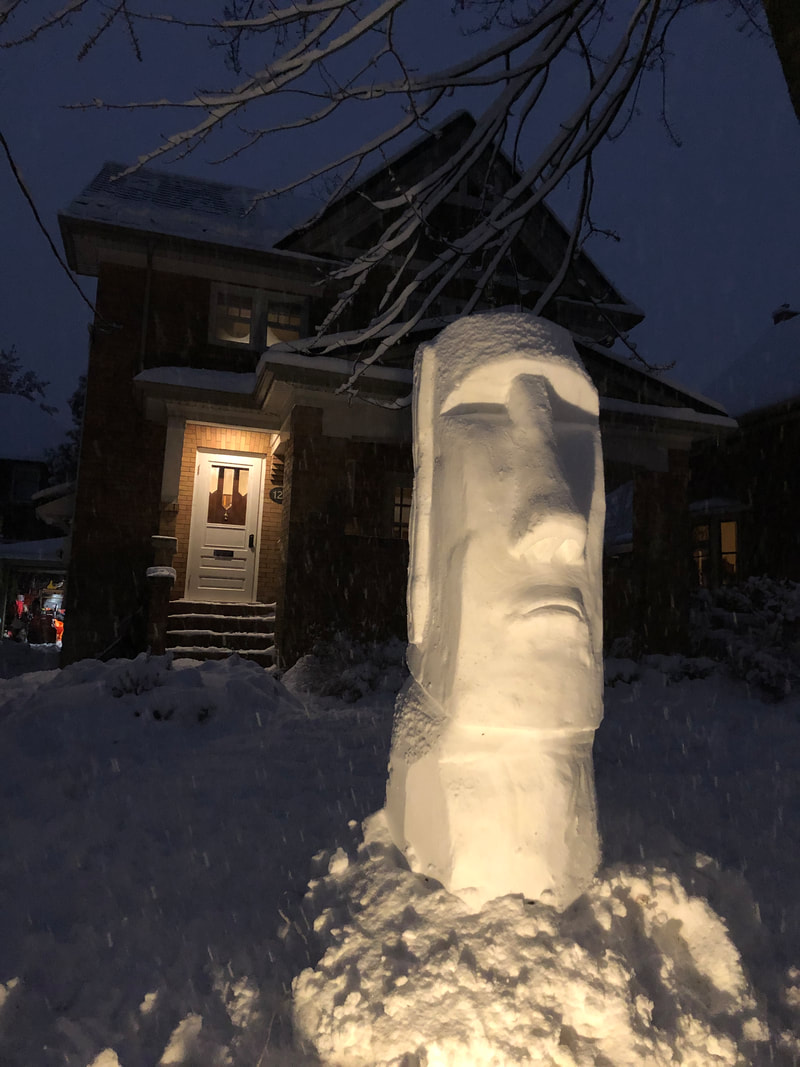
#9. Dan and Stoic double carve
|
January 27, 2021.
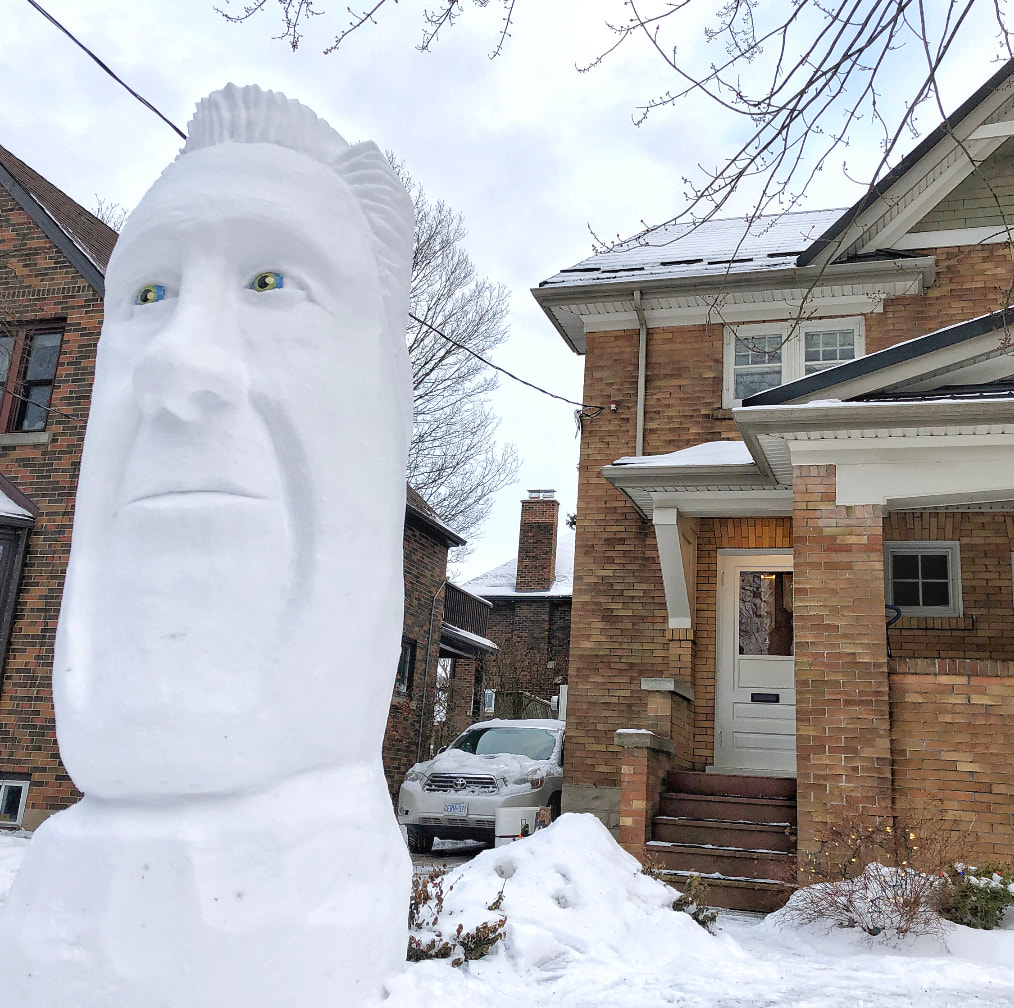
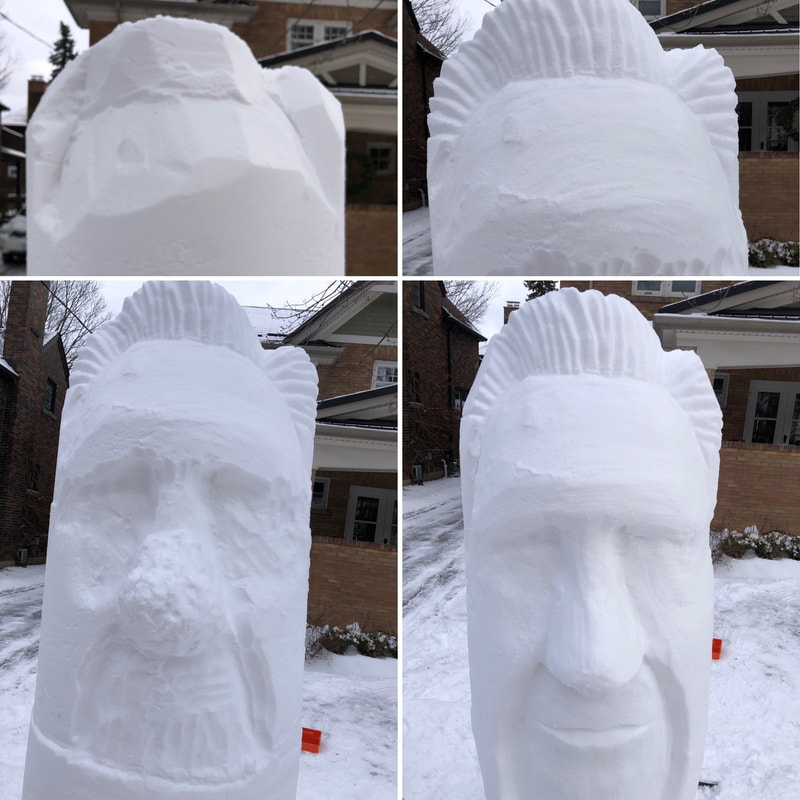
I headed out to Erb and Caroline the morning of Wednesday to put up a 5 section tower. It was just under 10'. I carved one side to point towards the traffic coming down into the Uptown, and the other side was a stoic figure facing the trail. The next morning, during a check on all the statues, I cleaned up the statue a bit. I smoothed the lower section, reduced the hair on the top right, and adjusted both facial expressions. On the dude, I made the smile a bit more like Dan Levy. On the Moai, I changed the frown to a small smile. As such, I can no longer call it a Moai, which is proper. |

|

|
#8. Kyle Lowry
|
January 26, 2021.
After carving the gnome I headed over to Caroline and Willis Way in Waterloo to carve my tribute to Kyle Lowry. The next day he would hit the 10,000 point mark, only the third Raptor to reach that mark. After the towers were up, we went home for some chili and then I returned later in the day to perform both carvings. |
|

|
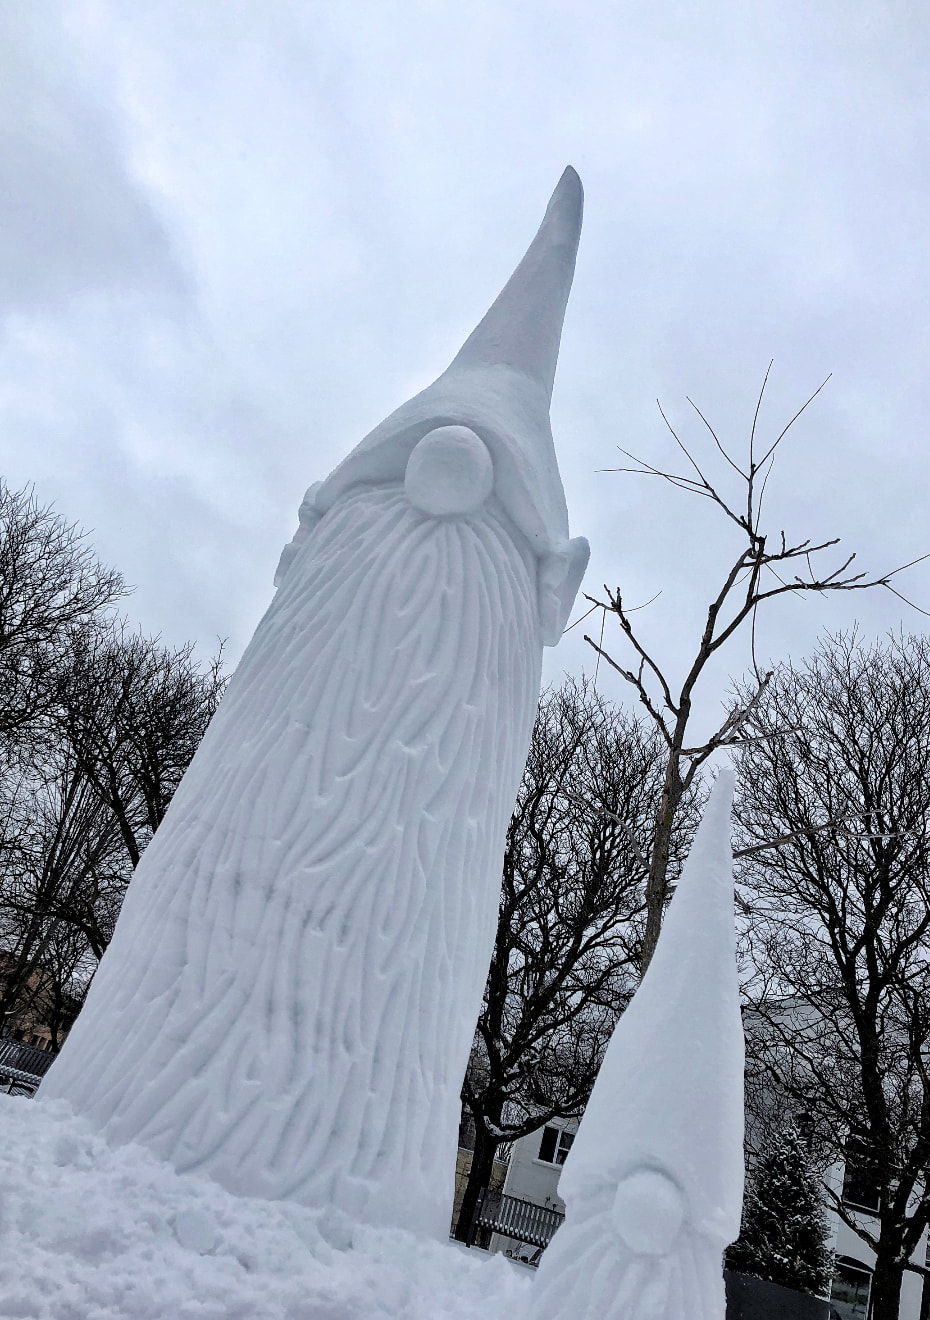
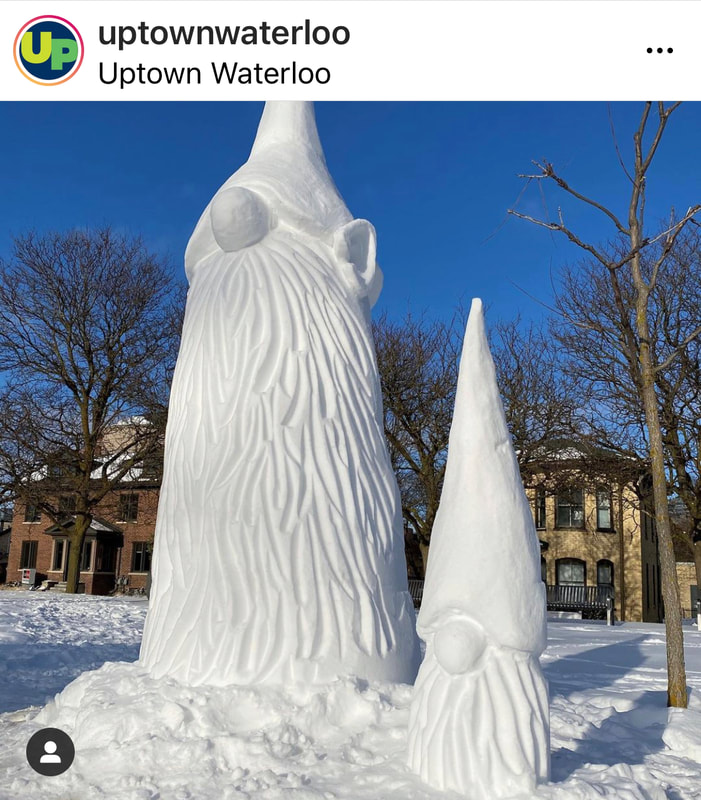
#7. Big and little gnome for Winterloo!
|
January 26, 2021.
We received snow, so I headed down to William and King Street in Waterloo to create a 10' gnome in support of the Winterloo festival. Lorna was such a great help with the snow scoop. We had the tower up in no time and used a 7 gallon pail and old maple syrup bucket to get some extra height. Then we headed to Caroline and Willis Way to put up another tower. This carving would recognize Kyle Lowry, our leader on the Toronto Raptors. |
|
|
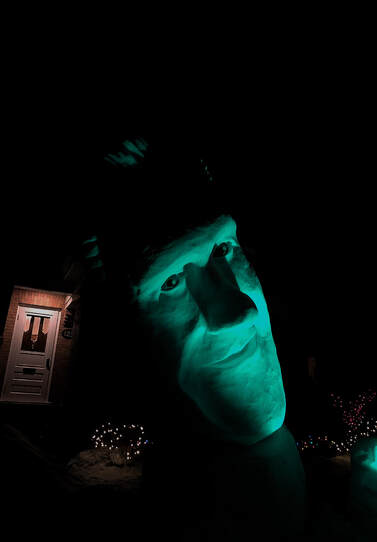
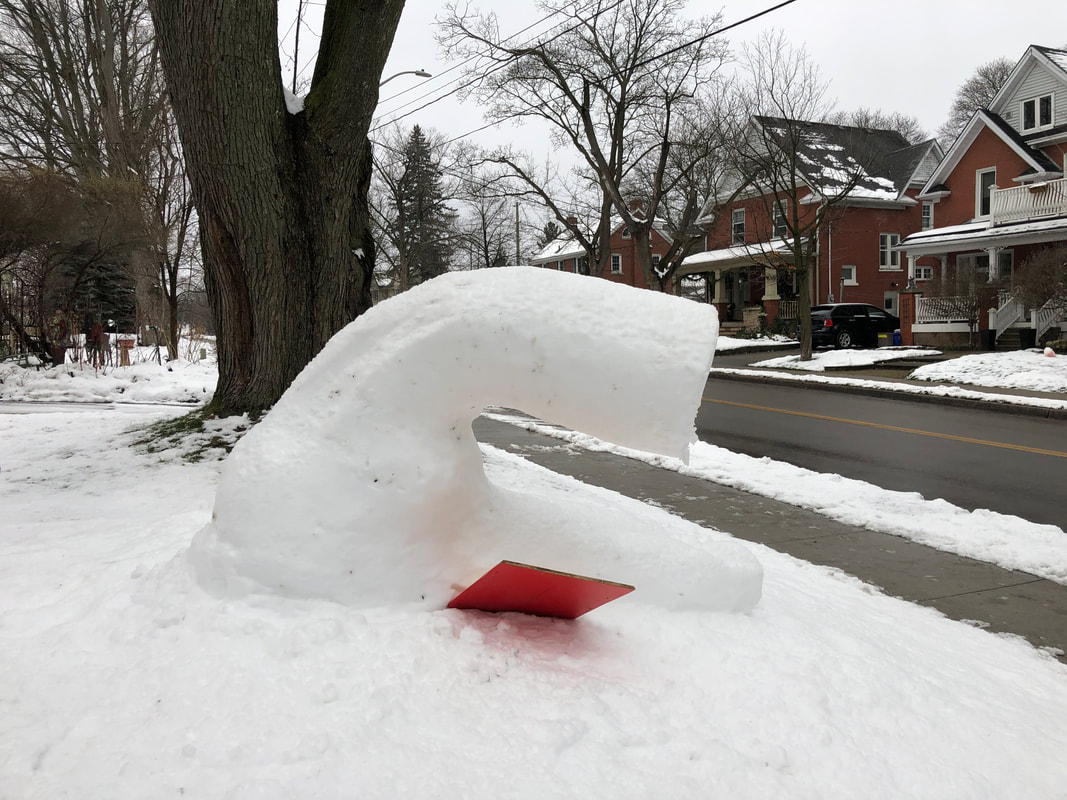
#6. Jay or Joe!
|
January 19, 2021.
A little bit of snow fell and it was time to build. I had not created a full face for some time, including eyes, and so it was time. I looked at all of my old maquettes and decided to recreate 'Jay'. I got out by 10:30am and had the tower completed by noon. It took every snowflake from our front and back yard. I then let it sinter while Lorna and I went for a socially distanced walk with friends. We were looking for a beaver in Waterloo Park that had been busy chewing trees to build a new home. I got back on the bank around 3:30pm and had Jay build before dusk. The next day, Joe Biden became President of the United States and some viewers thought my sculpture was of him. So I gave Jay a smile thus perhaps feeding the idea. I had taken a bit too much off the bottom left for his neck, and he therefore began his lean quite early. A number of viewers thought he was perhaps looking for a dropped contact lens. Others recommended a chiropractor. By Friday morning he gently touched the ground. |
|
|
|
|
|
|
Later, I went out to cut him up to add to the snowbank. But he cut into such beautiful pieces that I decided to create some modern art!
|
|
Just prior to this big carve, I was able to find enough snow to make a number of YouTube videos to support Snow Sculpting Club members. You will find them on the club part of this website.
|
|
Bonnpark Podcast
|
December 30, 2020.
I had a long interview with Sara and Graham about all things snow. We explored topics I had never been interviewed about before. It was a blast to do and I think their audience got something out of it. |

|
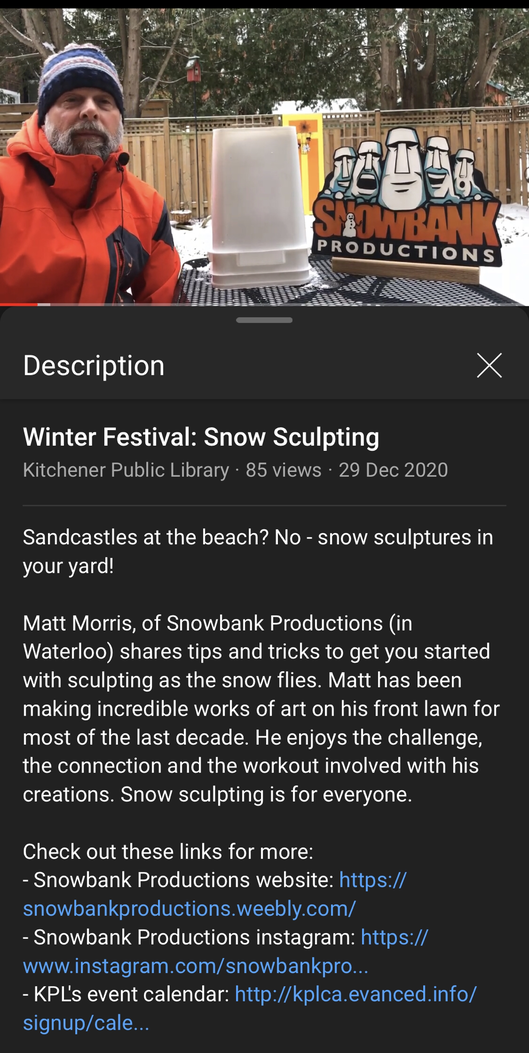
Kitchener Public Library
|
December 29, 2020.
I had filmed a video for Kitchener Public Library to support their Winter Festival. It was released on the above date and three registrants won one of my QP7000 pounders. The goal was to show people some ideas of how to have fun this winter in the snow. This link may still work. |
|
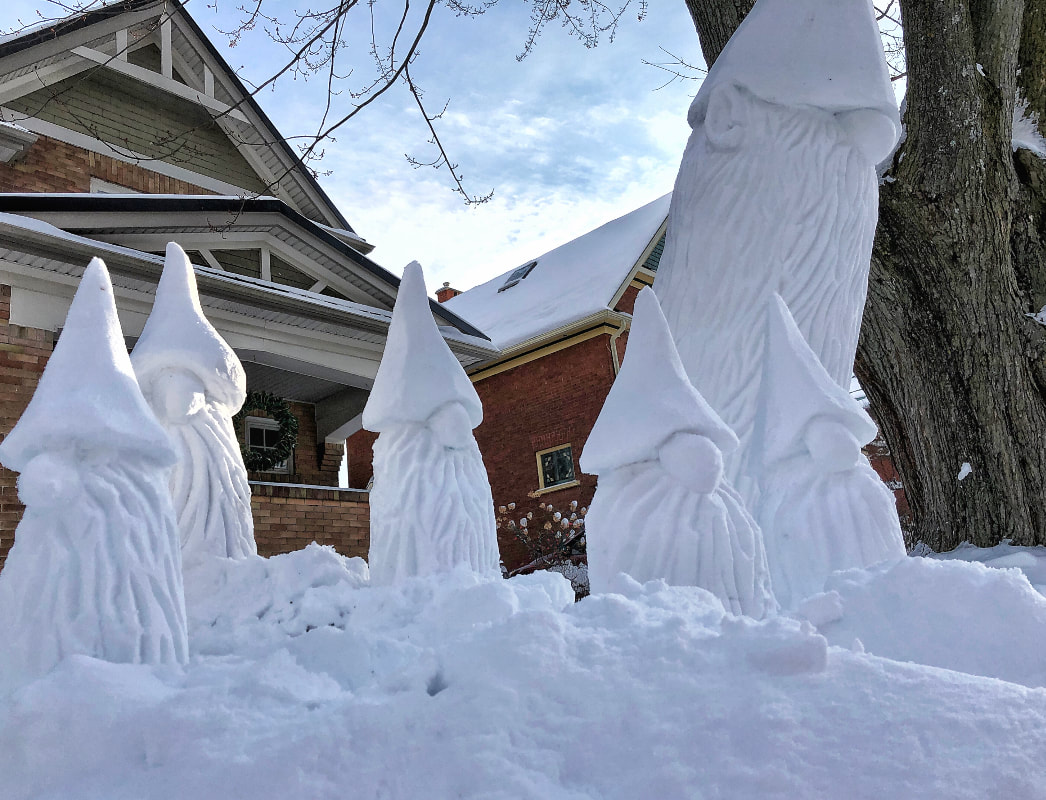
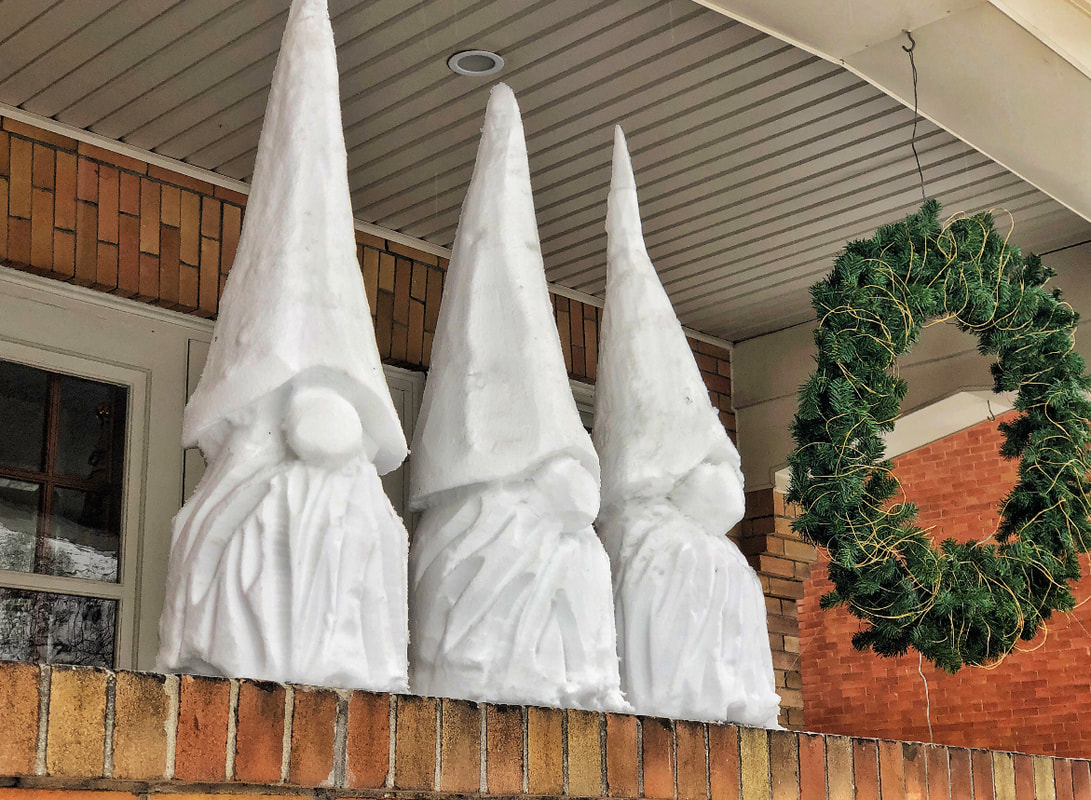
#5. Gnomes are SMALL!
December 27. 2020. Sunday.
I was shocked at the reaction to my 10' gnome. Apparently people love gnomes. Clearly I am out of touch as this has happened before with Baby Yoda and Among Us.
Not only was it popular, but I knew (from brief experience) that it was an achievable carving goal for members of my snow sculpting club.
Sunday began with a great xc ski with my friends Bill and Dean and a couple of other guys at Rockway Golf Course--an outstanding local place to ski. Once I got home, I had decided that I wanted to quickly make a video of me carving a minature (or actual size!) gnome and get it out there for club members. Warm temperatures were coming for Monday, and I knew we had a small window of opportunity. I was going to practice carve one small gnome and then film, but decided to run the camera anyways. It was a one take wonder, or certainly good enought to help club members. By 10:30am I had the video trimmed, loaded to YouTube and social media posts made. To my delight, a number of club members jumped on the idea and carved outstanding gnomes! Check out the #snowsculpting club hashtag on Twitter to see some of them!
After cutting the video, Lorna and I headed over to Westmount Golf Course where we had an awesome xc ski around the perimeter. What an absolutely gorgeous day--I've never seen more hiking tracks all over the golf course, or families sledding on the little hills. A perfect winter day.
My first small gnome carving which was the end point of the video I quickly made.
|
|
Lorna and I had a great xc ski during the process and later I would experiment with more gnome carvings. I’m seeing a lot of potential with gnomes for new snow sculptors. Such an attainable and cute/popular carve. So on December 29th, I refined shapes and experimented with forms. The pristine tower in picture 2 is so beautiful and was made with the 1/2” dusting of snow the night before. I carefully shovelled this ‘snow dust’ into the pail ensuring that I did not shovel any of the more crusty (icy) snow already hard on the ground. The beauty of a small gnome vs a 10' tower is that you can be very selective with snow collection. It didn’t take long. The experiments were performed using three containers--an amazing 7 gallon pail (30% bigger than a 5 gallon pail), a very old maple syrup bucket that I used 40 years ago to gather sap, and a used yogurt container. The maple syrup bucket was great. I had punched out the bottom to make both ends open. I filled it from the bigger opening and pounded the snow in with my mitten. To release it, I flipped it and just pushed out the plug of snow. Although this system seems ideal for small gnome creations, most club members will not have access to the (incredibly hard to source) 7 gallon bucket or an old maple syrup bucket. I do encourage everyone to experiment with different containers. My videos will likely stick with easier to source containers.
One last point of interest. I already call myself a speed carver as it's basically a necessity with snow sculpting. But I wanted to play with the idea of speed as it relates to the carving of a gnome. I had made a YouTube video for the process and linked that on Twitter for people to see. On Instagram, I used the IGTV feature to post the video which worked. But what if I could carve it in less than 2 minutes 20 seconds, which is the max in IG for immediate posting! Challenge accepted. I can currently carve a full (small) gnome in two minutes 14 seconds, but I'll refine that and eventually post. As I carved the last two gnomes today (12/30) just as the rain was starting to really come down, I was extra motivated to be speedy. I should have been recording.
The question, is--can I get my speed down to a point where my video title will be: "Gnome in 60 seconds"?
XC fun in the sun with Lorna!
|
After my xc ski with Lorna I made a few more smaller gnomes. They are so easy to carve! Have you considered making some?
|
|
|
I had created these towers for a special use, but then the rain forecast became eminent so I quickly carved them into gnomes. I put all three of the small (yet more pointy) gnomes in a protected spot on our front porch.
|

|
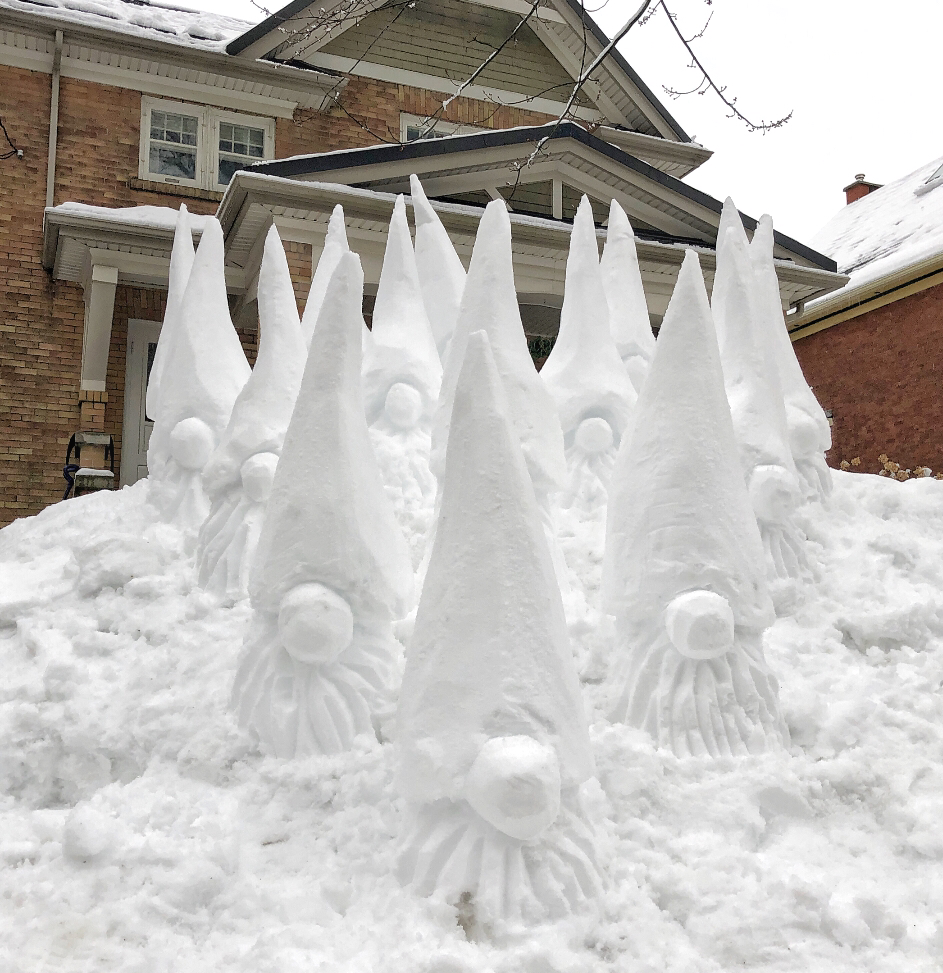
In early January I would make 15 more!
|
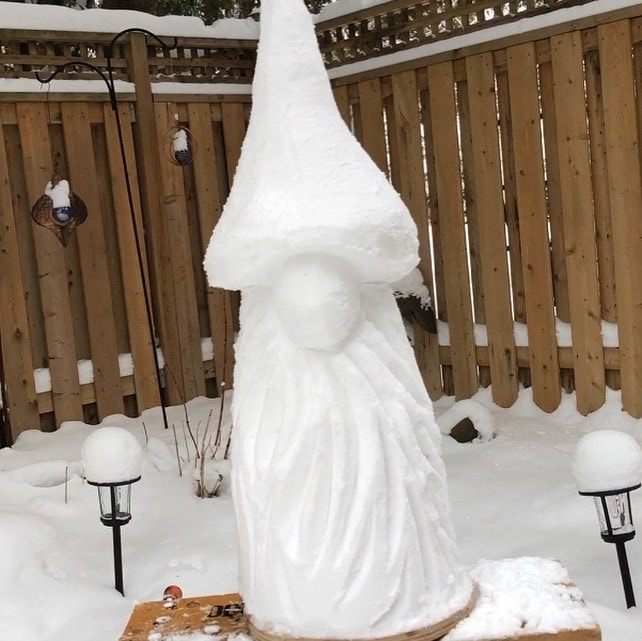
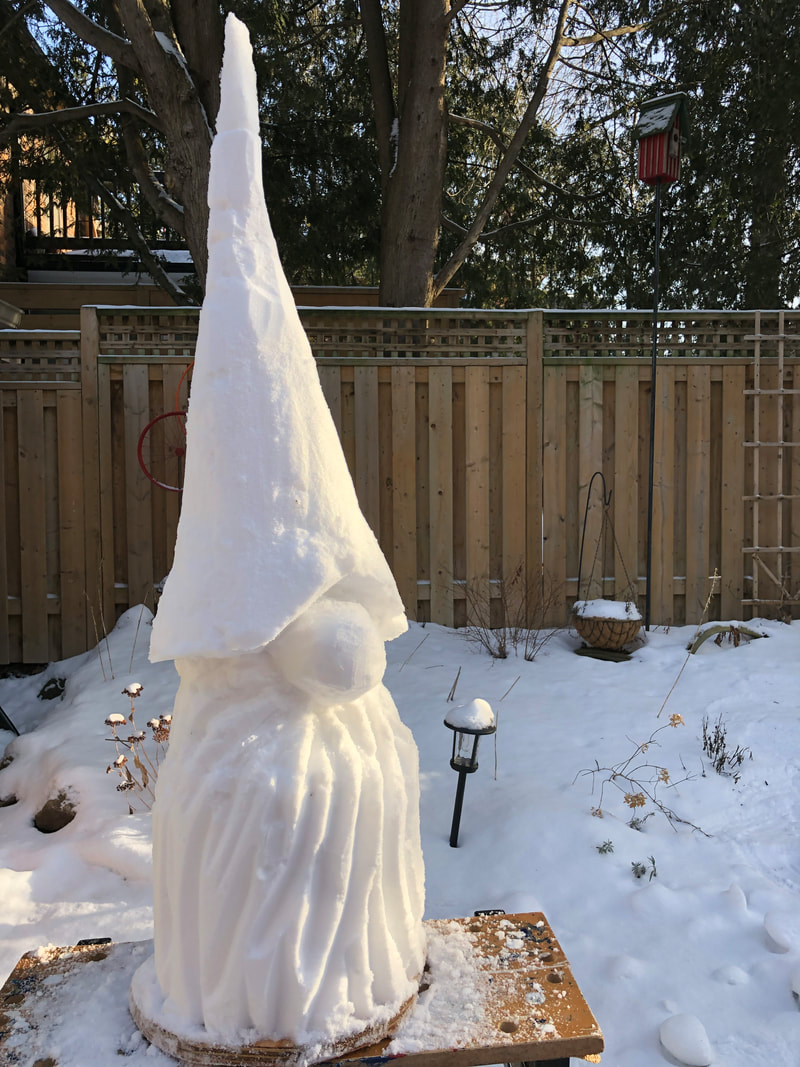
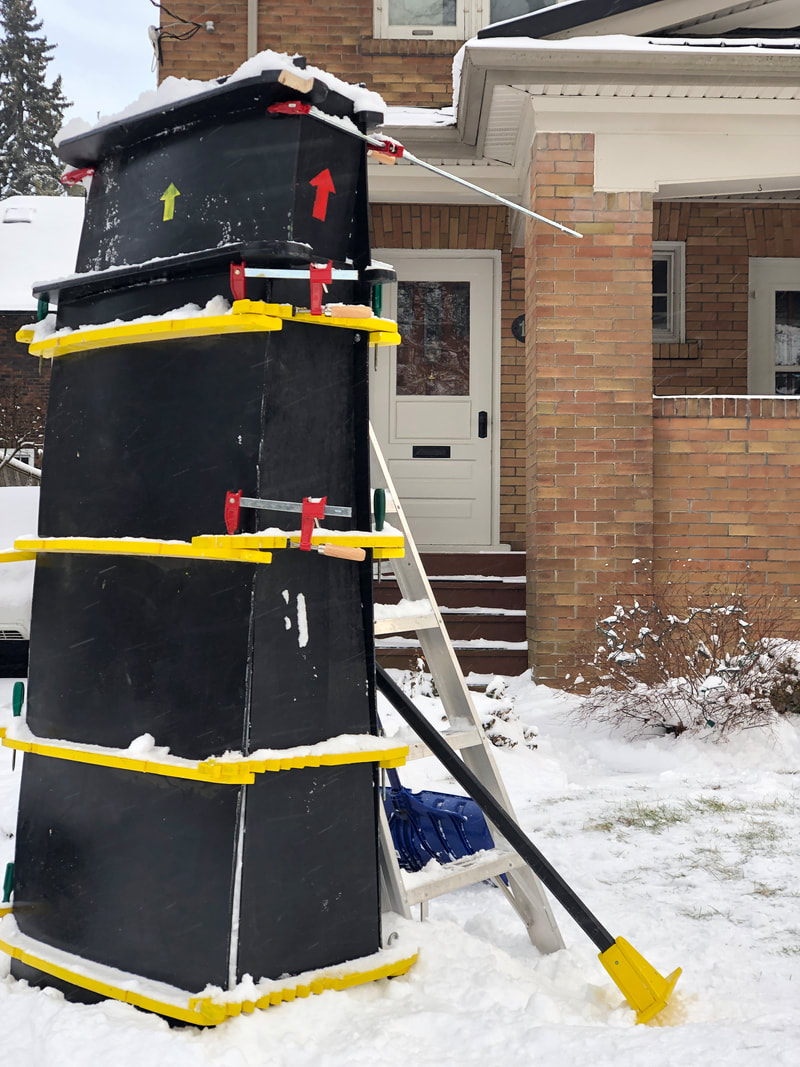
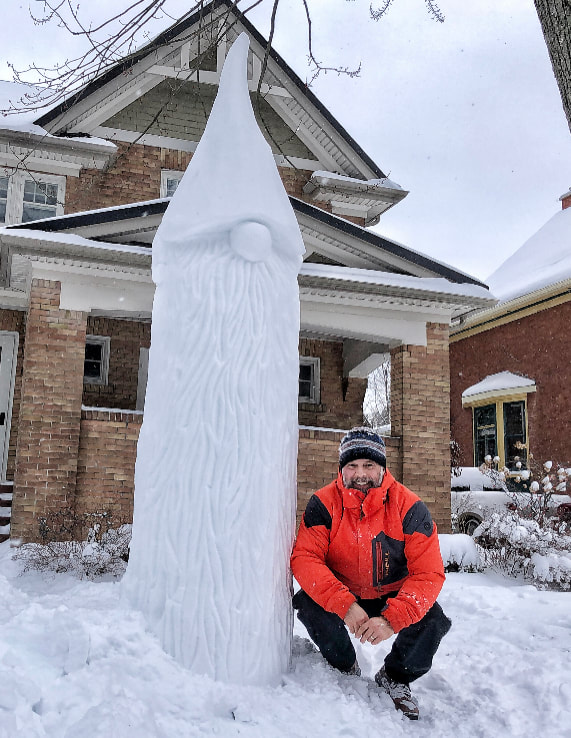
#4. Gnomes are BIG!
December 26, 2020. Saturday.
This story about my gnome is a multi-day story that involves a failed 'wall' and later, a successful gnome.
My wife Lorna and I, like most, had a quiet Christmas. These are the times.
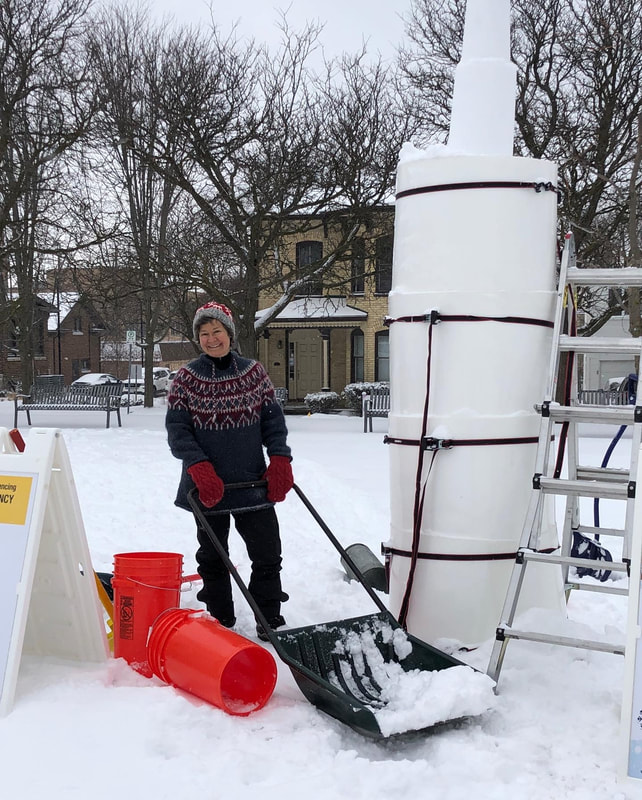
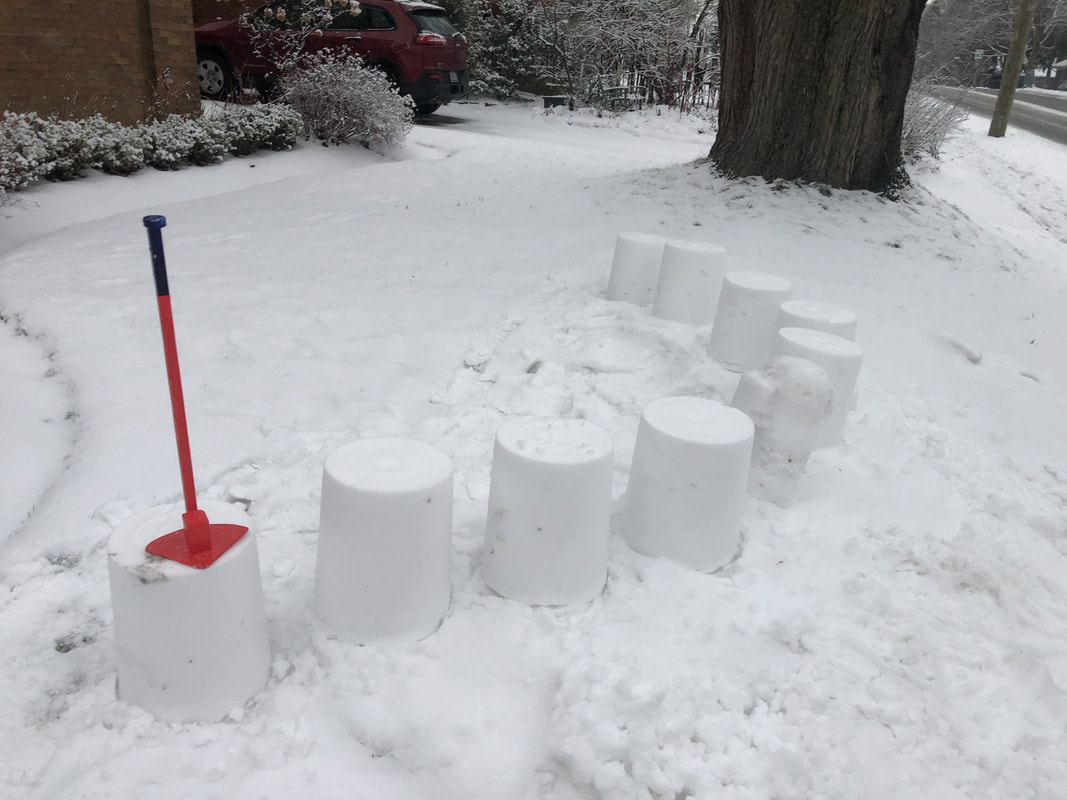
Later in the afternoon on the 25th, I went outside to set up a wall form. This is a fairly new type of build for me and involves building a section of wall and then sliding the form along. Previously, I'd used the form about three times, and this year the plan was to go higher. The first picture below shows the form with a small extension on top to allow it to go higher--it's the section with the red and yellow arrow pointing up. It should max out at 6'4". The first section went well and I slid the form along. But soon after, trouble with the build was brewing. So I pulled the plug for the day.
On boxing day I went outside again, determined to figure out what was going wrong. In the end, the wall fell down.
I remember that old saying "it's what you do after you fail that counts." My wall project was a disaster.
So I took a deep breath and thought about what I had learned. The approach to the wall needed more thought and a bit of engineering.
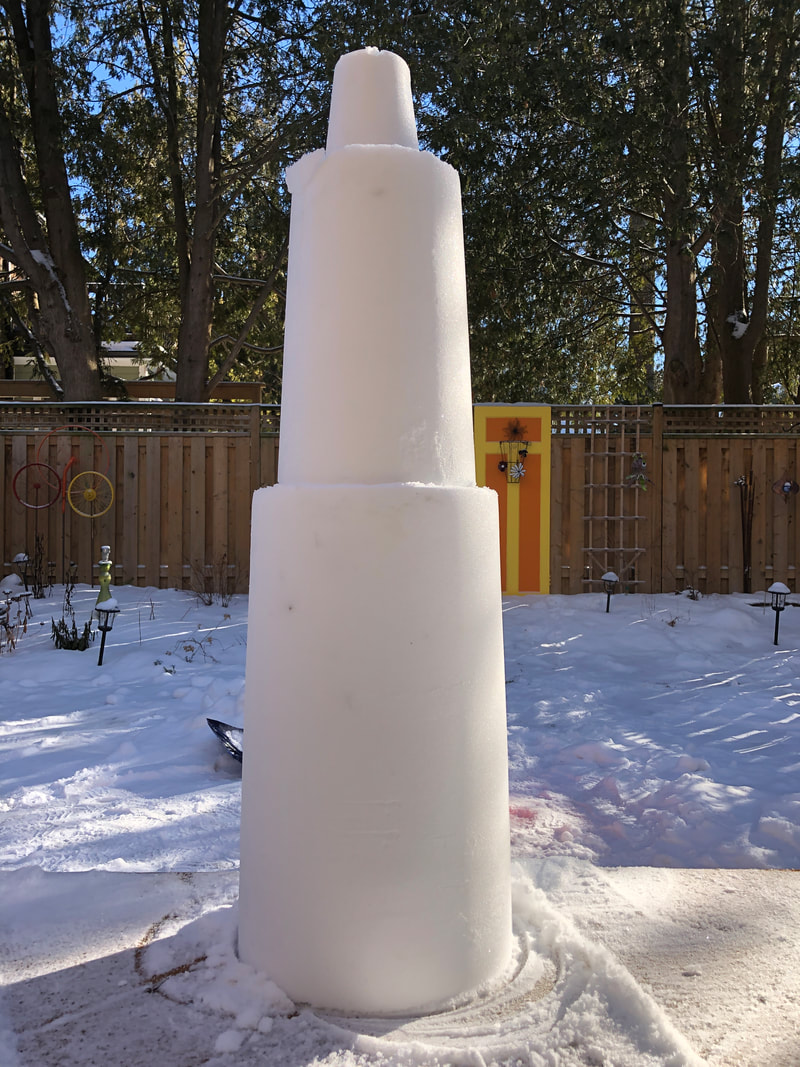
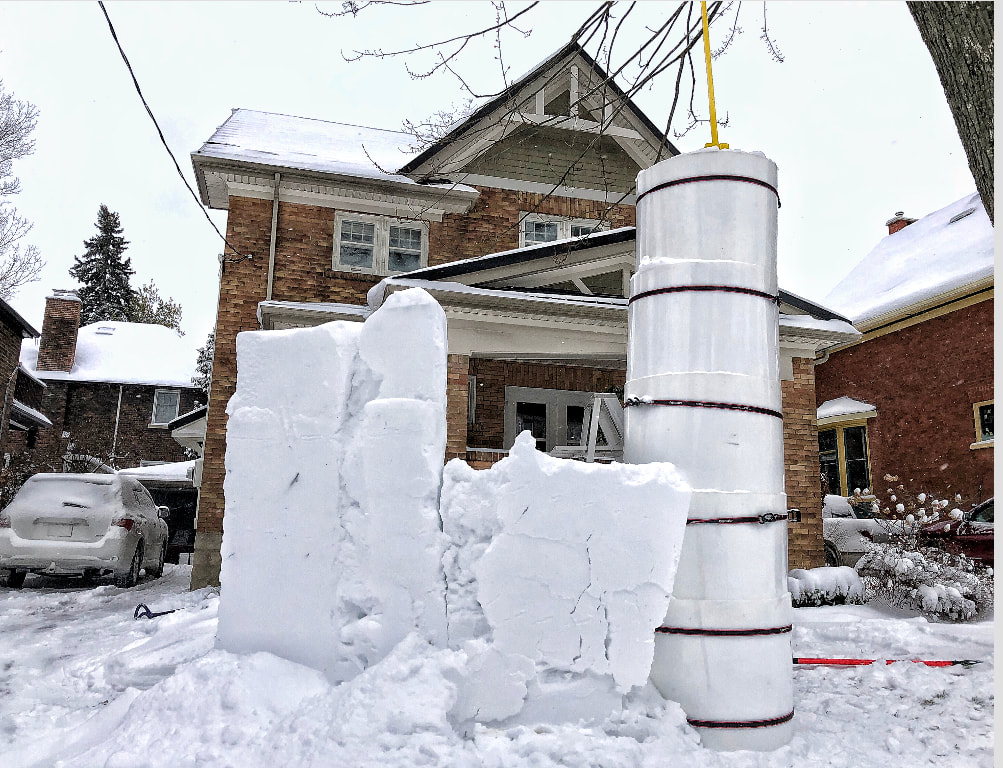
I decided to pivot to the building of a 9’ tall tower--that would later creep up to 10'. That extra foot was accomplished by putting an old maple syrup pail full of snow on the top of the 9' tower.
As my wife and I went for a walk while it sintered, we talked about what I would carve. I had prepared a maquette of a dude in overalls, but soon realised it was not compelling enough. I then began thinking of a wizard, but the conversation drifted towards the idea of a gnome. Lorna had a strong feeling that people loved gnomes. She was right!
This story about my gnome is a multi-day story that involves a failed 'wall' and later, a successful gnome.
My wife Lorna and I, like most, had a quiet Christmas. These are the times.
Later in the afternoon on the 25th, I went outside to set up a wall form. This is a fairly new type of build for me and involves building a section of wall and then sliding the form along. Previously, I'd used the form about three times, and this year the plan was to go higher. The first picture below shows the form with a small extension on top to allow it to go higher--it's the section with the red and yellow arrow pointing up. It should max out at 6'4". The first section went well and I slid the form along. But soon after, trouble with the build was brewing. So I pulled the plug for the day.
On boxing day I went outside again, determined to figure out what was going wrong. In the end, the wall fell down.
I remember that old saying "it's what you do after you fail that counts." My wall project was a disaster.
So I took a deep breath and thought about what I had learned. The approach to the wall needed more thought and a bit of engineering.
I decided to pivot to the building of a 9’ tall tower--that would later creep up to 10'. That extra foot was accomplished by putting an old maple syrup pail full of snow on the top of the 9' tower.
As my wife and I went for a walk while it sintered, we talked about what I would carve. I had prepared a maquette of a dude in overalls, but soon realised it was not compelling enough. I then began thinking of a wizard, but the conversation drifted towards the idea of a gnome. Lorna had a strong feeling that people loved gnomes. She was right!
Wall section 1 = success!
|
I slide the form along in preparation to build the second section.
|
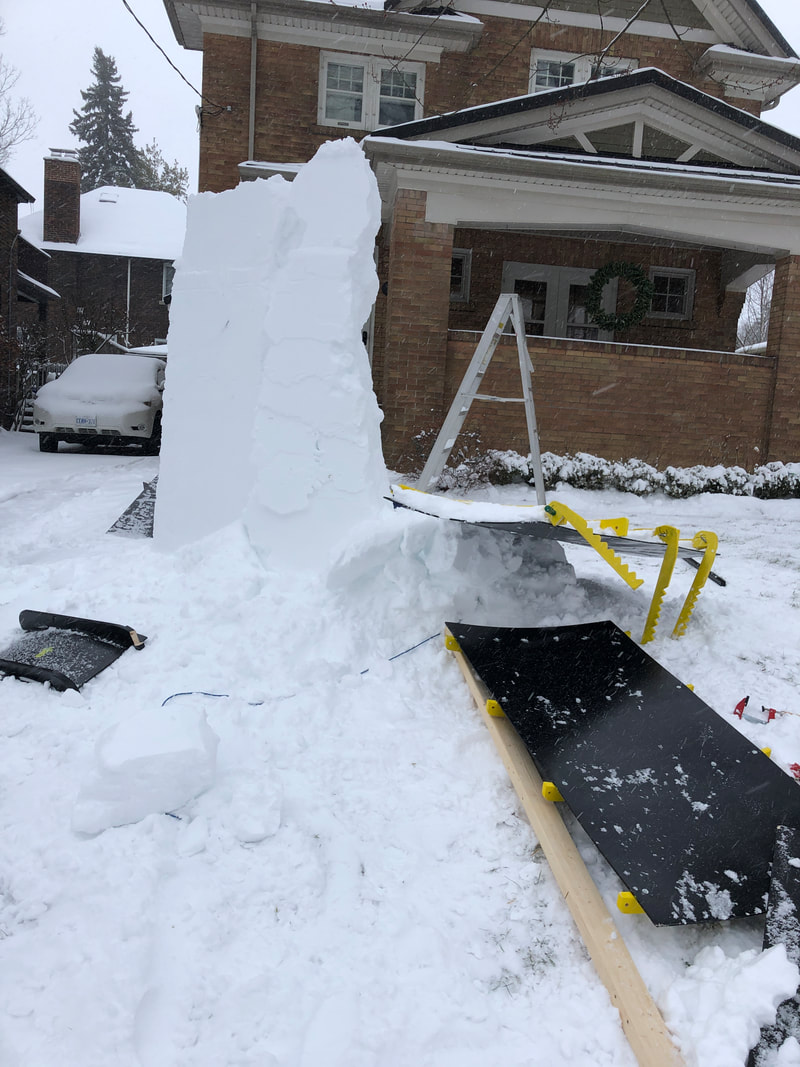
Disaster!
|
At right is a 5 section (9') snow tower rising from the ashes of the failed snow wall. Later I would knock down the remnants of the wall.
|
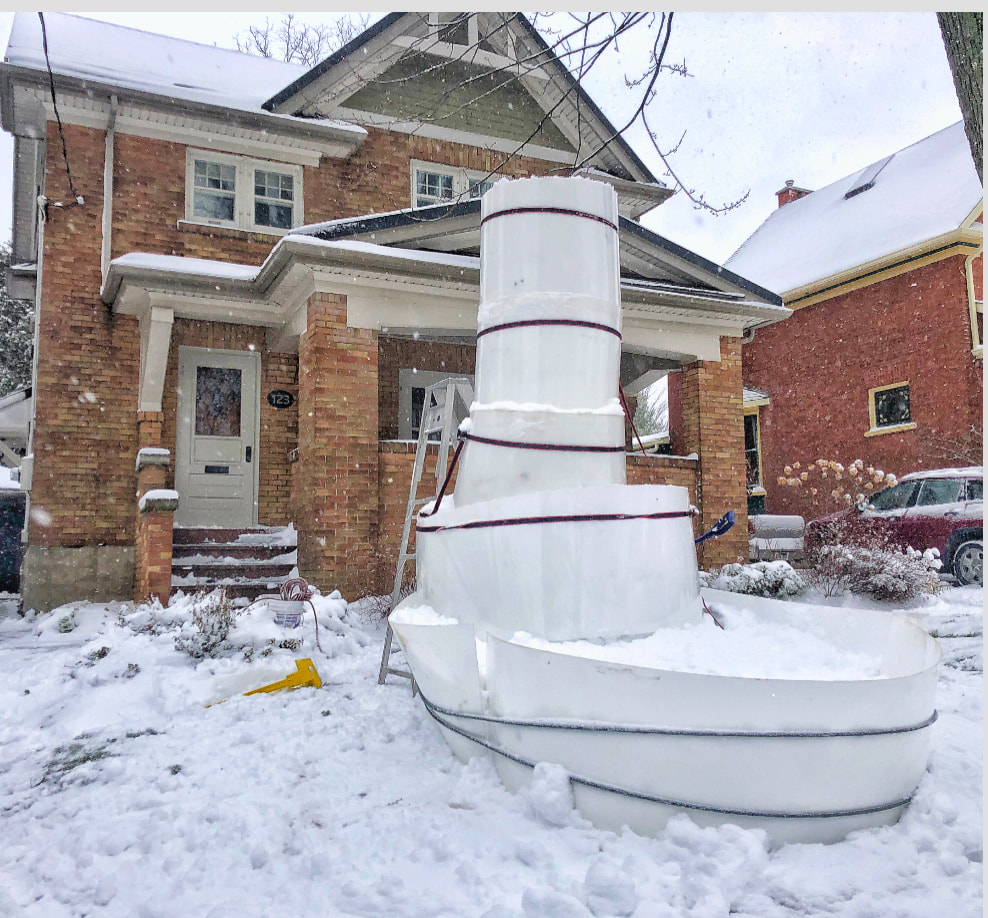
#3. CN Tower
December 21, 2020
I had pounded in a number of pails out front in preparation for something, but I wasn't sure what that would be. Then the big melt started to happen as you can see by the grass in view. So I went outside to knock them all down to help create the base for the next project. Just before I began though, I thought, "what if I can stack a few?" So I began stacking the somewhat melting pails of snow and up I went. Nine buckets later it became obvious what I had to make--a CN Tower! I had made one in the past but I believe this one was taller. The snow was very wet and therefore did not hold a line well, but I was OK with how it turned out. If you ever attempt this, note that the 'restaurant' takes much less width than you might think. The tower was 7’1” above our front lawn.
Two hours after I built it, I noticed a lean. And as I walked towards it to straighten it, the top fell off. It was a high risk build from the start.
|
|
#2. One foot of snow stomping on COVID
Tuesday, December 1, 2020.
A big day on the bank. I was motivated to create a sculpture to stomp on COVID. I had created feet before but this time I decided to put a sign underneath. I had a piece of plywood painted red from an old form. I taped out the letters CO and then ID. I ran my saw down the middle and stuck the two signs on either side underneath the sculpture. I dedicated it to the medical officers of health and their public health staff who are working so hard to help us get it right.
A big day on the bank. I was motivated to create a sculpture to stomp on COVID. I had created feet before but this time I decided to put a sign underneath. I had a piece of plywood painted red from an old form. I taped out the letters CO and then ID. I ran my saw down the middle and stuck the two signs on either side underneath the sculpture. I dedicated it to the medical officers of health and their public health staff who are working so hard to help us get it right.
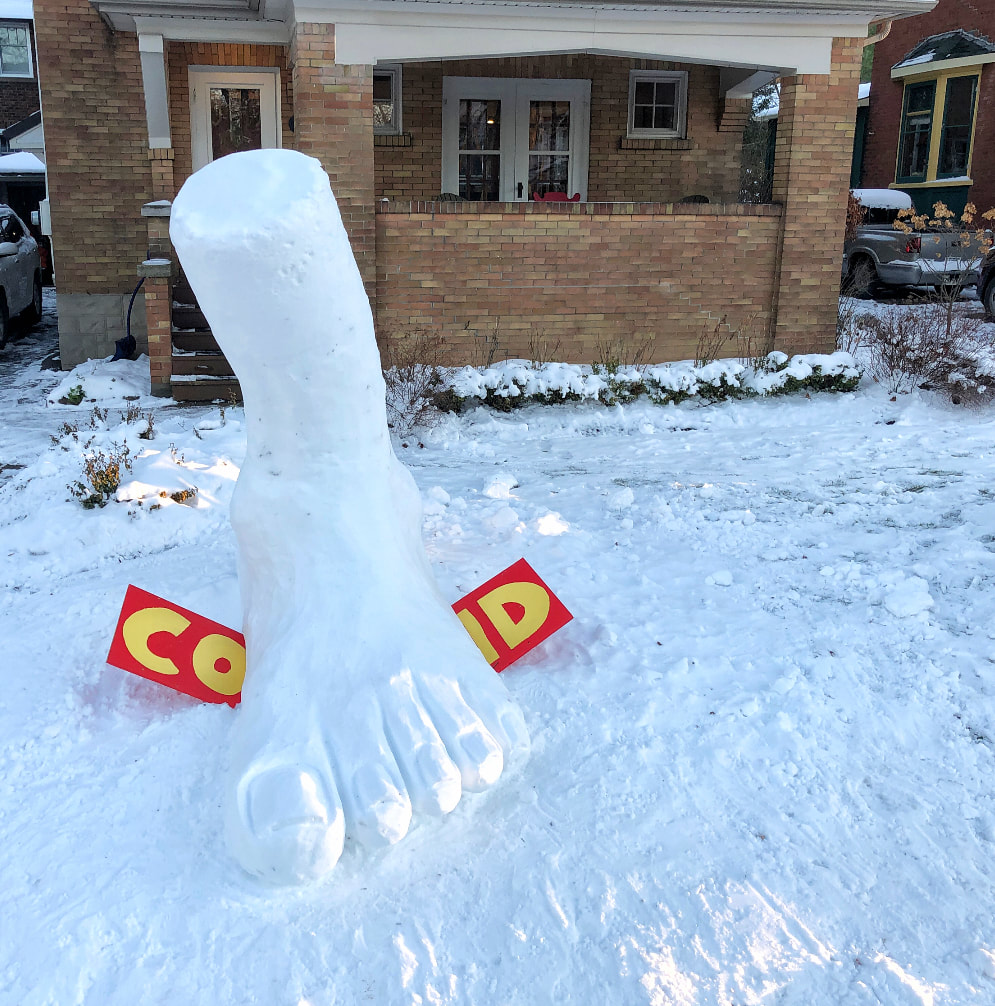
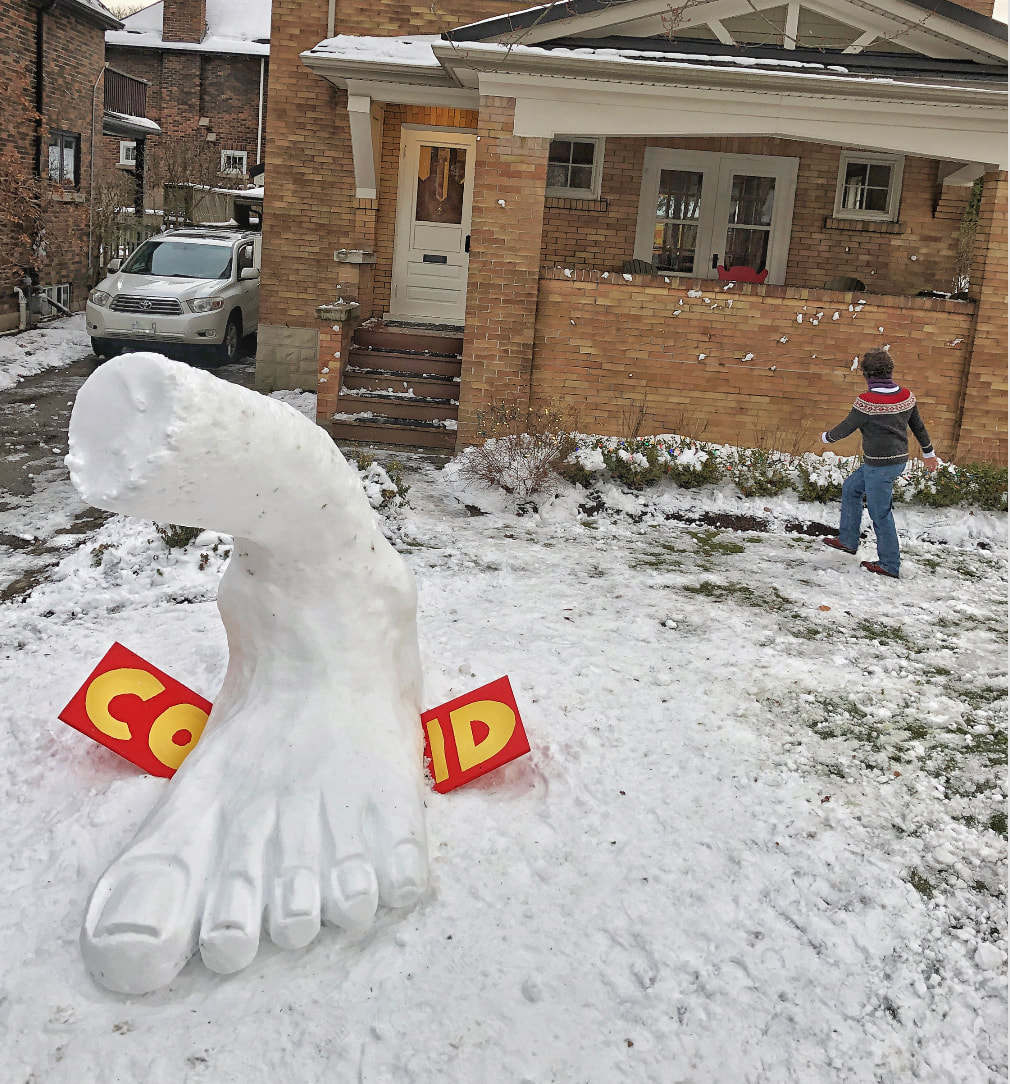
By the end of day 2, the leg had started to lean. Most of my sculptures do this. But the pressure on COVID was real!
Whoa! Hang in there foot of snow!
|
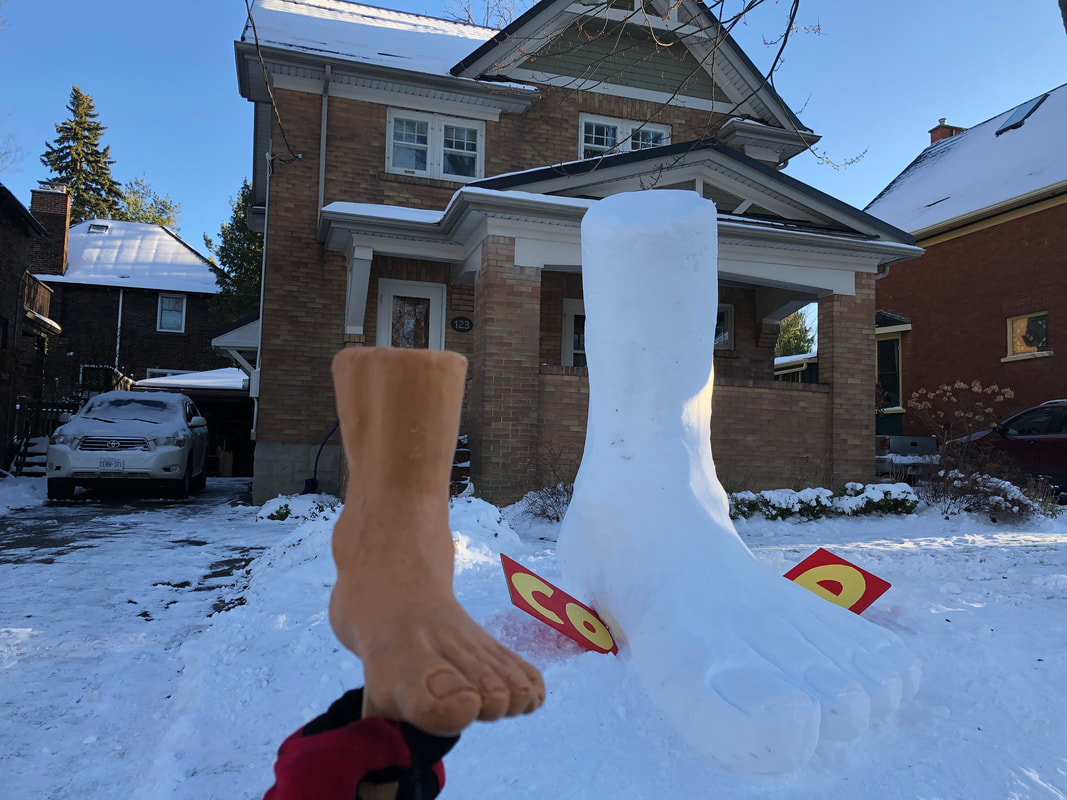
I had updated my 'maquette' of a foot to try and get the shape accurate. It certainly helped.
I used about 8 pieces of 2'x8', 2mm HDPE for the form. It was a lot of snow! To fill this big form took and hour and a half!
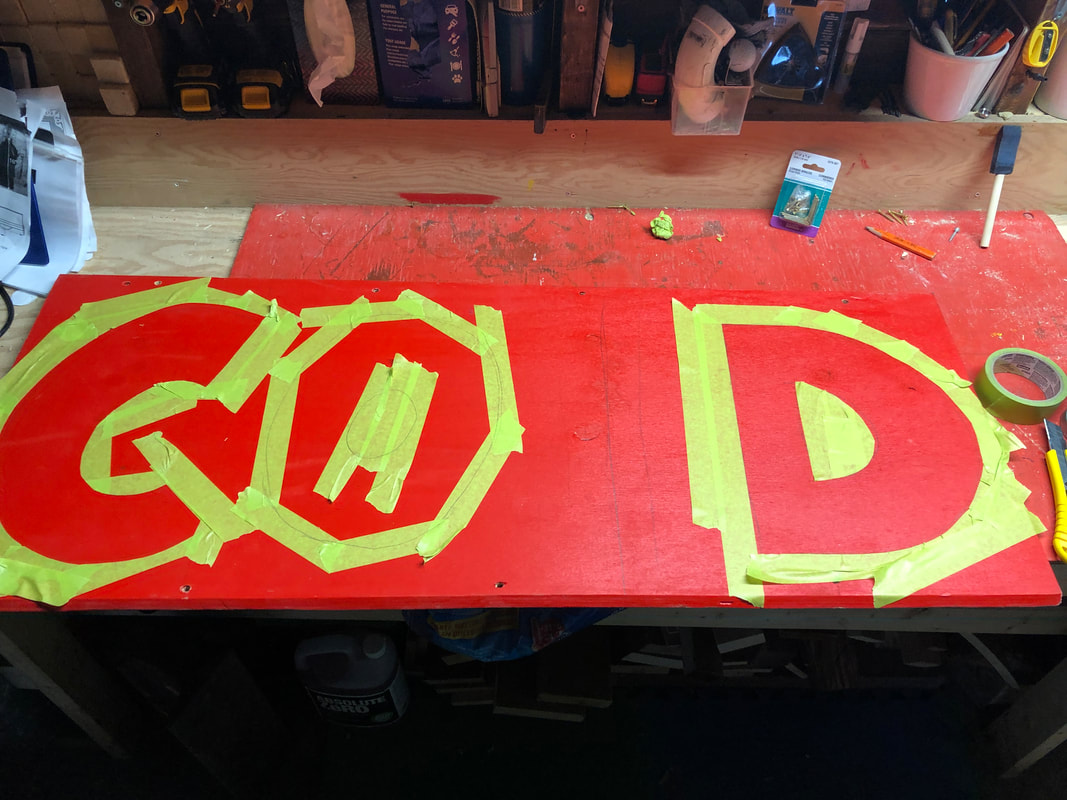
I quickly taped out the shapes of the letters I needed. I initially didn't include the I, but then my wife Lorna suggested it was needed. She was right!
|
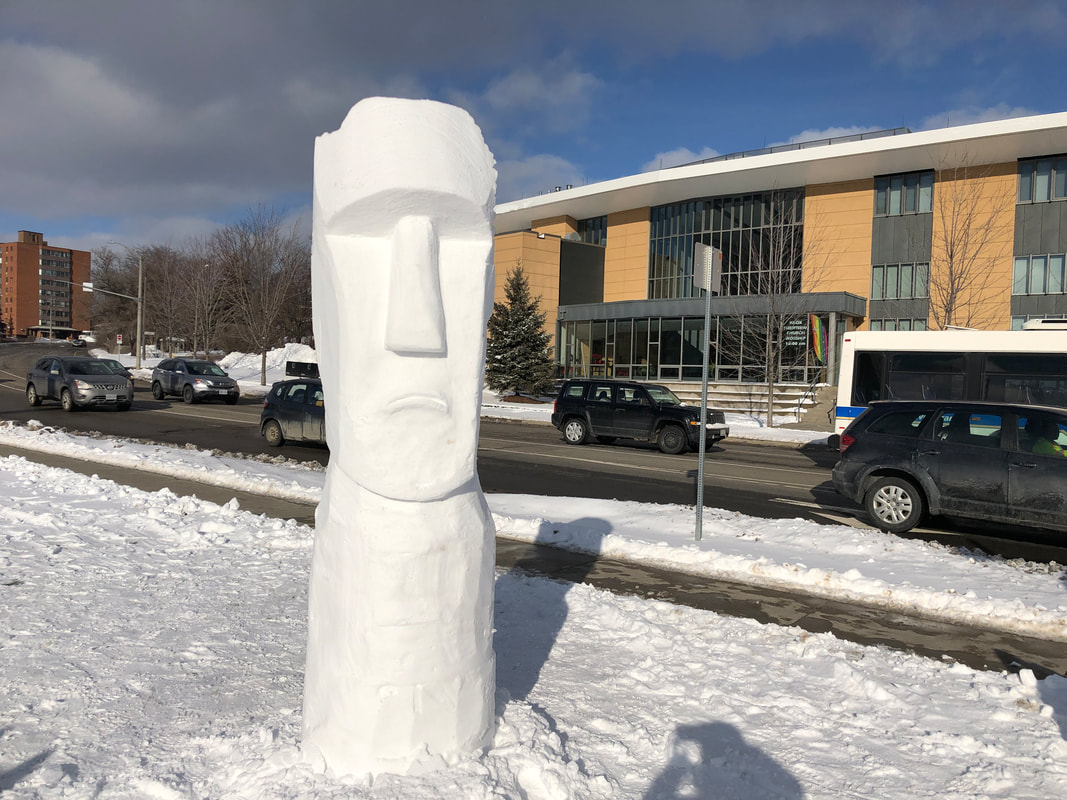
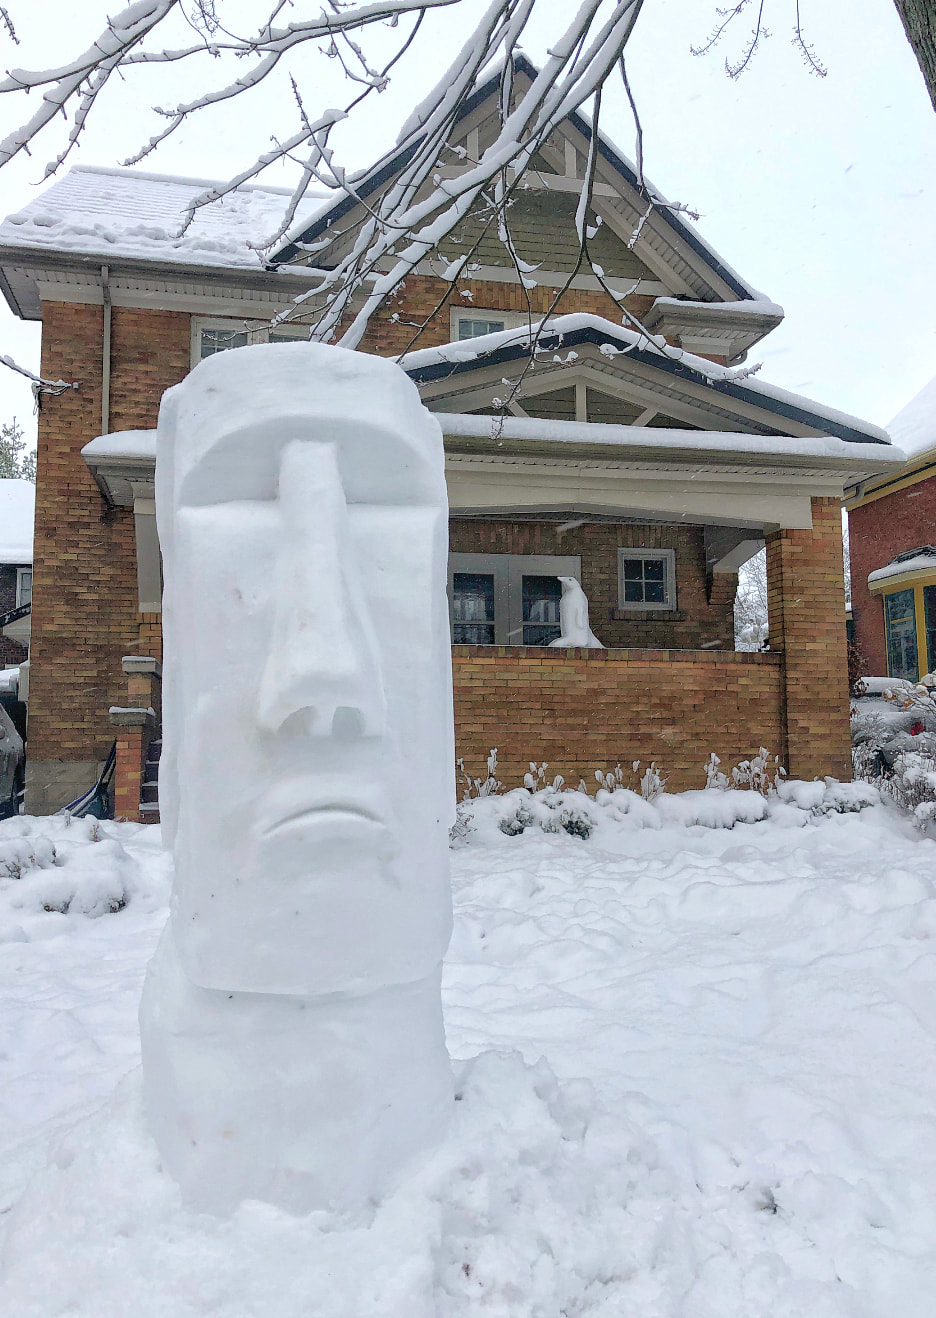
#1. Moai from Rapa Nui
And so another season of snow sculpting began on Sunday, November 22, 2020. During a pandemic.
I always start with a Moai sculpture based on the rock statues that are found on the island of Rapa Nui, sometimes known as Easter Island. It was a very packing snow day which made it not idea, but away I went.
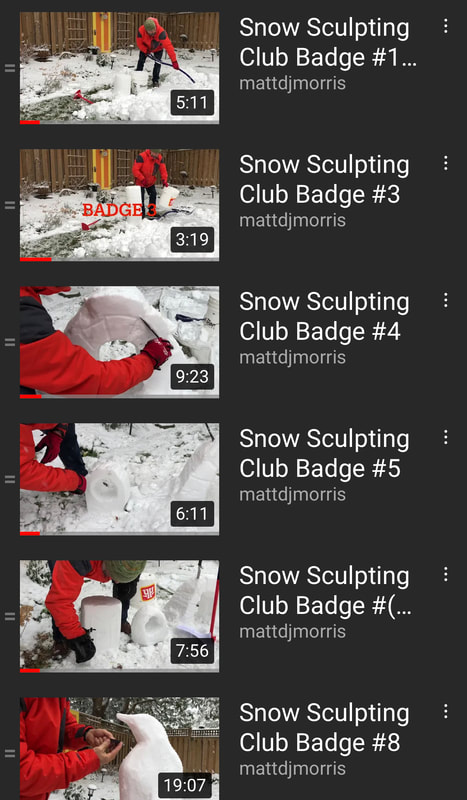
Earlier in the day I had filmed a number of videos in support of the Snow Sculpture Club. If you check out that page you will see a Badge system that guides enthusiasts through a number of tasks to improve their skills. The videos I created were in support of that learning.
I always start with a Moai sculpture based on the rock statues that are found on the island of Rapa Nui, sometimes known as Easter Island. It was a very packing snow day which made it not idea, but away I went.
Earlier in the day I had filmed a number of videos in support of the Snow Sculpture Club. If you check out that page you will see a Badge system that guides enthusiasts through a number of tasks to improve their skills. The videos I created were in support of that learning.
|
|
|
Pre-season activity!
It's been a busy summer (2020) and made especially challenging by the COVID pandemic. My winter preparations have centered around 6 projects:
1. Making a new 'snow block maker' contraption.
2. Adjusting my 'snow moving sled' so that it can be pushed in both directions.
3. Snow Sculpting Club!
Including making over 80 mini-snow pounders to give away to families in my neighbourhood.
4. Pail research. Is there a better pail that could be used by people just entering the snow sculpting realm.
5. Snowbank Productions logo!
6. Adjustments to the Wall Form.
Let’s take a look!
|
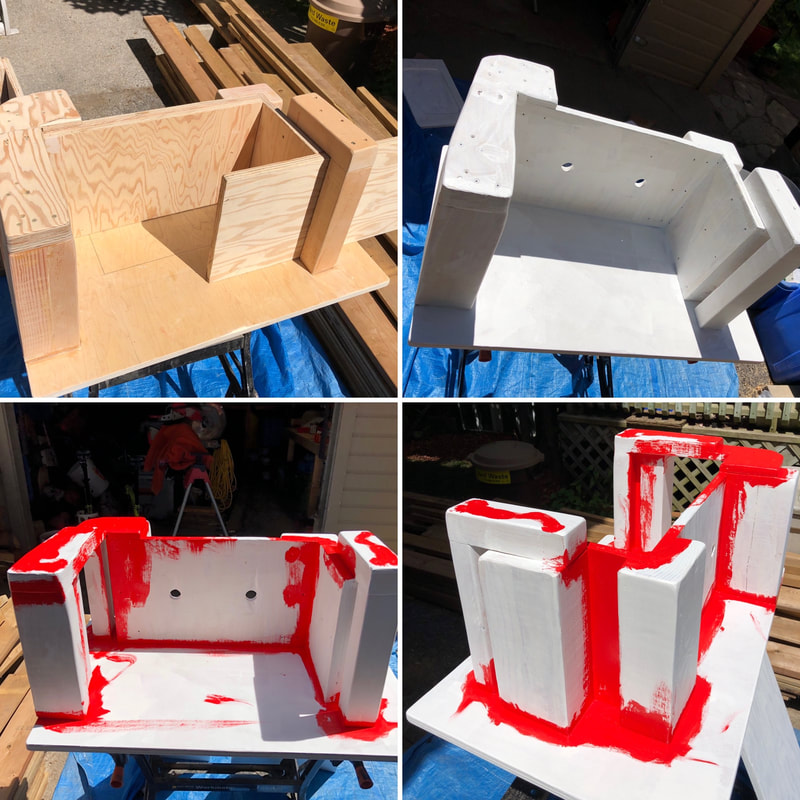
1. Snow Block Maker:
The snow block maker was my attempt to create a device that would help the user make good sized snow blocks expeditiously. I thought about the design for some time and eventually came to the idea of having two sides that could be pulled off once the snow was compacted into the box. The pictures here show it partially painted. I'll wait for snow to unveil how it looks today. It is unknown whether it will be a success, but the design and build was fun! Update: February 2024. I just posted a video of how the snow block maker works. Check it out below. |
|
|
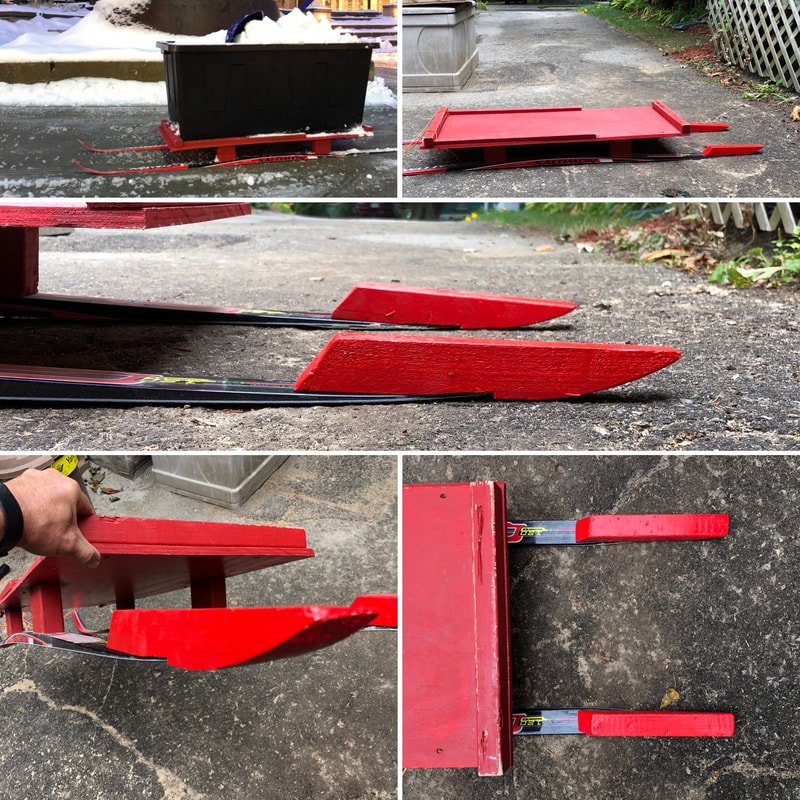
2. Snow Sled adjustment:
My 'box on a sled' has proven to be a really helpful contraption. I sometimes drag snow, that has fallen on a tarp, from the back of my driveway to the front of our house. Sometimes though I want to harvest the snow from our backyard too, but it is very difficult to drag a tarp full of snow through our gate. That is where the snow sled has been a great help. Here is the process. I lay out a tarp on our backyard when snow is in the forecast. After it snows, I pull the tarp corners into the middle. The resulting pile of beautiful clean snow is then shovelled into the box on the sled and then I simply slide it to the front yard. Before I had the sled, I used to pull a gigantic pail with a rope, but that was quite hard on the old back. The sled rocks. To make it a bit easier this year, I attached tips onto the tails of the skis. That way, I can avoid having to lift the sled up to turn it around. Now, it's always ready for the next direction! And at my age, any labour saving device is a win! When the snow arrives, we will see if it works! |
|
|
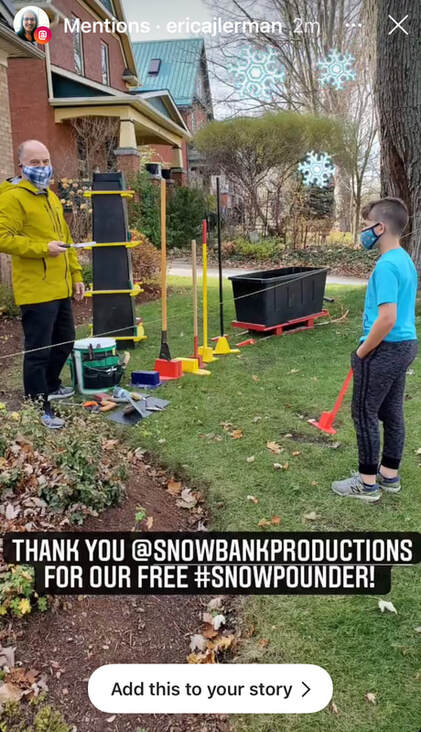
3. QP7000 snow pounder/
Snow Sculpting Club! I had made 4 mini-pounders last winter and given them to local children. They worked very well to compact snow into a bucket. The full explanation can be found by clicking the above menu "SPECIAL FEATURES" and then "SNOW POUNDERS". I will mention here that I ended up handing out over 60 pounders (to date). We had two socially distanced meetups where people could pick up their pounder and get a chance to look at some of my tools and forms. It all happened on our front lawn. After the demand during the first giveaway, I realized I needed to make more. I've now made over 80 QP7000's! I also kicked off the Snow Sculpting Club which is a way of helping kids (of all ages) have another fun thing to do during the upcoming long (pandemic) winter. A full review of the club can be found in the menu above. We now have people joining from Peel, Montreal, Alaska and Philadelphia Pennsylvania. One enthusiastic new club member drove from Toronto to get a snow pounder! 570 News and CBC KW Radio both covered the launch. And during the CBC interview, we included 3 neighbourhood children who have really become active in their snow sculpting persuits. What fun! A special thank you goes to Nat of Fat Sparrow Group for the donation of buckets. I gave these out to a few people who needed them. Once the snow arrives we will also test to see if their square buckets will release properly. If yes, there will be many additional opportunities to get 'pails to the people'! Also watch for the KPL Winter Festival happening Dec 29-31, 2020 where they will provide lots of ideas for winter fun. I created a video for their use, and you can view it on the SNOW SCULPTING CLUB menu item above. 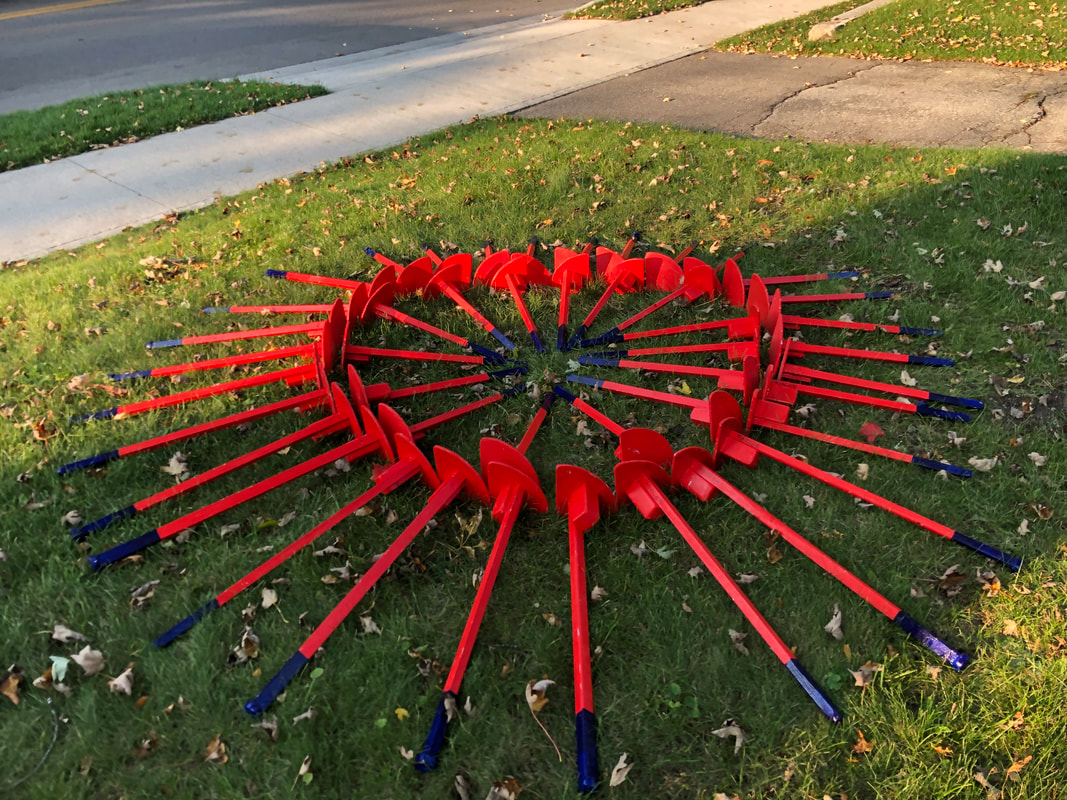
|
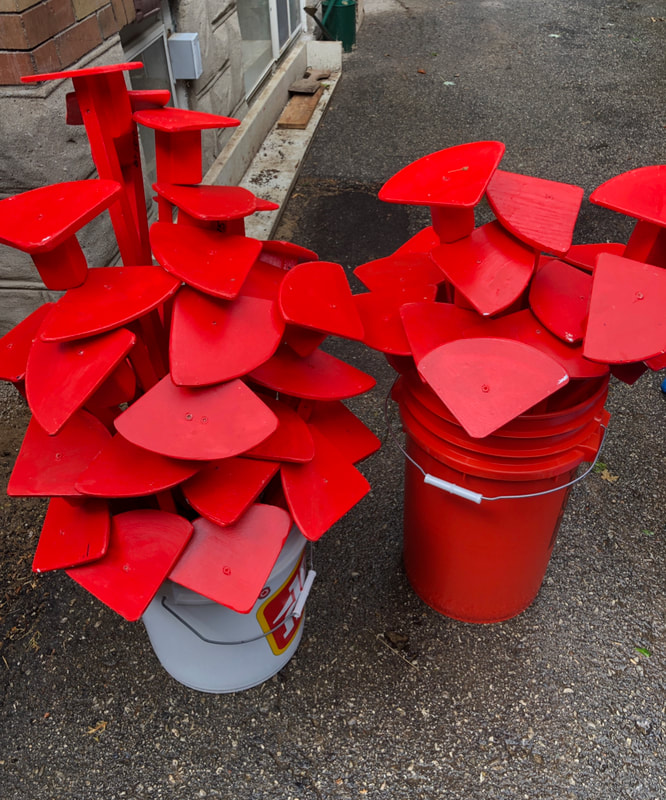
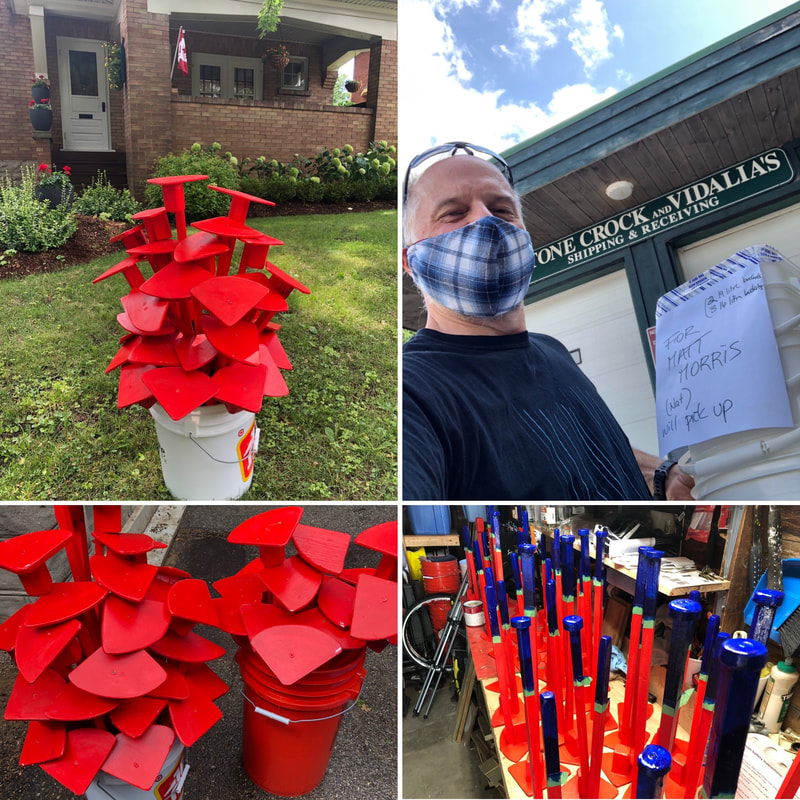
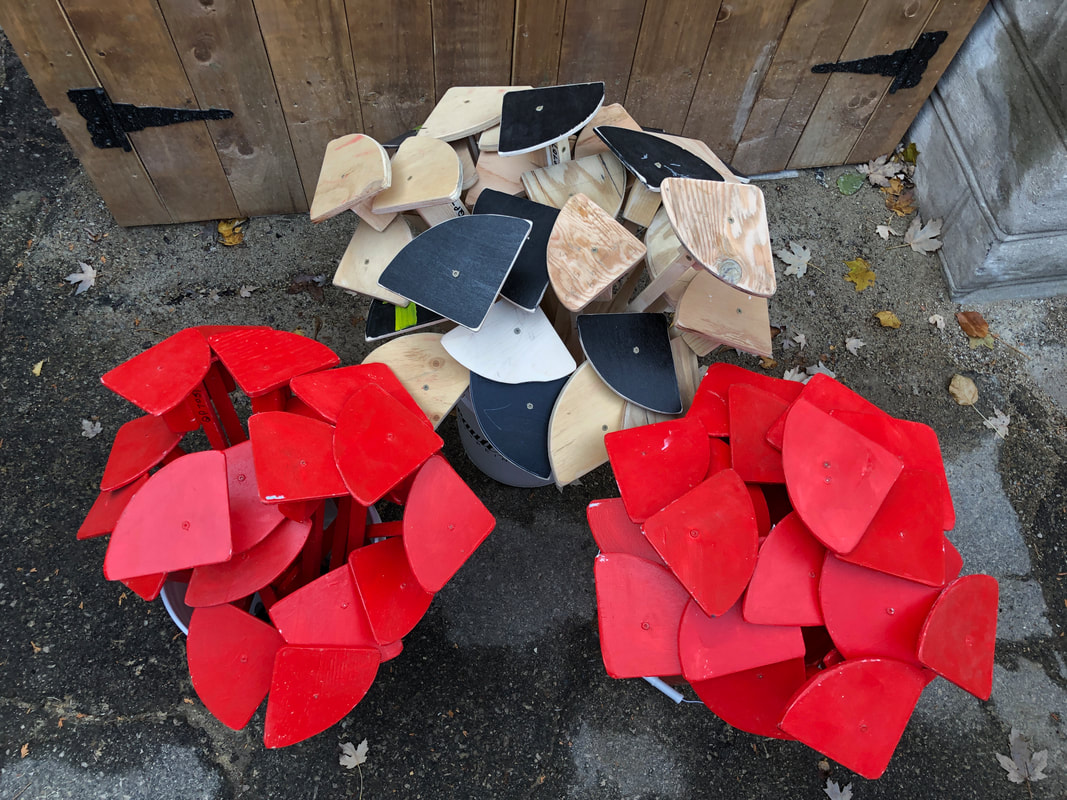
The unpainted ones are from the second production run. I didn't have time to paint them but wanted to make sure I had enough for the second day of giveaways.
|
|
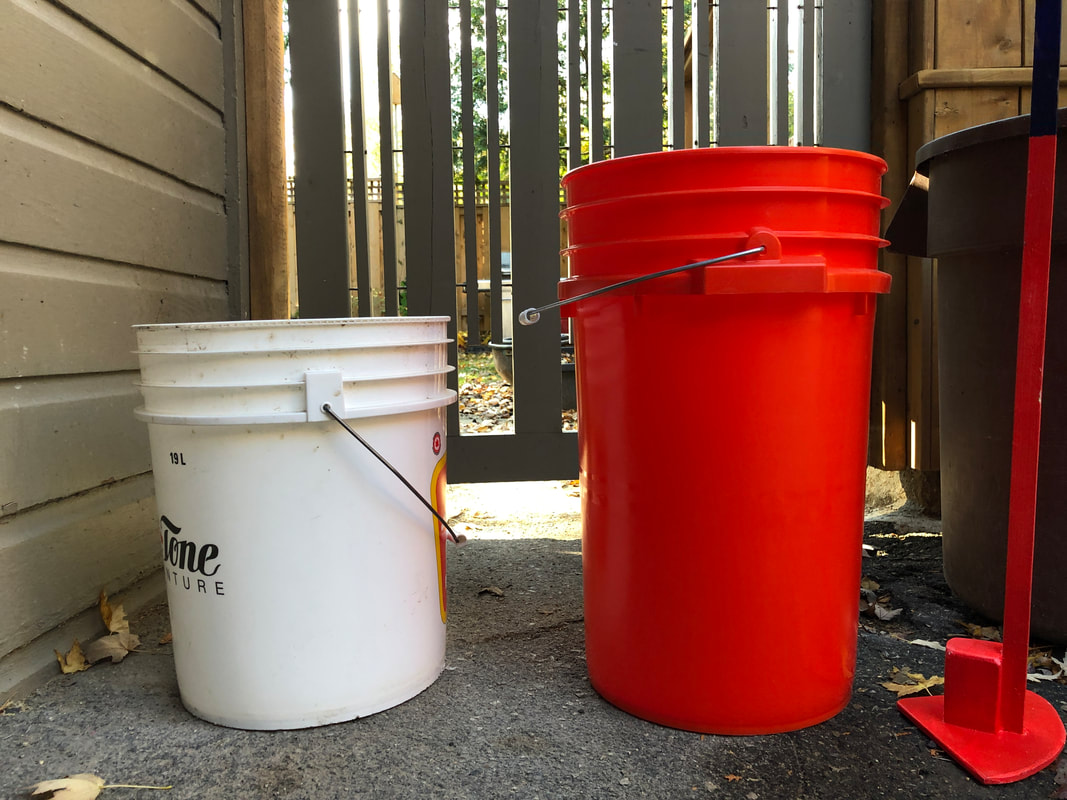
4. Larger Pail:
I see a 5 gallon pail as an excellent entry point for new snow sculpting enthusiasts. It's easy to have success building your first block with a 5 gallon pail. It can be carved or used as a building block for bigger structures. Once skilled with pails, some would naturally move on to larger plywood forms, or even large plastic forms. But the pail is the start. But then I thought--what if there was a somewhat bigger pail? Bigger, but still manageable? So I shopped around and discovered a 7 gallon pail. But I could not purchase it anywhere! Eventually I discovered a company called U-line who offer it. A 5 gallon pail is about $5.00. To my disappointment a 7 gallon pail (if you buy 5) is a little over $20.00 each with shipping. That is not cheap. And yet, I felt I needed to test the larger pail. Visually, it looks perfect for the entry level snow sculptor. Time will tell. Bring on winter so we can test to see if it works. The only real concern is "will it release the snow" once packed in. I'll try my usual technique first. If it doesn't work, I'll drill a hole in the bottom of the pail OR remove the bottom of the pail to see if that will facilitate the release. |
|
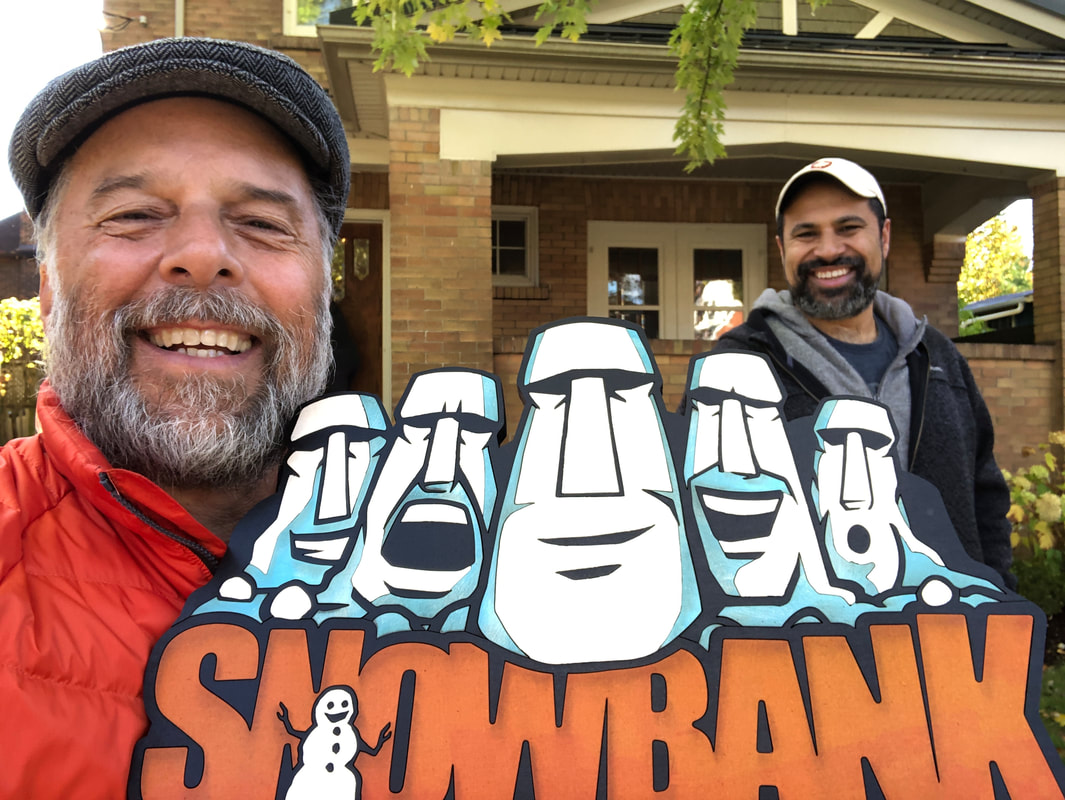
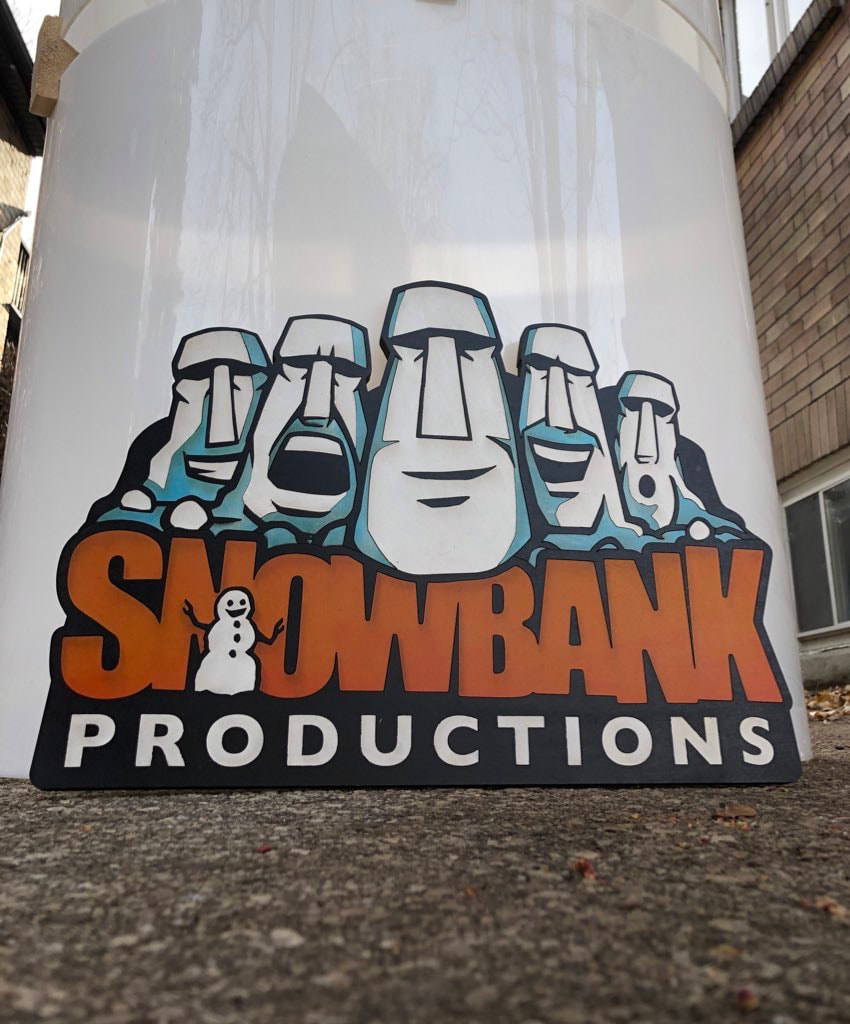
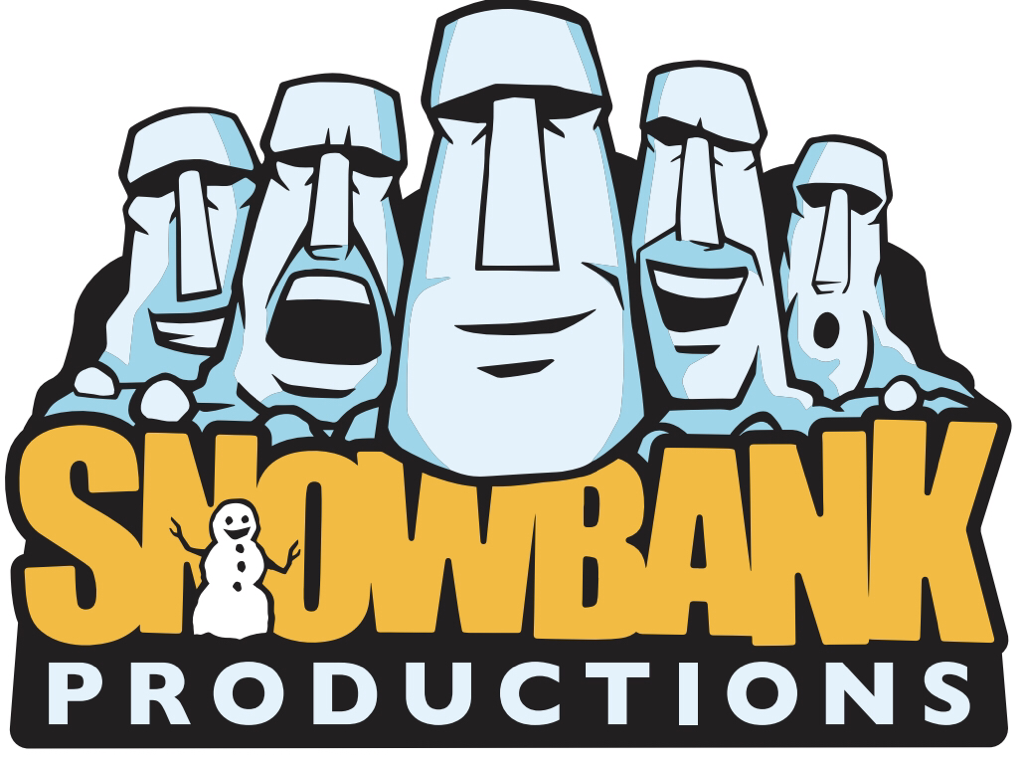
5. Snowbank Productions logo:
|
In the spring of this year, my good friend Jason Panda came to me with an idea. He was looking for a creative project involving a new laser cutter he had aquired. His idea was to design a logo for my little passion and then laser cut it. The result was absolutely stunning! The pictures are all you need to see. Thank you Jason for your amazing creativity and laser cutting excellence!
|
|
|
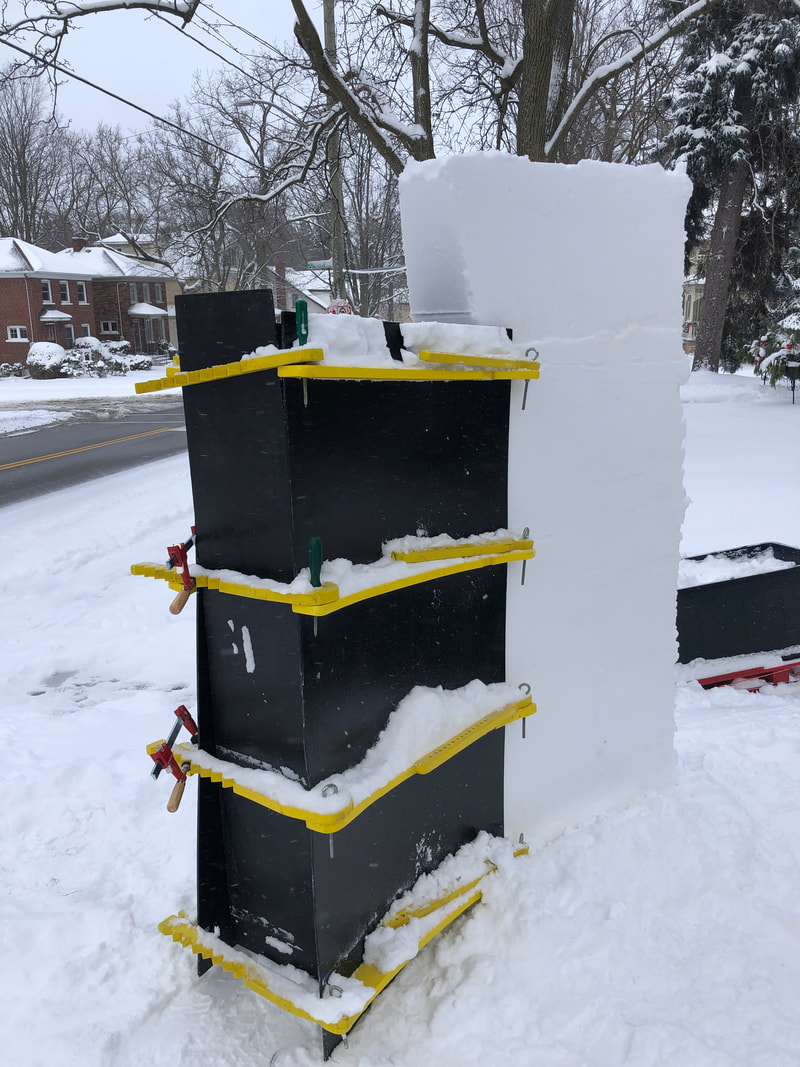
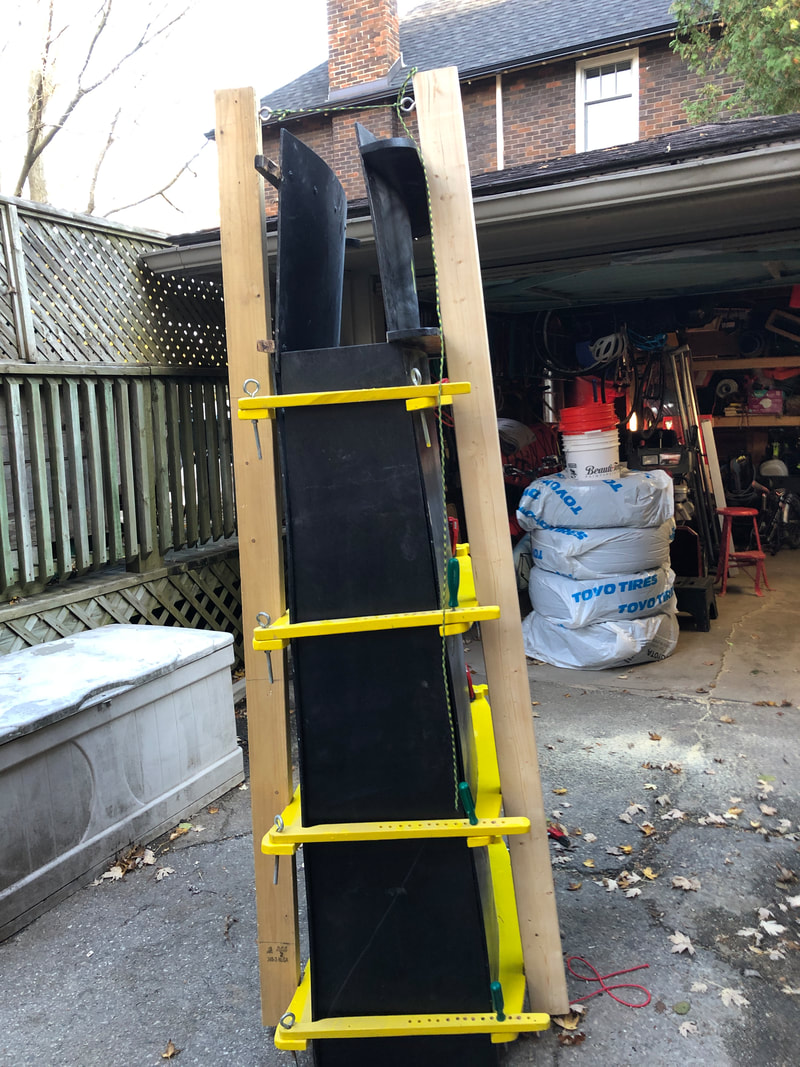
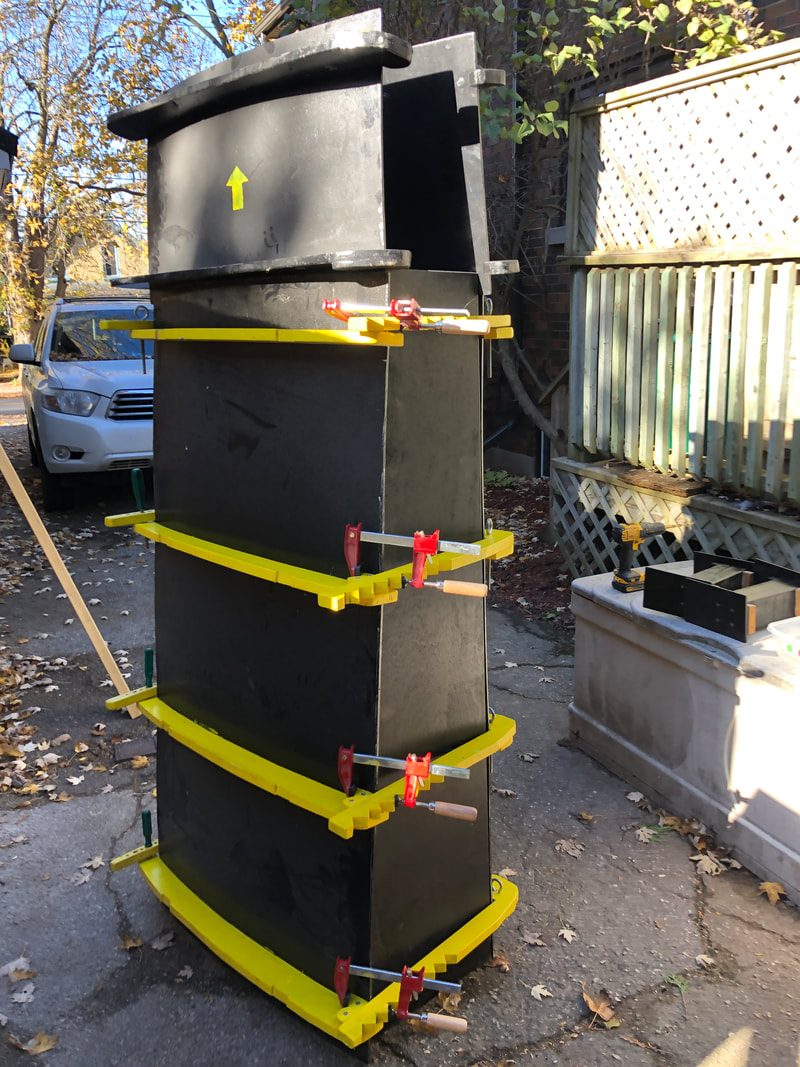
6. Adjustments to the Wall Form:
The wall was a success last winter. The special form was about 5 1/2 ' tall and could go as wide as I wanted. It was basically a form that allowed me to build a wall. Pretty simple. But it was time to go taller. I had build an extension to make it taller but it was not a robust design. I decided to make it robust and simple. In the end, I now have two 2 x 4's that bind the open end together. And the wall can now tower 6'4" above the ground. More details on the BUILDING WITH FORMS menu item. 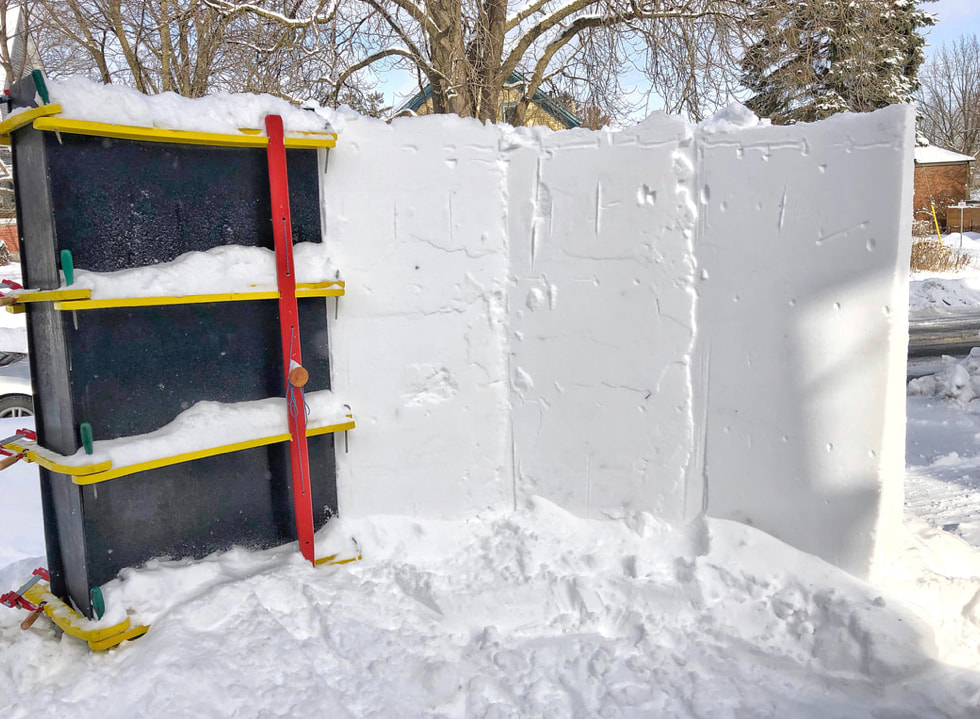
|

|
